Toile Tidings

Hello Everyone,

It seems that we are already hurtling through November so during this busy period quick cards are the order of the day.

These feature the Toile Tidings papers in traditional Real Red and, Garden Green.

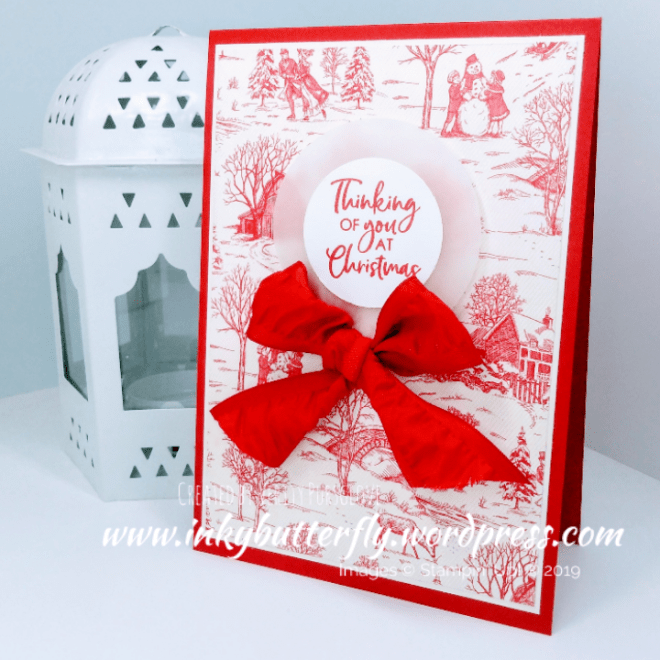
The card base was made the coordinating card stock colour.

The Designer Series Paper was layered on to a Very Vanilla card layer and then to the card base with snail adhesive.

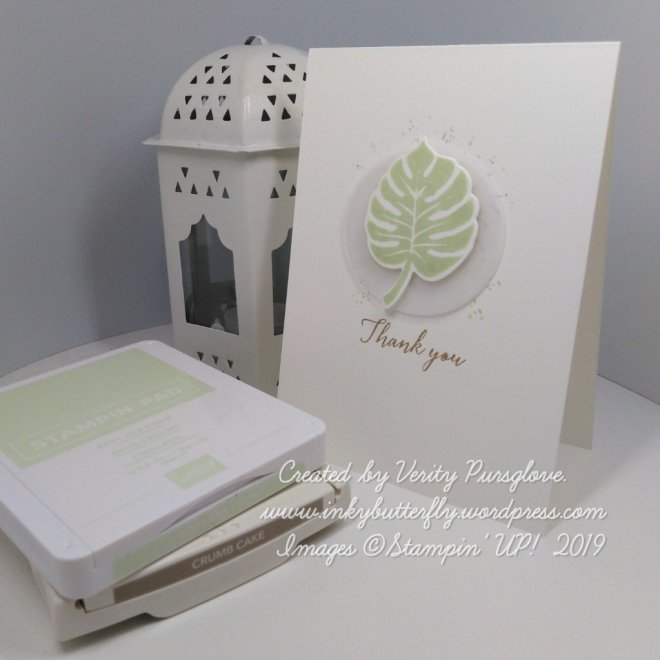
I picked out a, sentiment from the Itty Bitty Christmas stamp set. Matching ink was used to stamp on to Whisper White card stock in contrast to the Vanilla.

The sentiment was cut with a 1-1/2 inch circle punch and adhered to a 2-1/4 inch circle of vellum. This was added to the card with dimensionals.

A bow was tied from matching ribbon and secured with glue dots.

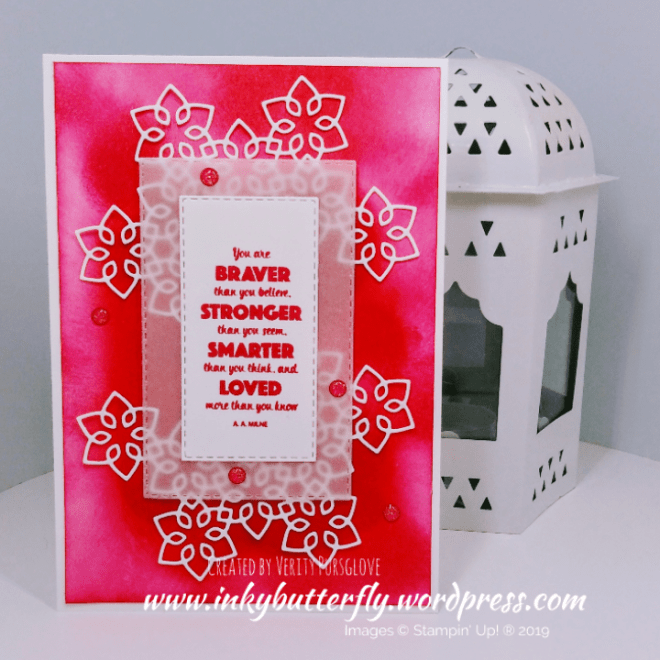
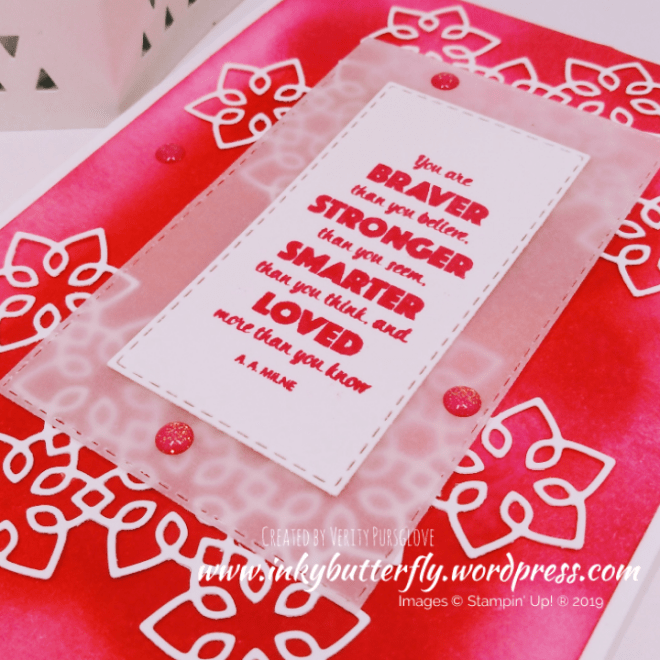
This is the Garden Green version. On this card I moved the sentiment to the side and added some metallic pearls.

I hope you enjoyed this project. The supplies used are listed and linked to the online store below.

I would love to be your demonstrator.

Thanks for stopping by today and happy Stampin’!

Verity xx

Product List

Inspire.Create #054

Hello Everyone,

Welcome to my blog. Every other Monday I share my project that I have used as my entry for the Inspire.Create challenge.

This time it’s a theme challenge. The design team have made some wonderful samples as inspiration. You can see them here.

And this is what I created!

This challenge was the perfect excuse to use the Christmas Layers Die.

I originally thought I would use white on white but the detail didn’t shine as much as I wanted.

Instead I chose a super bright background and sponged the card stock with Melon Mambo ink.

The sentiment was also stamped with Melon Mambo Ink.

Stitched Rectangles dies were used to cut the sentiment and some vellum.

These were adhered with dimensionals and embellished with Melon Mambo glitter enamel dots.

I hope you enjoyed this project. The supplies used are listed and linked to the online store below.

I would love to be your demonstrator.

Thanks for stopping by today and happy Stampin’!

Verity xx

Product List

Snowy Merry Christmas

Hello Everyone,

Look at this cute snowman! He’s so happy it’s Christmas!

A white card base was prepared by layering some Speciality Designer Series Paper on to the front.

Vellum was trimmed to 3 by 4-3/4 and secured to the centre of the card.

The snowman was stamped with Memento Ink and coloured with watercolour pencils. The coordinating punch was used to cut the image. His hat and arms were coloured with Stampin’ Blends.

I mounted the snowman onto some Designer Series Paper and White card stock before adhering to the card.

The sentiment was stamped with Flirty Flamingo ink and added with dimensionals.

I hope you enjoyed this project. The supplies used are listed and linked to the online store below.

I would love to be your demonstrator.

Thanks for stopping by today and happy Stampin’!

Verity xx

Product List

Inspire.Create #052

Hello Everyone,

Welcome to my blog. Every other Monday I share my project that I have used as my entry for the Inspire.Create challenge.

This time it’s a colour challenge. The design team have made some wonderful samples as inspiration. You can see them here.

And this is what I created!

I used the Modern Heart stamp set for my design, Stamping the outline with Gorgeous Grape and adding colour with Coastal Cabana. The panel was added to a Melon Mambo card base.

Melon Mambo Ink was used to stamp the sentiment which was cut with a 1-1/2 inch circle punch.

This was adhered to a 2″ circle of vellum and then to the card with dimensionals.

Gorgeous Grape glitter enamel dots completed the card.

I hope you enjoyed this project. The supplies used are listed and linked to the online store below.

I would love to be your demonstrator.

Thanks for stopping by today and happy Stampin’!

Verity xx

Product List

Bloom with Happiness

Hello Everyone,

I just love this card! It’s the first time I have used Pocketful of Happiness… I think there will be more to come!

The flower and leaf are a single stamp. This was randomly stamped with Highland Heather Ink over a Whisper White card layer.

Some Wink of Stella Glitter was added to the outside edge of each flower.

The edge of the card stock was very gently touched on to the ink pad before adding to a white card base.

The sentiment was stamped with Gorgeous Grape ink and cut with the Starburst Punch. A piece of Gorgeous Grape card stock was punched too and the two were layered together.

For added interest I adhered a Stitched circle cut from vellum to the card first, then added the sentiment with dimensionals.

The final touch were some epoxy drops added to the flower centres.

I hope you enjoyed this project. The supplies used are listed and linked to the online store below.

I would love to be your demonstrator.

Thanks for stopping by today and happy Stampin’!

Verity xx

Product List

A Wonderful Couple

Hello Everyone,

Wedding season is in full swing and this card has been made with a special couple in mind.

The background layer was stamped with Verdant Garden and heat embossed with silver powder.

A vellum layer softened the background a little before adding a final layer of Whisper White. This had been stamped with the sentiment using Smoky Slate ink.

The large Magnolia was stamped and coloured with watercolour pencils. After die cutting the image, I applied versamark ink over the top and heat embossed it with clear powder to give a glazed effect.

I hope you enjoyed this project. The supplies used are listed and linked to the online store below.

I would love to be your demonstrator.

Thanks for stopping by today and happy Stampin’!

Verity xx

Product List

Blender Pens

[102845]

£11.25

So Much to Love

Hello Everyone,

Today I am using die cuts to create a faux embossed look.

The die I have used for the background is from the Wild Rose set. It was cut 4 times and adhered to the card evenly spaced. The overhanging pieces were then trimmed away.

I picked out a sentiment from the Abstract Impressions stamp set. This was heat embossed with silver powder and cut with a Stitched Rectangle Die.

I didn’t like the sentiment on the card as it was, so I added a layer of vellum behind it which looked much better.

I hope you enjoyed this project. The supplies used are listed and linked to the online store below.

I would love to be your demonstrator.

Thanks for stopping by today and happy Stampin’!

Verity xx

Product List

Wonderful Rococo Rose

Hello Everyone,

Do you like the flowers I have used on my card today?

Read on to find out how I made them.

I started by making a Whisper White card base and embossed it with the Subtle embossing folder.

The background leaves were cut from vellum using a die from the, Well Written Die set.

I chose the sentiment from the Rooted in Nature stamp set and cut this with a Stitched Rectangle Die.

For the flowers I first cut circles with the Scalloped circle punches. The circles were then cut again using the Medium Daisy Punch.

The smaller flower was adhered to the larger one and a Rococo Rose faceted gem was added to the centre.

Some Soft Sea Foam leaves completed the card.

I hope you enjoyed this project. The supplies used are listed and linked to the online store below.

I would love to be your demonstrator.

Thanks for stopping by today and happy Stampin’!

Verity xx

Product List

Leaf Punch

[144667]

£15.00

Time to Shine

Hello Everyone,

Today’s card uses ink blending to create a background.

Sponge daubers were used to apply three shades of ink to a card layer. This was allowed to dry completely.

The leaf from the Daisy Lane stamp set was stamped with versamark ink and embossed using clear powder.

The sentiment was stamped on to vellum and embossed with white powder and wrapped around the blended panel.

This was then matted on to white card stock and adhered to a white card base with dimensionals.

I hope you enjoyed this project. The supplies used are listed and linked to the online store below.

I would love to be your demonstrator.

Thanks for stopping by today and happy Stampin’!

Verity xx

Product List

InspireINK Blog Hop – June Sketch Challenge

Good Morning Everybody,

Welcome to this month’s InspireINK blog hop. This time we have a sketch challenge to play with.

Please be sure to click through all the projects in the hop by clicking at the bottom of this post.

I reached for the beautiful Garden Lane Designer Series Paper to build the background layers. The banner was lifted on dimensionals.

The circular focal point was made by layering punched and die cut shapes on to a pearlized Doily.

The sentiment from the On To Adventure stamp set was stamped with Garden Green ink.

Click here for the other projects in the hop!

You are invited to the Inlinkz link party!

Click here to enter

I hope you enjoyed this project. The supplies used are listed below.

Thanks for stopping by today and happy Stampin’!

Verity xx

Product List

Life Looks Beautiful

Hello Everyone,

I haven’t used this stamp set for a while, so here she is teamed with Mint Macaron.

There are some exciting limited time only products available until the end of May, while stocks last!

Paper Pumpkin is popular in other USA market as a subscription box. This month the UK also has the chance to order this kit as a one off payment. The contents are a surprise!

Everything is Rosy product medley contains fully coordinating products to create beautiful projects.

For today’s project I first stamped and coloured the lady and used Stitched Rectangles to cut her out. This was layered on to vellum and Mint Macaron card stock.

Some Polka Dot Tulle ribbon was added to the bottom along with the sentiment.

The card base was made from Mint Macaron card and layered with white card stock embossed with the Seaside Embossing folder.

The decorative panel was then adhered to the card with dimensionals.

I hope you enjoyed this project. The supplies used are listed and linked to the online store below.

I would love to be your demonstrator.

Don’t miss out on these last chance items…. When they’re gone, they’re gone!

Thanks for stopping by today and happy Stampin’!

Verity xx

Product List

So Much to Love #GDP188

Hello Everyone,

This week is a Case the Designer challenge!

See what the Design Team have created here

I picked out the use of Designer Series Paper, flowers and rectangular layers.

A piece of DSP was layered on to a Whisper White card base.

Stitched Rectangle dies were used to cut a frame and an additional smaller rectangle.

The sentiment from the Abstract Impressions set was stamped on to the rectangle with Flirty Flamingo ink.

The frame and sentiment were added to the card with dimensionals.

Blooms from the Pop of Petals stamp set were stamped in Flirty Flamingo ink and punched out. These were adhered with Multipurpose glue.

Leaves were punched from vellum for added texture.

I liked this so much I made this version with Highland Heather.

I hope you enjoyed this project. The supplies used are listed below.

Thanks for stopping by today and happy Stampin’!

Verity xx

Product List

Leaf Punch

[144667]

£15.00

Blue Marble

Hello Everyone,

Today’s project uses one of the gorgeously detailed background stamp. This stamp retires at the end of May.

I used the Stamparatus to stamp the background image. Sponge dauber were used to apply the different coloured inks, working from light to dark and cleaning the stamp each time.

The sentiment from the Rooted in Nature stamp set was stamped onto vellum and heat embossed with copper powder.

The vellum was wrapped around the background and adhered to a Night of Navy card base.

A pearlized Doily was added behind the vellum. A scattering of sequins finished the card.

I hope you enjoyed this project. The supplies used are listed and linked to the online store below.

I would love to be your demonstrator.

Don’t miss out on these last chance items…. When they’re gone, they’re gone!

Thanks for stopping by today and happy Stampin’!

Verity xx

Product List

Project Share Project

Hello Everyone,

Welcome to this week’s Project Share. As always my friends have created some lovely work. Please use the links to visit their blogs and read more about their projects.

Jill has been sharing some fabulous introductory projects especially for crafters that a new to Stamping.

See more here

Heather is #simplestamping with the gorgeous 2017 in colours which will be retiring in June.

See more here

Gez has made this adorable card folder. This would make a lovely gift.

See more here

Helzie is using vellum to create a soft look to this colourful background.

See more here

I hope you enjoyed this project. The supplies used are listed and linked to the online store below.

I would love to be your demonstrator.

Thanks for stopping by today and happy Stampin’!

Verity xx

Product List

Lifetime of Love

Good Morning All,

Today I have a touch of #simplestamping, just one stamp set, one ink pad and some DSP.

Some Specialty Vellum was added to a white card base.

The main image was stamped on to separate panel of card stock with Gray Granite ink. This was adhered to the base with Snail.

Finally, I stamped the sentiment. This was trimmed to fit the panel and added using dimensionals.

I hope you enjoyed this project. The supplies used are listed and linked to the online store below.

I would love to be your demonstrator.

Don’t forget to check out Sale-a-bration and the free products available when you spend multiples of £45.

If your shopping wish list gets to £99, there’s no better time to join my team. You can choose £170 worth of products to be included in your personal starter kit; add a little extra and receive an exclusive Stampin’ Up! Craft & Carry tote.

Thanks for stopping by today and happy Stampin’!

Verity xx

Product List

One Leaf

Hello Everyone,

Something very simple to share with you today.

Soft Sea Foam is one of my favourite Stampin’ UP! colours. I used this to stamp the leaf which was then die cut.

This adhered to a vellum circle with dimensionals.

On a white card base, I stamped a splatter image front Timeless Textures. Crumb Cake ink was used to add the sentiment.

The vellum circle was then adhered to the card, also with dimensionals.

I hope you enjoyed this project. The supplies used are listed and linked to the online store below.

I would love to be your demonstrator.

Don’t forget to check out Sale-a-bration and the free products available when you spend multiples of £45.

If your shopping wish list gets to £99, there’s no better time to join my team. You can choose £170 worth of products to be included in your personal starter kit; add a little extra and receive an exclusive Stampin’ Up! Craft & Carry tote.

Thanks for stopping by today and happy Stampin’!

Verity xx

Product List

Cascading Squares

Hi Everyone,

I thought I would try out a completely different layout for today’s project.

Rich Razzleberry card stock, Share What You Love paper and vellum were cut in to 2 inch squares.

These were adhered to a Crumb Cake card base starting with the Rich Razzleberry at the top and bottom. I then added the DSP. The Vellum square was added in the centre.

Old Olive ink was used to stamp the sentiment which was cut with the Everyday Label Punch.

Rich Razzleberry card stock was used to cut some leaves which were tuck in under the label. A few pearls were added to finish the card.

I hope you enjoyed this project. The supplies used are listed and linked to the online store below.

I would love to be your demonstrator.

Thanks for stopping by today and happy Stampin’!

Verity xx

Product List

Leaf Punch

[144667]

£15.00