From the Bottom of my Heart

Hello Everyone,

Lots of colouring of one sort or another going on in today’s card.

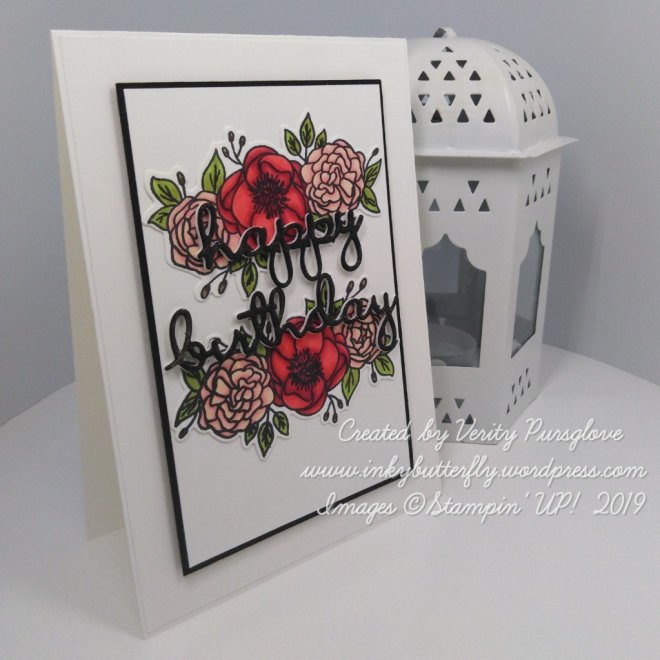
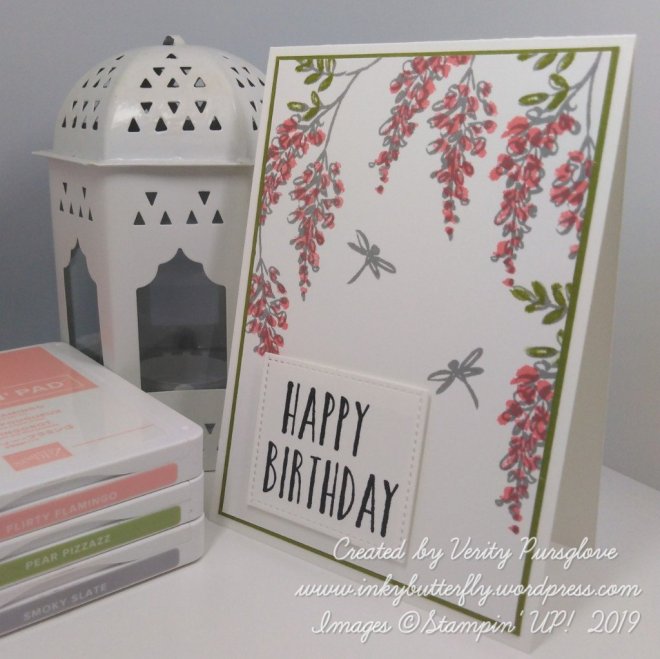
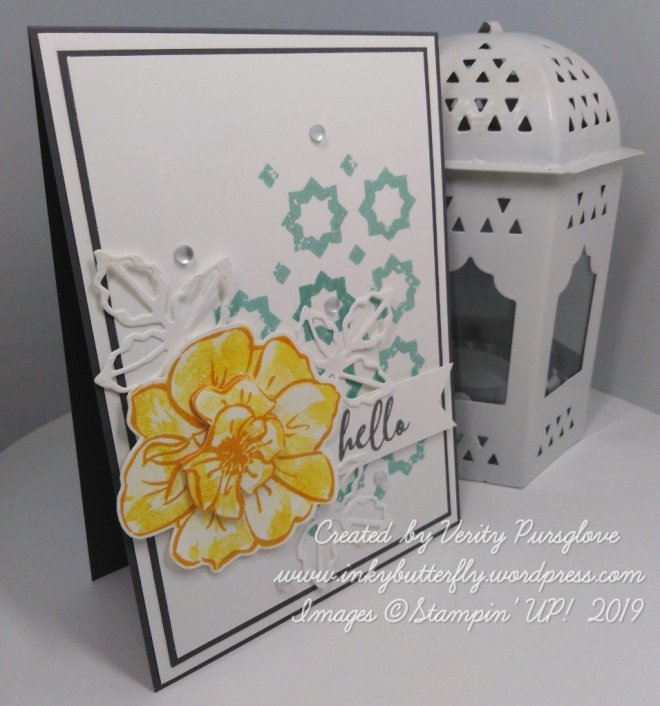
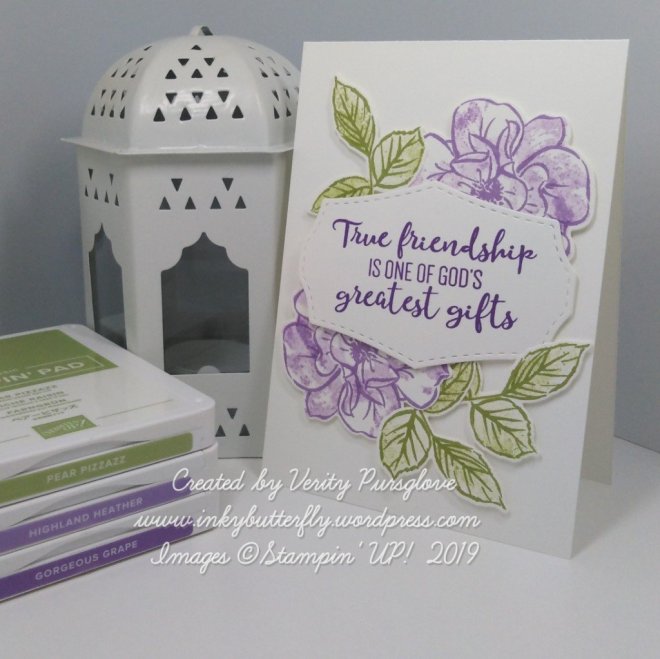
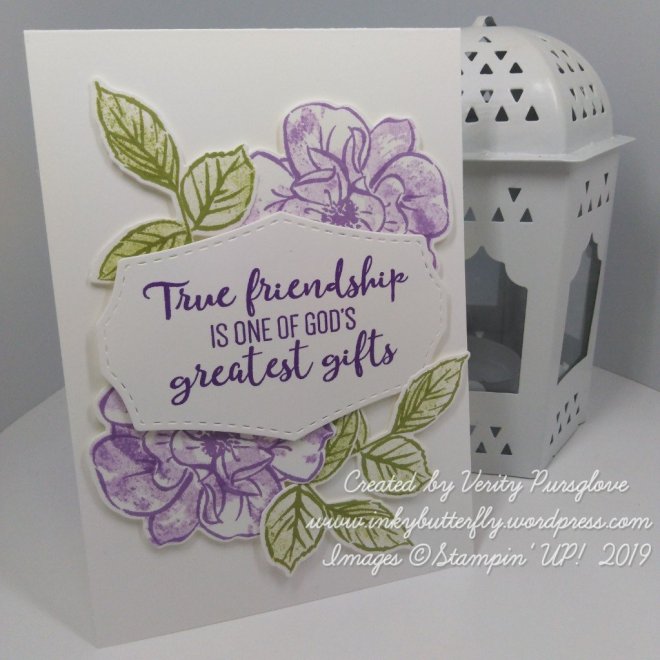
I began by preparing the background panel.

I used my grid paper to line up some post it note masks so I could add ink to this portion. I did this with a sponge and Highland Heather ink.

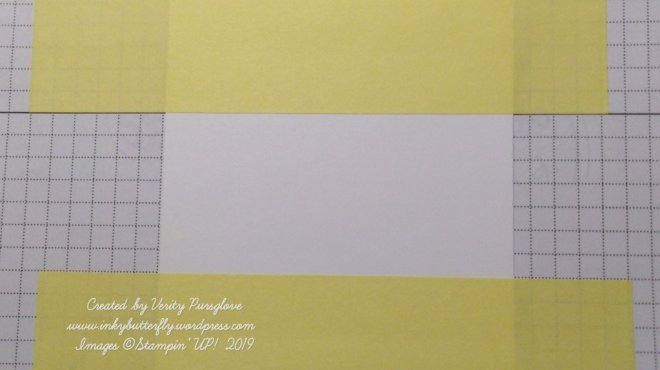
Leaving the post it notes in place, I secured a pattern mask over the top and added more Highland Heather ink. I then added versamark to the inked section, peeled away the post it notes and embossed with clear powder.

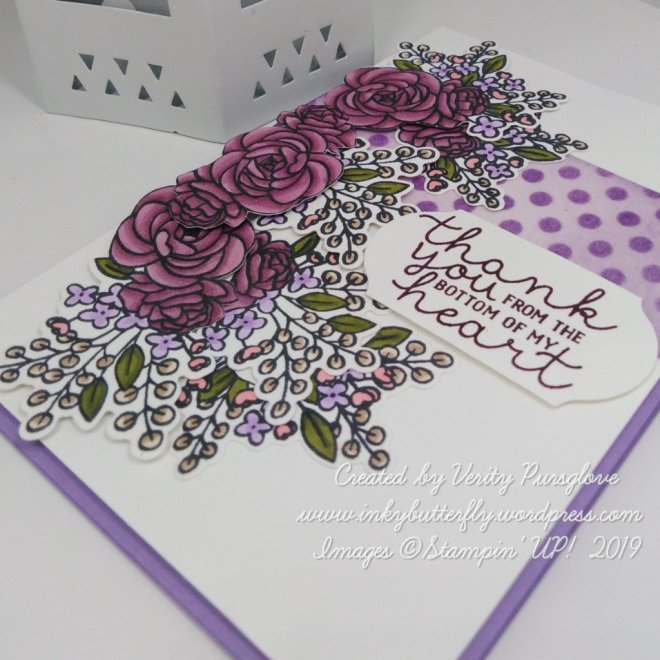
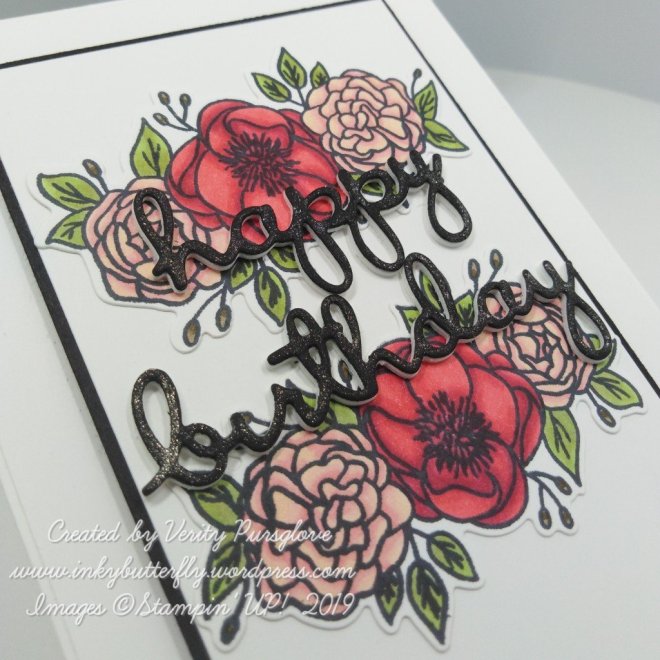
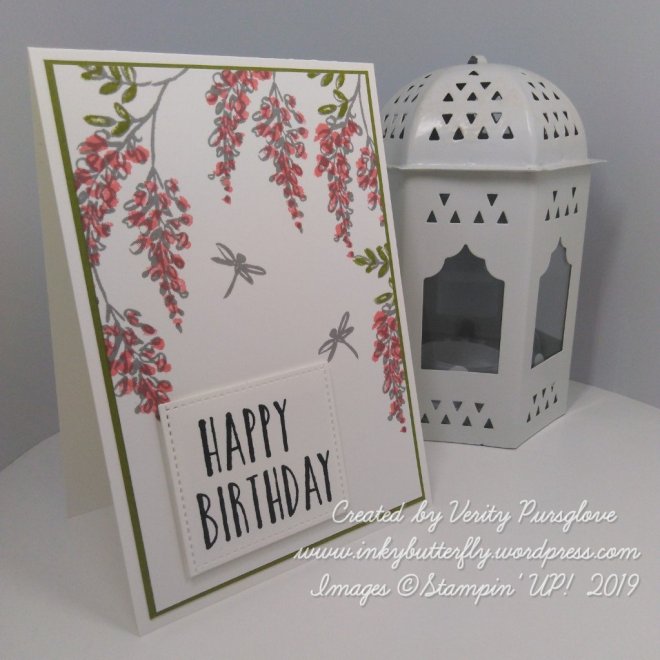
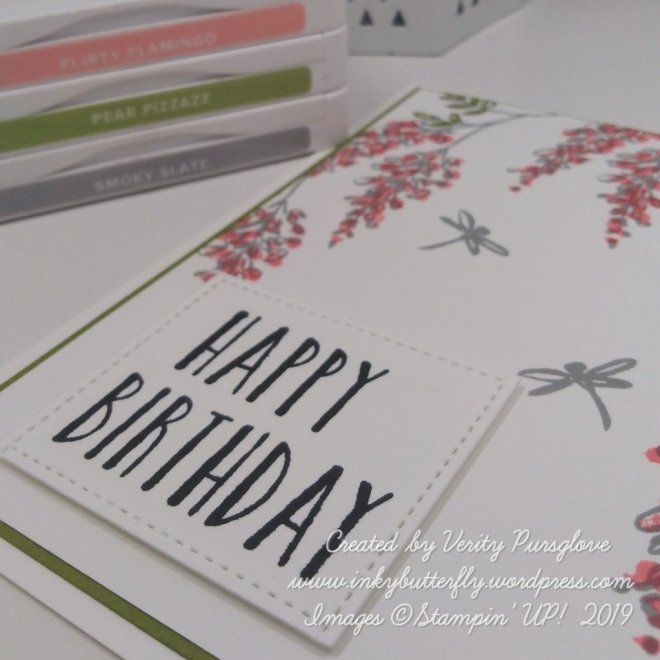
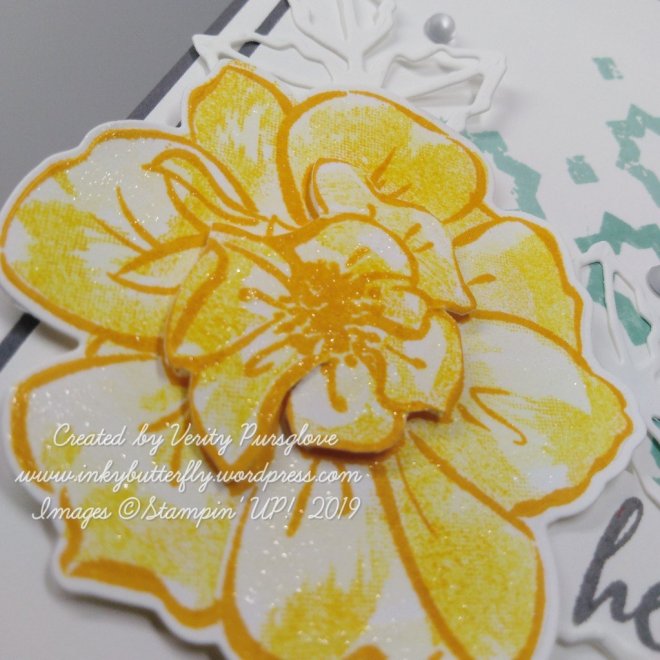
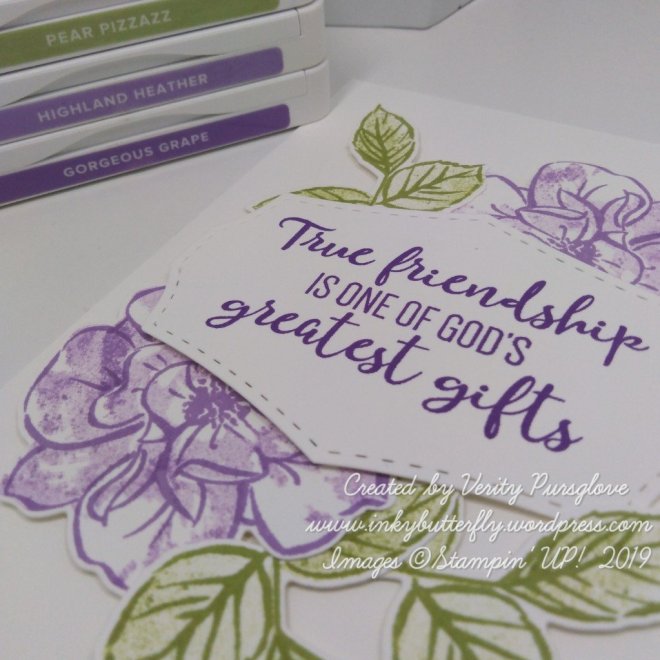
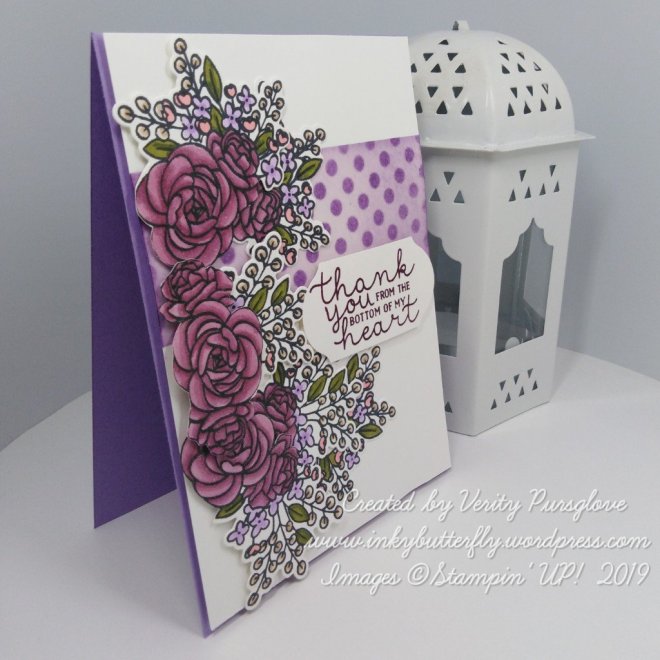
The florals are from the Bloom and Grow set. These were stamped three times with Memento ink and coloured with Stampin’ Blends Markers.

The coloured images were die cut and then manually cut apart to create the large spray of flowers. I used a mix of dimensionals and liquid glue to add texture.

Finally, the sentiment was stamped with Blackberry Bliss ink and cut with the Timeless Label punch and Wink of Stella Glitter was added to the larger flowers.

I hope you enjoyed this project. The supplies used are listed and linked to the online store below.

I would love to be your demonstrator.

Thanks for stopping by today and happy Stampin’!

Verity xx

Product List

Grid Paper

[130148]

£11.75

Inspire.Create #050

Hello Everyone,

Welcome to my blog. Every other Monday I share my project that I have used as my entry for the Inspire.Create challenge.

This time it’s a sketch challenge. The design team have made some wonderful samples as inspiration. You can see them here.

And this is what I created!

As you can see, I opted to change the circle to a star….. I have been itching to use the new So Many Stars Bundle!

I prepared a Night of Navy card base and added to this a white layer stamped with the tiny stars in the set using Pacific Point Ink.

A smaller panel was masked off with post it notes and inked with Pacific Point. Stars were stamped over the top with versamark and embossed with clear powder.

The section was inked again, this time with Night Of Navy. Additional stars were embossed with white powder.

The sentiment was added with Pacific Point Ink. The panel was matted with Night Of Navy card stock and adhered to the base with dimensionals.

A large star was stamped and die cut and adhered to the card with dimensionals. A few adhesive sequins completed the card.

I hope you enjoyed this project. The supplies used are listed and linked to the online store below.

I would love to be your demonstrator.

Thanks for stopping by today and happy Stampin’!

Verity xx

Product List

Pretty Pink Peacock

Hello Everyone,

I thought I would do something different with the Royal Peacock.

I switched up the colours and used Blackberry Bliss, Rich Razzleberry and Melon Mambo to stamp the peacock.

The details were added with versamark and embossed with copper powder.

I cut a Nested Label from a white card layer and added to a Melon Mambo card base.

The peacock was adhered to the Label with dimensionals. This in turn was repositioned on the card also with dimensionals.

A heat embossed sentiment and some Die cut Feathers completed the card.

I hope you enjoyed this project. The supplies used are listed and linked to the online store below.

I would love to be your demonstrator.

Thanks for stopping by today and happy Stampin’!

Verity xx

Product List

InspireINK Blog Hop – Birthdays

Good Morning Everybody,

Welcome to this month’s InspireINK blog hop. This time we have a theme challenge.

I have chose to work with the Bloom and Grow bundle for this challenge.

The florals were stamped with Memento Ink to allow Colouring with Stampin’ Blends Markers.

The combinations I used were;

Dark Cherry Cobbler, Dark Real Red, and Dark Poppy Parade

Light Flirty Flamingo, Dark Petal Pink, and Light Petal Pink

Dark Mossy Meadow, Dark Shaded Spruce, and Dark Old Olive.

The coloured images were die cut ready to adhere to the card.

Happy Birthday was die cut from white fun foam and Basic Black card stock and adhered together.

Black and White card layers were prepared and added to a white card white card base.

The decorative elements were laid out on the card before adhering with Multipurpose glue.

Wink of Stella Glitter was added to the lettering as a finishing touch.

Please be sure to click through all the projects in the hop by clicking at the bottom of this post.

Click here for the other projects in the hop!

You are invited to the Inlinkz link party!

Click here to see the other projects

I hope you enjoyed this project. The supplies used are listed below.

Thanks for stopping by today and happy Stampin’!

Verity xx

Product List

Embossed Modern Heart

Hello Everyone.

Those of you who follow me, will know I usually use white card bases, so today I am switching it up…. with black!

I fancied trying to emboss this lovely heart image with white powder. I really liked the look but thought it needed some layers to carry it off.

I added the sentiment first also heat embossed in white, the die cut with a Stitched Rectangle.

This was layered on to a white rectangle cut from white card stock before adhering to the card base.

I hope you enjoyed this project. The supplies used are listed and linked to the online store below.

I would love to be your demonstrator.

Thanks for stopping by today and happy Stampin’!

Verity xx

Product List

Project Share Project

Hello Everyone,

Welcome to this week’s Project Share. As always my friends have created some lovely work. Please use the links to visit their blogs and read more about their projects.

Jill has taken inspiration from another member of our team for her money envelope project. The foiled DSP makes this look extra special.

Visit Jill’s blog here for more information.

Heather has made this cute Dino card. There are so many colours in the DSP it just makes me smile.

Visit Heather’s blog here

Gez’s little gift box looks beautiful made with DSP. The Daisy Topper adds texture and dimension and happens to also be really pretty.

Visit Gez’s blog here

I hope you enjoyed these projects. The supplies used are listed and linked to the online store below.

I would love to be your demonstrator.

Thanks for stopping by today and happy Stampin’!

Verity xx

Product List

Tropical Dies

[146831]

£25.00

Simply Scored

[122334]

£28.00

Happy Birthday with Soft Spring

Hello Everyone,

Today’s card features the Soft Spring hostess stamp set.

You can get this stamp set with an order of £150 or more…. Club together with friends or just treat yourself!

The outline image was stamped with Smoky Slate ink around the top of a Whisper White card layer.

Flirty Flamingo and Pear Pizzazz inks were used to fill in the spaces.

The large happy birthday was taken from the Perennial Birthday stamp set. I cut this with a Stitched Square Die.

The panel was layered on to Pear Pizzazz card stock and then on to a Whisper White card base.

I hope you enjoyed this project. The supplies used are listed and linked to the online store below.

I would love to be your demonstrator.

Thanks for stopping by today and happy Stampin’!

Verity xx

Product List

Magnolia Thanks

Hello Everyone,

There’s lots going on with this card, it was so much fun to make.

The Magnolia was stamped with Stazon Ink and coloured with watercolour pencils and die cut.

I wanted to use one of the laser cut note cards. I inked a piece kf Whisper White card stock with Melon Mambo ink and adhered this behind the front panel.

I added the Magnolia with dimensionals. The sentiment was heat embossed on black card stock.

I hope you enjoyed this project. The supplies used are listed and linked to the online store below.

I would love to be your demonstrator.

Thanks for stopping by today and happy Stampin’!

Verity xx

Product List

So Much to Love

Hello Everyone,

Today I am using die cuts to create a faux embossed look.

The die I have used for the background is from the Wild Rose set. It was cut 4 times and adhered to the card evenly spaced. The overhanging pieces were then trimmed away.

I picked out a sentiment from the Abstract Impressions stamp set. This was heat embossed with silver powder and cut with a Stitched Rectangle Die.

I didn’t like the sentiment on the card as it was, so I added a layer of vellum behind it which looked much better.

I hope you enjoyed this project. The supplies used are listed and linked to the online store below.

I would love to be your demonstrator.

Thanks for stopping by today and happy Stampin’!

Verity xx

Product List

Free as a Bird Thank You card

Hello Everyone,

So I admit it…. I have been avoiding using this set. At launch there were so many lovely things being made with this set, but now I want to share a card with you.

It’s nothing fancy but like how it turned out.

I started with main image which I stamped with Memento Ink and coloured with Stampin’ Blends. I used a reference image to make my birds in to bluetits.

I die cut the image with a Nested Die and also cut the small thank you sentiment.

Leaves were stamped and coloured on a card layer before adhering the birds with dimensionals.

I hope you enjoyed this project. The supplies used are listed and linked to the online store below.

I would love to be your demonstrator.

Thanks for stopping by today and happy Stampin’!

Verity xx

Product List

Inspire.Create #049

Hello Everyone,

Welcome to my blog. Every other Monday I share my project that I have used as my entry for the Inspire.Create challenge.

This time it’s a colour challenge. The design team have made some wonderful samples as inspiration. You can see them here.

And this is what I created!

I prepared a Basic Grey card base and added a white card layer.

A smaller layer was used to stamp a background with Pool Party Ink using the Verdant Garden stamp set. This was matted on to more Basic Grey card stock and adhered to the card base.

Mango Melody ink was used to stamp the floral from the To a Wild Rose stamp set. The centre portion was stamped again and layered onto the first.

The sentiment was stamped with Basic Grey ink and tucked behind the flower.

As finishing touches, I added some die cut leaves, frosted epoxy dots and some Wink of Stella Glitter.

I hope you enjoyed this project. The supplies used are listed and linked to the online store below.

I would love to be your demonstrator.

Thanks for stopping by today and happy Stampin’!

Verity xx

Product List

Wonderful Rococo Rose

Hello Everyone,

Do you like the flowers I have used on my card today?

Read on to find out how I made them.

I started by making a Whisper White card base and embossed it with the Subtle embossing folder.

The background leaves were cut from vellum using a die from the, Well Written Die set.

I chose the sentiment from the Rooted in Nature stamp set and cut this with a Stitched Rectangle Die.

For the flowers I first cut circles with the Scalloped circle punches. The circles were then cut again using the Medium Daisy Punch.

The smaller flower was adhered to the larger one and a Rococo Rose faceted gem was added to the centre.

Some Soft Sea Foam leaves completed the card.

I hope you enjoyed this project. The supplies used are listed and linked to the online store below.

I would love to be your demonstrator.

Thanks for stopping by today and happy Stampin’!

Verity xx

Product List

Leaf Punch

[144667]

£15.00

Birthday Sails

Hello Everyone,

I hope you has a great weekend!

Today’s project features the Lilypad Lake stamp set with a sentiment from Well Said.

I wanted a soft colour palette so I stamped the outline of the boats with Basic Grey ink. The sails were coloured with Stampin Blends markers.

Pool Party ink was used to stamp the ‘water’ on to a card layer.

The sentiment was stamped and die cut and adhered to the card first, followed by the boats, using dimensionals.

I hope you enjoyed this project. The supplies used are listed and linked to the online store below.I would love to be your demonstrator.

Why not join my team and enjoy discounted prices on your favourite Stampin’ supplies!

Thanks for stopping by today and happy Stampin’!

Verity xx

Product List

Lakeside Dies

[146351]

£25.00

Greatest Gift

Hello Everyone,

Today’s card features the To a Wild Rose bundle.

This stamp set and coordinating dies are perfect for making beautiful cards quickly and easily.

All the elements were stamped on to Whisper White card stock.

The outline images were stamped with full strength Ink. The fill in used second generation ink for a slightly lighter shade.

I chose the darker Gorgeous Grape ink for the sentiment.

The images were all die cut and adhered to he card with dimensionals.

I hope you enjoyed this project. The supplies used are listed and linked to the online store below.

I would love to be your demonstrator.

Why not join my team and enjoy discounted prices on your favourite Stampin’ supplies!

Thanks for stopping by today and happy Stampin’!

Verity xx

Product List

Birthday Bugs!

Hello Everyone,

I thought I would try something clean and Simple with fun Wiggle Worm stamp set for today’s project.

The bugs were stamped with Memento Ink so I could colour them with Stampin’ Blends.

I used the coordinating dies to cut the out the images.

On a Whisper White card base, I stamped the happy birthday greeting in Bermuda Bay Ink.

The insects were then adhered with mini dimensionals.

I hope you enjoyed this project. The supplies used are listed and linked to the online store below.

I would love to be your demonstrator.

Why not join my team and enjoy discounted prices on your favourite Stampin’ supplies!

Thanks for stopping by today and happy Stampin’!

Verity xx

Product List

Inspire.Create #046

Hello Everyone,

Welcome to my blog. Every other Monday I share my project that I have used as my entry for the Inspire.Create challenge.

This time it’s a colour challenge. The design team have made some wonderful samples as inspiration. You can see them here.

And this is what I created!

If I’m honest I wasn’t sure what I wanted to create to begin with, I don’t have all the ink colours. But I have the card stock! I already had these Stitched Rectangles left over from another project.

For some added interest, though it is not clear on the photos, I stamped the script image from the Very Versaille stamp set with versamark and heat embossed with clear powder.

The coloured rectangle was added towards the right hand side of the card with dimensionals.

I wanted a bold sentiment, I picked this one from Rooted in Nature.

This was stamped with Memento ink and die cut with a Stitched Circle. Each circle was mounted on to a Pearlized Doily.

I hope you enjoyed this project. The supplies used are listed and linked to the online store below.

I would love to be your demonstrator.

Thanks for stopping by today and happy Stampin’!

Verity xx

Product List

Rawrsome!

Hello Everyone,

Today I am sharing this rawrsome card… This stamp set is so cute!

Some designer series paper was adhered to a white card base.

Mossy Meadow ink was used to stamp the sentiment which was cut with the Timeless Label punch.

The dinosaur was stamped with seco d generation Night of Navy ink and die cut. This, was adhered to the card overlapping the sentiment.

Some punched leaves were finished the project.

I hope you enjoyed this project. The supplies used are listed and linked to the online store below.

I would love to be your demonstrator.

Why not join my team? There is even more to gain when you become a demonstrator during July…. No pressure to sell, just enjoy shopping your favourite products at a discount!

Thanks for stopping by today and happy Stampin’!

Verity xx

Product List

Leaf Punch

[144667]

£15.00

Life is So Good

Hello Everyone,

I love the flexibility that two-step Stamping offers…. These flowers could be any colour to suit any recipient.

I originally stamped the images on to a Whisper White card layer starting with the foliage.

The flower heads were added next, these were easy to line up by looking through the clear block.

The sentiment was stamped next with Memento black ink. Once this was in place, I added the little dragonflies.

I opted to die cut the images with a Stitched Rectangle Die. I adhered this to a white card base with dimensionals.

I hope you enjoyed this project. The supplies used are listed and linked to the online store below.

I would love to be your demonstrator.

Thanks for stopping by today and happy Stampin’!

Verity xx

Product List

Simply Set Sail

Hello Everyone,

I made this card to show what can be done with minimal supplies.

I chose to use Night Of Navy ink to stamp the boats and the sentiment on to Whisper White card stock.

Once the images were die cut it was easy to position them on to a Whisper White card base.

Finally, the birds were stamped with 2nd generation ink.

I hope you enjoyed this project. The supplies used are listed and linked to the online store below.

I would love to be your demonstrator.

Why not join my team and enjoy shopping with a discount. Click below to find out more!

Thanks for stopping by today and happy Stampin’!

Verity xx

Inspire.Create #045

Hello Everyone,

Welcome to my blog. Every other Monday I share my project that I have used as my entry for the Inspire.Create challenge.

This time it’s a theme challenge.

The design team have made some wonderful samples as inspiration. You can see them here.

I have used the emboss resist technique for my project;

I picked out the Stargazing stamp set…. I thought the stars would be perfect for this technique.

First, I applied Balmy Blue ink to some white card stock where the sentiment would be. I then used versamark ink to stamp the images. These were embossed with clear powder.

I then added Pacific Point and Night of Navy ink over the top. A damp cloth rubbed away the excess ink.

The panel was die cut with a Stitched Rectangle and layered on to Whisper White card stock.

A Night of Navy card base was embossed with the Swirls & Curls embossing folder before adding the topper with dimensionals.

I hope you enjoyed this project. The supplies used are listed and linked to the online store below.

I would love to be your demonstrator.

Thanks for stopping by today and happy Stampin’!

Verity xx

Product List