April SU colour challenge

Hello Everyone,

Time for another colour challenge. This is a Facebook group challenge, just for fun, to stretch the creativity.

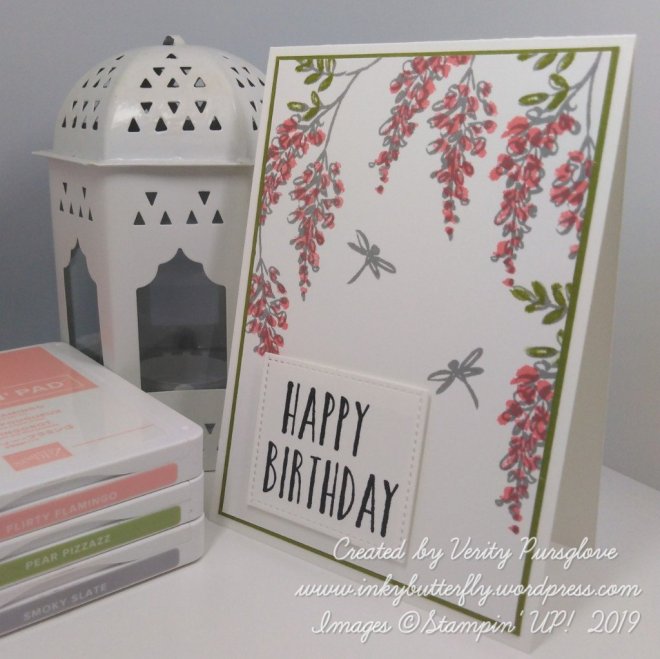
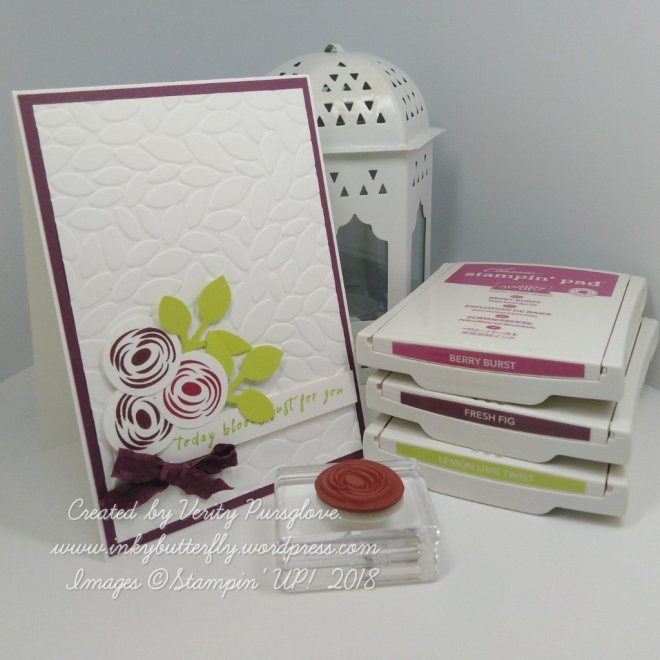
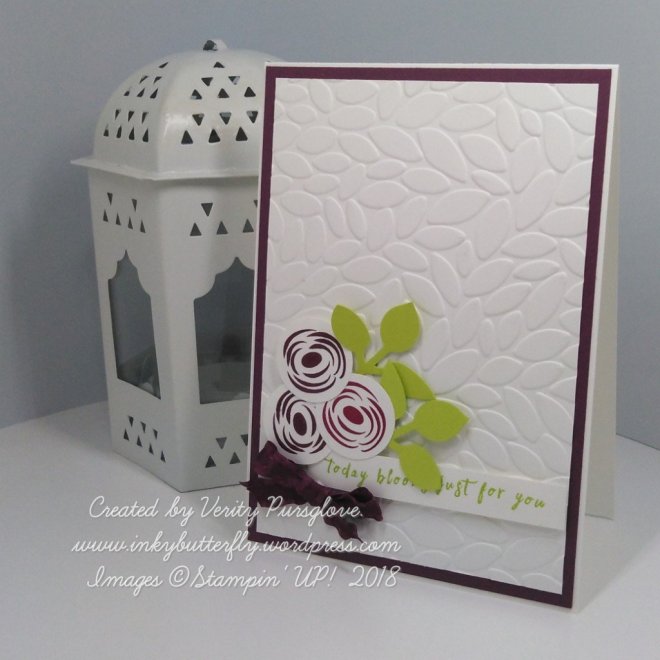
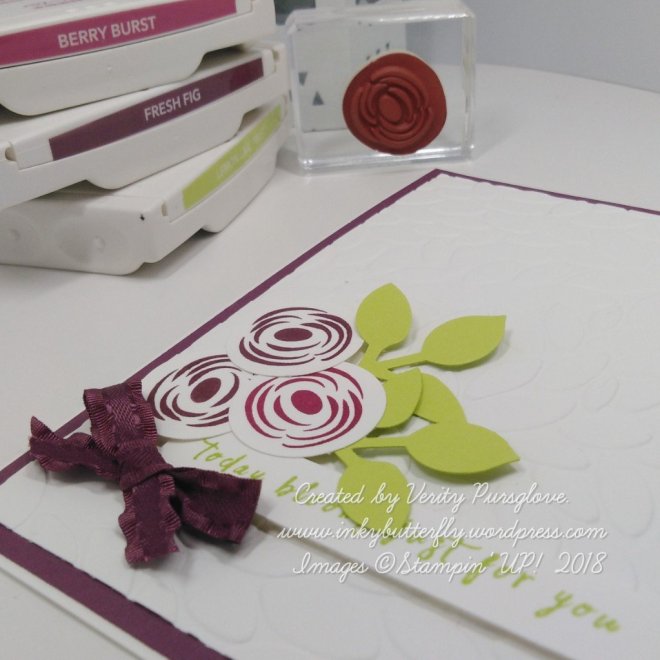
My card also features retiring products, Perennial Birthday stamp set, the Pretty Label Punch and Call Me Clover ink.

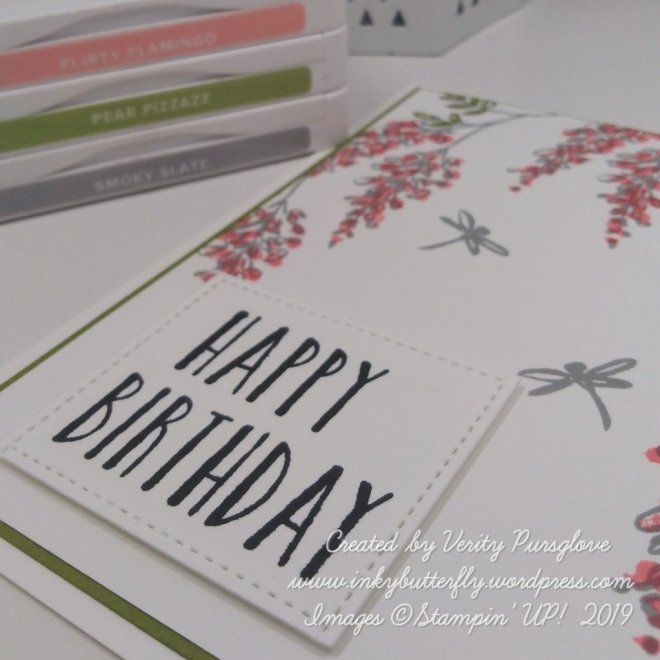
I started by adding a band of colour across a white card layer using a stamping sponge and wrapping some polka dot ribbon around it.

The flowers and foliage were added next and the panel was adhered to a white card base.

The sentiment was stamped with Call Me Clover ink and punched with the Pretty Label punch.

I hope you enjoyed this project. The supplies used are listed and linked to the online store below.

I would love to be your demonstrator.

Thanks for stopping by today and happy Stampin’!

Verity xx

Product List

Upline Colour Challenge 2

Hello Everyone,

Here’s another colour challenge card, just a bit of fun during these crazy times.

I have taken the opportunity to showcase some retiring products, Pop of Petals, Perennial Birthday, Four Petal Flower punch and the Leaf Punch.

You can see all the last chance products here along with links to the Early Release Product Medley and the Clearance Rack.

I stamped my own background layer with Pop of Petals and Mango Melody ink. This adhered to a Poppy Parade card base.

Coastal Cabana ink was used to add some leaves to separate layer and stamp the sentiment. I ran a Poppy Parade marker along the edge and adhered this with dimensionals.

Flowers were stamped with Poppy Parade ink and punched out. Multi purpose glue was used to secure them to the card.

Finally, some punched vellum leaves added some additional details and texture.

I hope you enjoyed this project. The supplies used are listed and linked to the online store below.

I would love to be your demonstrator.

Thanks for stopping by today and happy Stampin’!

Verity xx

Product List

Paper Trimmer

[152392]

£23.00

Leaf Punch

[144667]

£15.00

Bold Birthday

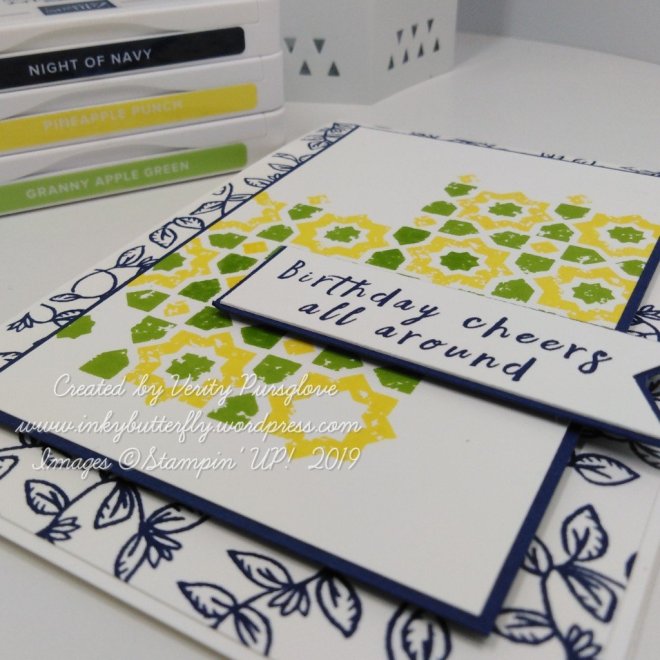
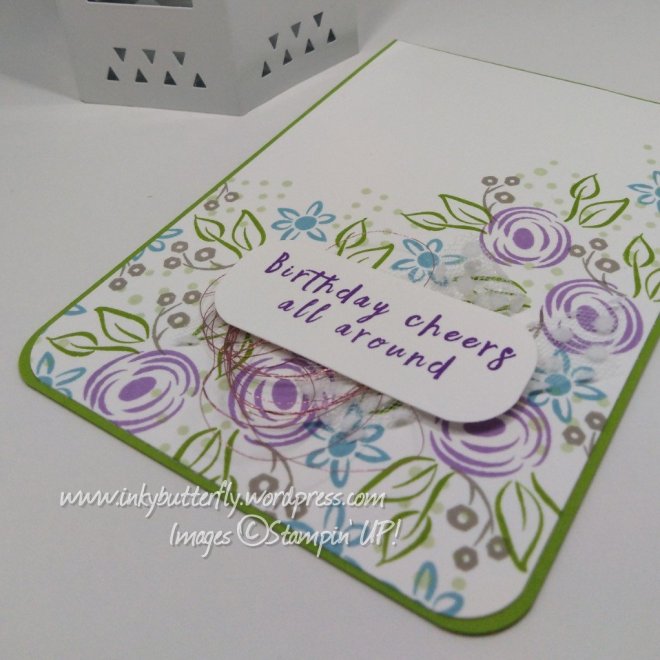
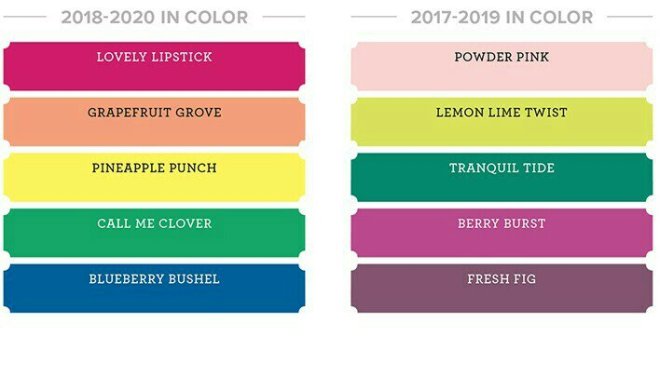
Hello Everyone,Two retiring stamp sets used in this card so if you love them as much as me be sure to get your order in soon!The layout is very similar to cards I have made before, building the background with the Label Me Bold stamp set.I added an extra layer of vellum for extra interest and texture.The sentiment from Perennial Birthday was stamped with the retiring In Colour Blueberry Bushel.I hope you enjoyed this project. The supplies used are listed and linked to the online store below.I would love to be your demonstrator.Thanks for stopping by today and happy Stampin’!Verity xxProduct List

Paper Trimmer

[152392]

£23.00

Project Share Project

Hello Everyone,

Welcome to this week’s Project Share. As always my friends have created some lovely work. Please use the links to visit their blogs and read more about their projects.

Jill is casing Pinterest with her Poppy card. Water colouring and die cutting coming together perfectly!

Visit Jill’s blog here for more information.

Heather has used one of my favourite sets to play along with a colour challenge! I love the layered daisy with the grey leaves

Visit Heather’s blog here to see which colours she used

Gez has used a simple layout that really shows off the beauty of these dies. The large happy birthday sentiment is perfect for this type of card!

Visit Gez’s blog here for more ideas

I hope you enjoyed these projects. The supplies used are listed and linked to the online store below.

I would love to be your demonstrator.

Thanks for stopping by today and happy Stampin’!

Verity xx

Product List

Happy Birthday with Soft Spring

Hello Everyone,

Today’s card features the Soft Spring hostess stamp set.

You can get this stamp set with an order of £150 or more…. Club together with friends or just treat yourself!

The outline image was stamped with Smoky Slate ink around the top of a Whisper White card layer.

Flirty Flamingo and Pear Pizzazz inks were used to fill in the spaces.

The large happy birthday was taken from the Perennial Birthday stamp set. I cut this with a Stitched Square Die.

The panel was layered on to Pear Pizzazz card stock and then on to a Whisper White card base.

I hope you enjoyed this project. The supplies used are listed and linked to the online store below.

I would love to be your demonstrator.

Thanks for stopping by today and happy Stampin’!

Verity xx

Product List

More Perennial Birthday

Hello Everyone,

Perennial Birthday is a great go to set for a beautiful but quick birthday card.

For today’s card I have used combined some of the new In Colours with a favourite from the Stampin Up colour palette.

The flowers were stamped on to a card layer using Seaside Spray and Mint Macaron inks.

This was layered with Pretty Peacock card stock and adhered to a Whisper White card base.

Pretty Peacock ink was used to stamp the sentiment.

I hope you enjoyed this project. The supplies used are listed and linked to the online store below.

I would love to be your demonstrator.

Thanks for stopping by today and happy Stampin’!

Verity xx

Product List

Birthday Cheers #GDP193

Hello Everyone,

This week is a colour challenge at the Global Design Project!


See what the Design Team have created here.

……. And this is my project…..

I have used the Verdant Garden stamp set to create the backgrounds on each of the Whisper White panels.

The smaller panel was layered on to Night Of Navy card stock and adhered to the card with dimensionals.

The sentiment was taken from the Perennial Birthday stamp set and stamped with Night Of Navy ink.


I hope you enjoyed this project. The supplies used are listed below.

Thanks for stopping by today and happy Stampin’!

Verity xx

Product List

Project Share Project

Hello Everyone,

Welcome to this week’s Project Share. As always my friends have created some lovely work. Please use the links to visit their blogs and read more about their projects.

Jill has reproduced this tea and biscuit holder which we all learned at our recent team retreat.

Visit Jill’s blog here

Heather needed some somewhere to keep her library clips and made this carton with a window.

Visit Heather’s blog here

Gez has been busy making baby cards for some design challenges. The Gingham Gala papers are perfect.

Visit Gez’s blog here

Helzie wants to say thanks! and has used this cute image to say it in style! I think she may have used her Stampin’ Blends too?

Visit Helzie’s blog here

I hope you enjoyed these projects. The supplies used are listed and linked to the online store below.

I would love to be your demonstrator.

Thanks for stopping by today and happy Stampin’!

Verity xx

Product List

In Colour Medley

Hello Everyone,

It will soon be time to say a fond farewell to some of the current In Colours. So today, I have used three of them to make this card.

I love using grungy stamps to make backgrounds. I used Artisan Textures for this project.

Lemon Lime Twist ink was used for the base layer. This was adhered to a Tranquil Tide card base.

On the topper, Berry Burst ink ink was used for the large image. A smaller image was chosen and stamped with Tranquil Tide ink. This was layered on to Tranquil Tide card stock and added to the card with dimensionals.

The sentiment from Perennial Birthday was stamped with Berry Burst ink and added across the topper.

Leaves from Tropical Chic were stamped with Tranquil Tide ink and die cut. These were tucked behind the sentiment strip.

I hope you enjoyed this project. The supplies used are listed and linked to the online store below.I would love to be your demonstrator.Don’t miss out on these last chance items…. When they’re gone, they’re gone!

Thanks for stopping by today and happy Stampin’!

Verity xx

Product List

Lots of Happy Birthday

Hello Everyone,

Have you seen the Stamparatus tool? I couldn’t have made this card front without it!

I started at the bottom of the card stock, stamping first with Night Of Navy ink.

Keeping the card in place, the stamp plate was moved up on the hinge. I stamped the next row with Pacific Point twice.

The plate was moved up again, and stamped with Pacific Point once.

The next two levels were stamped without reinking the stamp.

The rest of the card was made by matting and layering with glimmer paper and Twinkle Twinkle Designer Series Paper.

I hope you enjoyed this project. The supplies used are listed and linked to the online store below.

I would love to be your demonstrator.

Thanks for stopping by today and happy Stampin’!

Verity xx

Product List

Stamparatus

[148187]

£46.00

Project Share Project

Hello Everyone,

Welcome to this week’s Project Share. As always my friends have created some lovely work. Please use the links to visit their blogs and read more about their projects.

Heather has used the Bloom by Bloom stamp set to create this cute background. The narrow note cards work really well with this #simplestamping technique.

See more about this project on Heather’s blog here

Gez has loved playing with this die set. This is such a great way to use this design. Wouldn’t you just love to receive this beautiful gift.

See more about this project on Gez’s blog here

Jill has created this wonderful celebratory card. I just love the colours and that spotty DSP. Here the special occasion is a birthday, how would you use this design?

See more about this project on Jill’s blog here

I hope you enjoyed these projects. The products used are listed below.

Thanks for stopping by today and happy Stampin’!

Verity xx

Product List

Simply Scored

[122334]

£28.00

Swirly Birthday #GDP177

Hello Everyone,

This week the challenge is a colour challenge!

See what the Design Team have created with this colour combo here

And this is my card…

I love the Swirly Bird stamp set…. It can be used for any occasion, gender neutral, and works with just about any colour combination going!

I started with Granny Apple Green ink, stamping the splatter image in both first and second generation ink.

The large swirl was added next with Coastal Cabana ink. The same ink, but second generation, was used for the smaller swirl.

For the sentiment, I used the bold font of the Perennial Birthday set with Melon Mambo ink. I adhered this to the card with dimensionals.

I hope you enjoyed this project. The supplies used are listed below.

Thanks for stopping by today and happy Stampin’!

Verity xx

Product List

Blooms for You #GDP156

Good Morning!

Wednesday means a Global Design Project entry. This week the challenge is to Case the Designer…. See what the design team have made here

I have made this card featuring the Petal Burst embossing folder and Perennial Birthday stamp set.

I kept the embossed background opting for the Petal Burst folder, though any design would fit with this project. This was adhered on to a Fresh Fig card layer and then to a Whisper White card base.

The sentiment was added next. This was stamped with Lemon Lime Twist ink.

Flowers were stamped in Berry Burst & Fresh Fig ink and punched out. Leaves were punched from Lemon Lime Twist card stock.

A bow was tied from Fresh Fig Ruffled ribbon.

I hope you enjoyed this project. The supplies used are listed below.

Thanks for stopping by today and happy Stampin’!

Verity xx

Product List

Leaf Punch

[144667]

£15.00

Inspire.Create #024

Good Morning,

I was spoiled for choice when it came to designing this card for this week’s Inspire.Create challenge.

The design team have made some fabulous pretty cards that you can on the Inspire.Create blog here!

I plumped for the Perennial Birthday stamp set. At first, I thought I would use pink ink, but finally settled on purple and blue.

I began by Stamping the florals on to a white card layer, (4 by 5-3/4 inches).

Highland Heather, Granny Apple Green, Gray Granite and Balmy Blue ink built the background. Some speckles of Soft Sea Foam filled in the white spaces and added some texture.

The bottom corners were rounded before adhering to a Granny Apple Green card base.

White Polka Dot Tulle ribbon and Rose metallic thread were looped and secured on to the card. The sentiment was added over the top with dimensionals.

I hope you enjoyed this project. The supplies used are listed below.

Thanks for stopping by today and happy Stampin’!

Verity xx

Product List

In Colours 2018

Hello Everyone!

It’s almost here! The new Stampin’ Up! Annual Catalogue 2018 will go live this Friday 1st June.

We will be saying goodbye to the In Colours that joined in 2016….. But that means there are new ones!

Introducing…..

Lovely Lipstick, Grapefruit Grove, Pineapple Punch, Call Me Clover and Blueberry Bushel.

Aren’t they divine!

So for today’s post, I have made five identical cards to showcase these colours and the coordinating card stock and Designer Series Paper.

I have used white card stock to make the card bases and added In Colour DSP to each.

White card stock was cut to 3 by 4-3/4 inches and stamped with matching ink using Touches of Texture.

The Starburst Punch was used to cut the card stocks and adhered to a circle of vellum. This was adhered to the card with dimensionals.

Perennial Birthday was used to stamp the sentiment on to one inch strips of white card. These were trimmed to size using the Triple Banner Punch.

I hope you enjoyed this project. More projects featuring new catalogue items coming over the next week!

Have you got a new catalogue?? If not let me know and I will post one out to you absolutely FREE!

Thanks for stopping by today and Happy Stampin’!

Verity x

Product List

Lovely Happy Birthday

Good Morning!

I’ve made another large card for today’s project. This one features the Whole Lot of Lovely designer series paper.

The base was made from Tangerine Tango card stock which was cut lengthways at 5-7/8 inches and then folded in half. Keep the leftover strip for later.

A 5-3/4 inch square of patterned paper was added to the front.

Two 3-3/4 inch squares of Tangerine Tango were cut to make the topper. One was covered with patterned paper.

The plain square was adhered flat to the card base with Snail adhesive. The patterned piece was added at an angle with dimensionals.

Using the strip of leftover card stock, punch out six flowers with the Pansy punch. Also cut three sets of leaves from Old Olive card stock with the Leaf Punch.

Each of the flowers were lightly spritzed with water and scrunched. Once dry, two flowers were layered together with glue dots.

The flowers and leaves were arranged in the corner. Black rhinestones were added to the centres.

I used my stamparatus to make sure the sentiment was stamped well. Using the tool allowed me to stamp twice in the same place to give a very crisp image. I cut some banner ends and adhered with Snail adhesive.

I hope you enjoyed this project. The supplies used are listed and linked to the online store below.

Thanks for stopping by today and Happy Stampin’!

Verity x

Product List

Pansy Punch

[130698]

£14.50

Leaf Punch

[144667]

£14.50

Celebrating You

Good Morning,

Today’s card is bright and cheerful ready for Spring, and it is so easy to make.

On a white card layer, a selection of images were stamped from the Perennial Birthday stamp set. The colours I have used are;

  • Sweet Sugarplum
  • Pear Pizzazz
  • Crumb Cake
  • Flirty Flamingo

Sweet Sugarplum Striped Grosgrain ribbon was adhered across the bottom of the panel. This was then added to a Sweet Sugarplum card base.

A sentiment from the same stamp set was was cut with the Pretty Label punch. The edges were lightly inked using a sponge dauber and adhered with dimensionals.

A small bow was tied and added to the card with glue dots.

I hope you enjoyed this project. The supplies used are listed and linked to the online store below.

Thanks for stopping by and Happy Stampin’!

Verity x

Product List

Emerald Birthday

Hi Everyone,

I have used the Perennial Birthday stamp set to make this one layer card today.

I used the speckles to make an interesting background with Peekaboo Peach ink.

Happy Birthday was placed in the middle using Emerald Envy ink.

The swirly flowers in the set were stamped using Flirty Flamingo ink with the leaves added with Emerald Envy ink.

The stamped panel was adhered to an Emerald Envy layer and then on to a Peekaboo Peach card base.

I hope you enjoyed this project. The supplies used are listed and linked to the online shop below.

Thanks for stopping by and happy Stampin’!

Verity x

Product List

Perennial Birthday

Hi Everyone,

I would like to share this card made with the Perennial Birthday stamp set.

A Calypso Coral card base was stamped with the speckles around the edge.

A piece of Whisper White card was stamped with the smaller flower using Calypso Coral ink. These were “stamped off” once for a more faded look.

Garden Green ink was used to stamp the sentiment.

I used Stampin’ Write markers to colour the large flower stamp for a multi coloured impression. This was cut with a Layering Circle die and layered on to a Garden Green scalloped circle.

As a final touch, a small bow tied from Basic Grey Shimmer ribbon.

I hope you enjoyed this project. The supplies used are listed and linked below. These will be available to purchase from 3rd January 2018.

Thanks for stopping by and happy Stampin’!

Verity x

Product List