Inspire.Create.Challenges #123 – Sketch Challenge with Dragonfly Garden

Hello Everyone,

Welcome to my blog today sharing with you my design team project for the Inspire.Create.Challenges blog!

Our challenge this time is to use this card sketch.

See the other design team creations HERE

I chose to use some ink blending to create the vertical panel.

You can see how I made this card in my video tutorial…..

This colour combo reminds of a sunset on a summer’s evening!

The black layer ties the embossing and sentiment together.

This card takes on a completely different look by using these deeper colours. White embossing would look good too!

I hope you enjoyed this project.

The supplies used are listed and linked to the online store below.

I would love to be your demonstrator.

Thanks for stopping by today and happy Stampin’!

Verity xx

Product List

Using Retiring In Colours with the Dragonfly Garden Stamp Set

Hello Everyone,

The 2021-2022 annual catalogue will retire in a few weeks time and that means we will be losing this wonderful set of In Colours!

It’s not all bad news…. We get five brand new ones to replace them!

So for today’s card I’m using them all! I’ve picked out the Dragonfly Garden Stamp Set, another annual catalogue favourite!

You can see how I made this card in my video tutorial….

Curling the wings of the punched dragonflies gives them movement and adds some dimension to the finished project.

I popped in a layer of Basic Black to lift the stamped layer from the base card.

I hope you enjoyed this project.

The supplies used are listed and linked to the online store below.

I would love to be your demonstrator.

Thanks for stopping by today and happy Stampin’!

Verity xx

Product List

Four Cards made in a Flash with the Stamparatus Tool

Hello Everyone,

Today I am showing how to use the Stamparatus to make multiple cards, quickly and easily!

I’m using the Dragonfly Garden stamp set for my cards. This of course can be substituted for any stamps you wish to use.

The card has been kept very simple with no extra embellishments except for some Wink of Stella which was used over the dragonfly body.

You can see how I made this card in my video tutorial….

I’d love to see your creations using the Stamparatus!

I hope you enjoyed this project.

The supplies used are listed and linked to the online store below.

If your order is less than £150, use the Hostess Code PBNW9JZN when placing your order to get an extra gift from me!

I would love to be your demonstrator.

Thanks for stopping by today and happy Stampin’!

Verity xx

Product List

Creating Subtle Backgrounds with Decorative Masks & Pastels

Hello Everyone,

Today I am sharing a technique to create backgrounds using the Soft Pastel Assortment.

Using this medium gives a much softer colour to the background than can be achieved with inks.

You can see how I made this card in my video tutorial….

The piece was simply layered with coordinating cardstock with a die cut sentiment added with dimensionals

This card used a different mask but the same pastel colours. This time the sentiment was cut with the Double Oval punch.

I hope you enjoyed this project.

The supplies used are listed and linked to the online store below.

If your order is less than £150, use the Hostess Code PBNW9JZN when placing your order to get an extra gift from me!

I would love to be your demonstrator.

Thanks for stopping by today and happy Stampin’!

Verity xx

Product List

Creative Colour Challenges #4 with Blossoms in Bloom

Hello Everyone,

Today’s card is for teammate Vickie’s Creative Colour Challenge….

Find out more and participate HERE

I have used the Blossoms in Bloom stamp set with the Dragonfly Garden Bundle for my project.

You can see how I made this card in my video tutorial…..

I love how these cards turned out!

This is the Rich Razzleberry version…

Can you pick a favourite?

I hope you enjoyed this project.

The supplies used are listed and linked to the online store below.

If your order is less than £150, use the Hostess Code YKD92HEX when placing your order to get an extra gift from me!

I would love to be your demonstrator.

Thanks for stopping by today and happy Stampin’!

Verity xx

Product List

Triple Panel Card with Dragonfly Garden

Hello Everyone,

I’ve tried a different layout for today’s card, what do you think?

I’m really thrilled with the colour combination too, using the 2020 in colours which I absolutely love!

You can see how I made this card in my video tutorial….

A touch of Wink of Stella on the dragonfly and some clear Elegant Faceted Gems add some twinkle for the recipient.

For this sample, I made the card base from Night of Navy card stock and stamped with Bumblebee and Just Jade inks!

I hope you enjoyed this project.

The supplies used are listed and linked to the online store below.

If your order is less than £150, use the Hostess Code YESHEZSG when placing your order to get an extra gift from me!

I would love to be your demonstrator.

Thanks for stopping by today and happy Stampin’!

Verity xx

Product List

Project Share Project

Hello Everyone,

Welcome to this week’s Project Share. As always my friends have created some lovely work. Please use the links to visit their blogs and read more about their projects.

****** ****** ******

Jill’s card is just one of a set made with just one sheet of designer series paper! With 12 sheets in ever pack, that’s a lot of cards!

Visit Jill’s blog here

Heather’s card shows just one of many ways of using these fabulous die cuts. They are more versatile than they first appear!

Visit Heather’s blog here

Gez has made this bold and bright block watercolour background for her card. It’s really easy and so effective!

Visit Gez’s blog here

I hope you enjoyed these projects. The supplies used are listed and linked to the online store below.

I would love to be your demonstrator.

Thanks for stopping by today and happy Stampin’!

Verity xx

Product List

Project Share Project

Hello Everyone,

Welcome to this week’s Project Share. As always my friends have created some lovely work. Please use the links to visit their blogs and read more about their projects.

This week all the projects feature fancy fold cards!

*************************

Jill’s stepper card is beautiful and bright, just the thing to cheer someone up when they are feeling under the weather!

Visit Jill’s blog here

*************************

Heather’s card is full of sunshine and hopes for a summertime outside lockdown! This fun fold is an interesting variation on a gatefold!

Visit Heather’s blog here

*************************

Gez has made this twisted easel card, wouldn’t this look great on your mantelpiece? And it features my favourite colour too!

Visit Gez’s blog here

*************************

I hope you enjoyed these projects. The supplies used are listed and linked to the online store below.

I would love to be your demonstrator.

Thanks for stopping by today and happy Stampin’!

Verity xx

Product List

Inspire.Create.Challenge #085

Hello Everyone,

Today I am delighted and honoured to be sharing my first project as an Inspire.Create challenge. Design Team member!

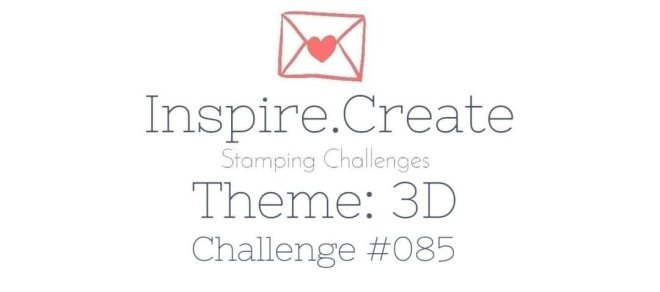
This time it’s a 3D theme challenge. The rest of the design team have made some wonderful samples as inspiration. You can see them here.

Why not give it a go? We’d love to see your 3D creations!

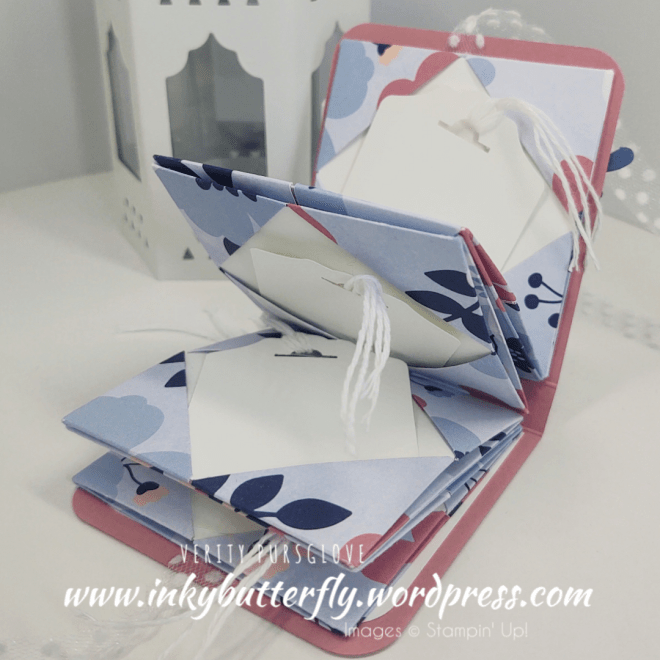
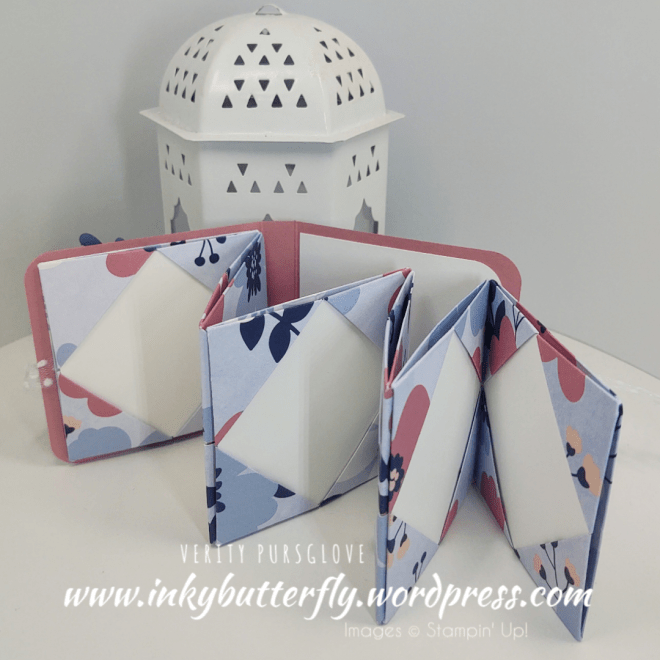
3D projects aren’t my forté… I hope you enjoy my effort with this mini album. I learned to make these many years ago. They make lovely gifts!

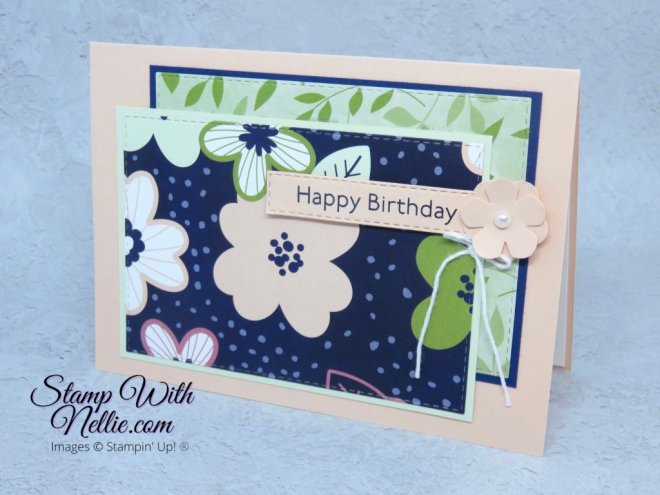
I made my samples with the Paper Blooms Sale-a-bration designer series paper pack. I just love the colour palette in this collection!

Each “page” uses a 6 by 6 piece of paper so you can get 4 out of each 12 by 12 sheet. This project requires 6 pages.

To make each square;

  • Fold in half and reopen, bring each side to the middle fold to create 4 sections
  • Turn 90 degrees and repeat. You should have 16 squares, measuring 1-1/2 inches, in your paper
  • I like to use a scoreboard to create these first set of squares, (score at 1-1/2, 3 and 4-1/2 inches)
  • Fold each corner to the centre point, crease and reopen
  • Turn in each corner to the first 1-1/2 inch intersection, then fold in to the centre

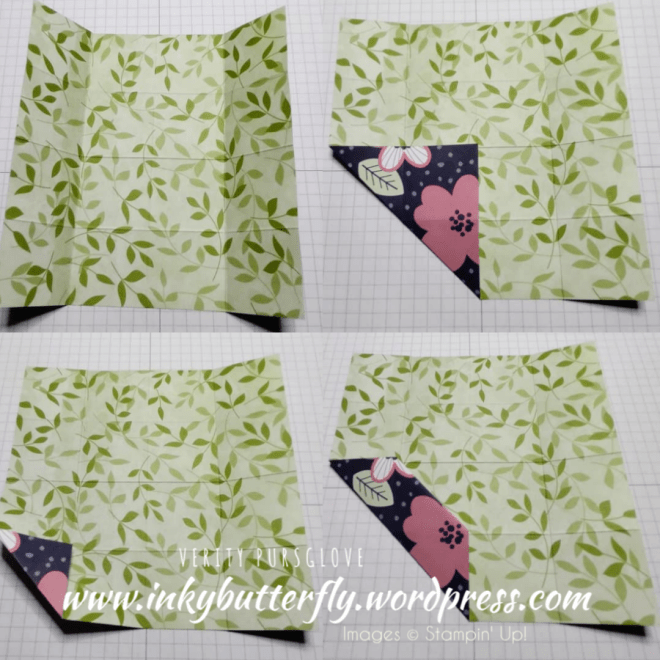
  • Turn over the folded paper
  • Fold each corner the the centre point and reopen
  • Turn it back over
  • On three sides, lift and fold back on itself – this is called a squash fold

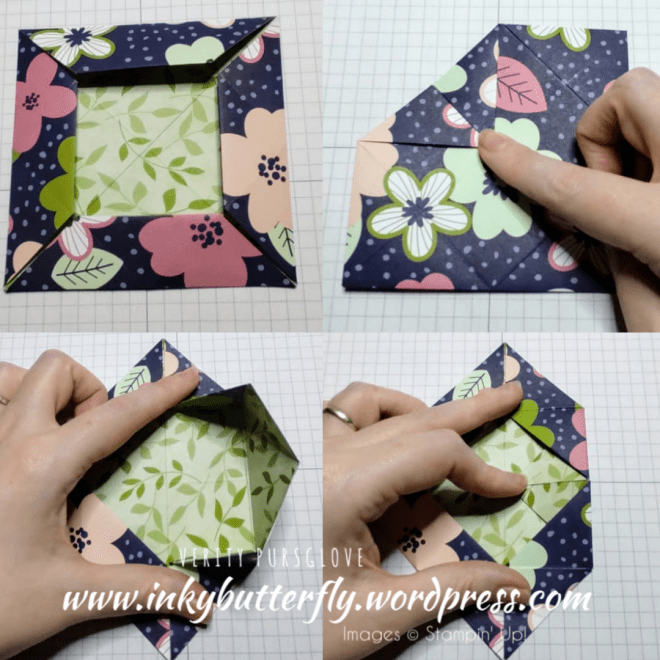
  • Insert a square of cardstock that measures just under 3 inches.
  • Use the exposed points to join the pages together with wet glue
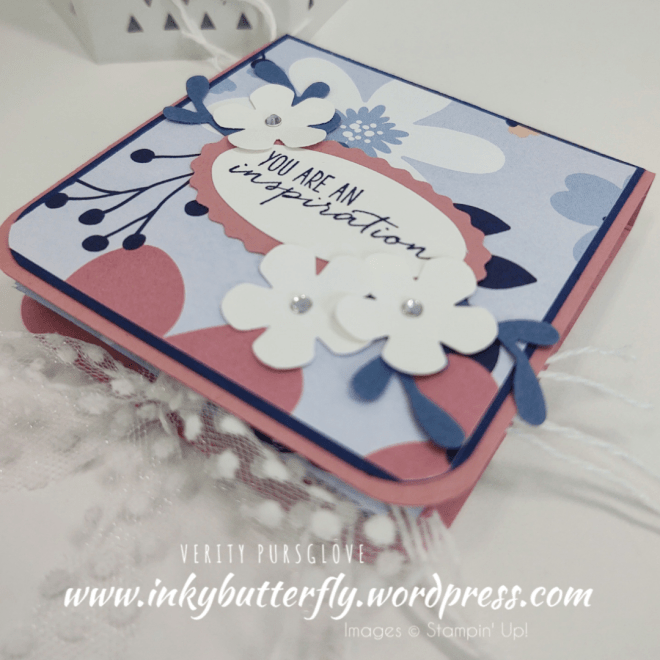
To make the cover;

  • Cut a piece of cardstock 7 by 3-1/4 inches
  • Score on the long side at 3-1/5 and 3-3/4 inches
  • Cut a layer in coordinating cardstock 3-1/8 square, and designer series paper 3 inches square
  • Round the corners and adhere the pieces to the front cover
  • Add ribbon across the inside of the cover
  • Add white cardstock to the inside back cover, over the ribbon
  • Decorate the front using the Double Oval, Small Bloom and Sprig Punches!

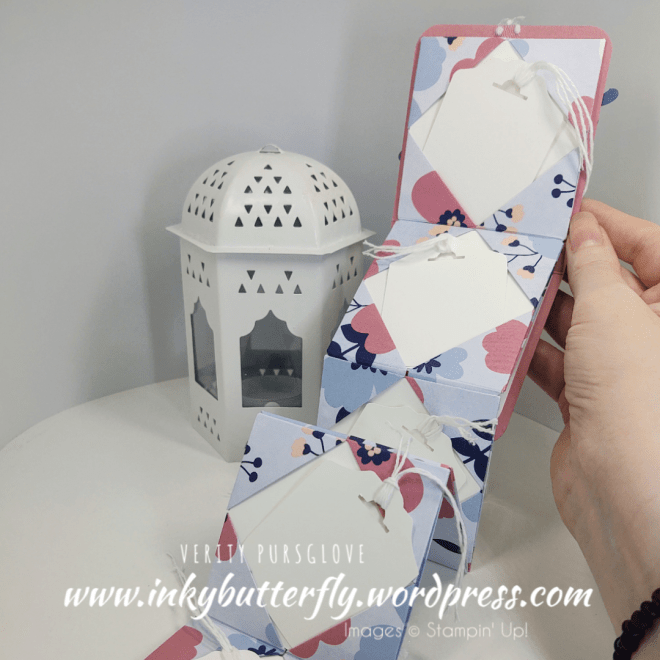
Adhere the pages to the inside front cover of the album. If preferred, the back page can also be adhered in place.

Tags and other embellishments can be added to the inside.

I hope you enjoyed this project.

I have created 2 videos showing the page folding and making the cover.

The supplies used are listed and linked to the online store below.

If your order is less than £150, use the Hostess Code UYZ33U2J when placing your order to get an extra gift from me!

I would love to be your demonstrator.

Thanks for stopping by today and happy Stampin’!

Verity xx

Product List

Cardmaking with the Dandy Garden Designer Series Paper

Hello Everyone,

Something completely different to my usual style today, but it thought I’d give it a go!

There’s no real “formula” that I used for the measurement of each piece of paper, I just went with what I thought looked good!

See how I made this card in my video tutorial….

I resisted adding any embellishments as I thought this could be given to a guy too!

Here is the original card. The layers are slightly different, swapping the Calypso Coral and Misty Moonlight.

I hope you enjoyed this project.

The supplies used are listed and linked to the online store below.

If your order is less than £150, use the Hostess Code UYZ33U2J when placing your order to get an extra gift from me!

I would love to be your demonstrator.

Thanks for stopping by today and happy Stampin’!

Verity xx

Product List

Project Share Project

Hello Everyone,

Welcome to this week’s Project Share. As always my friends have created some lovely work. Please use the links to visit their blogs and read more about their projects.

*** *** *** *** *** *** *** *** *** *** ***

Jill has created her card using the paper piecing technique. Looks fantastic in these bright colours with the black outline!

Visit Jill’s blog here to see more

Heather has used one of my favourite techniques, emboss resist. It’s now even easier to do with the blending brushes!

Visit Heather’s blog here for more

Gez has made this lovely presentation box for her note card set I shared last week. This would make a great gift!

Visit Gez’s blog here for more

I hope you enjoyed these projects. The supplies used are listed and linked to the online store below.

I would love to be your demonstrator.

Thanks for stopping by today and happy Stampin’!

Verity xx

Product List

Dragonfly Garden Colour Challenge

Hello Everyone,

I love colour challenges… This time the challenge was to use Cherry Cobbler, Coastal Cabana and Cinnamon Cider!

I chose to work with the Dragonfly Garden bundle!

See how I made this card in my video tutorial….

I think I like the Coastal Cabana dragonfly best!

I hope you enjoyed this project.

The supplies used are listed and linked to the online store below.

If your order is less than £150, use the Hostess Code UYZ33U2J when placing your order to get an extra gift from me!

I would love to be your demonstrator.

Thanks for stopping by today and happy Stampin’!

Verity xx

Product List

Project Share Project

Hello Everyone,

Welcome to this week’s Project Share. As always my friends have created some lovely work. Please use the links to visit their blogs and read more about their projects.

Jill is sharing some Valentine’s Day ideas. I love this card which steps away from the traditional reds and pinks!

Visit Jill’s blog here

Heather has used a sketch challenge as inspiration for her card. This gorgeous paper is available for free with a qualifying order!

Visit Heather’s blog here

Gez is making her patterned paper go further with this one sheet wonder technique. Imagine how many cards you could make!

Visit Gez’s blog here

I hope you enjoyed these projects. The supplies used are listed and linked to the online store below.

I would love to be your demonstrator.

Thanks for stopping by today and happy Stampin’!

Verity xx

Product List

Project Share Project

Hello Everyone,

Welcome to this week’s Project Share. As always my friends have created some lovely work. Please use the links to visit their blogs and read more about their projects.

Jill’s style really suits this pretty stamp set. I love the colour choices too!

Visit Jill’s blog here for more details!

Heather’s card is packed with texture. I love the embossed dragonfly!

Visit Heather’s blog here to see more!

Gez has taken a different look at this stamp set to create this striking masculine card!

Visit Gez’s blog here for the details!

I hope you enjoyed these projects. The supplies used are listed and linked to the online store below.

I would love to be your demonstrator.

Thanks for stopping by today and happy Stampin’!

Verity xx

Product List

Sale-a-bration is HERE! featuring Oh So Ombre and Corner Bouquet!

Hello Everyone,

Today is the day! New mini catalogue is live and Sale-a-bration has begun!

This is one of the biggest events in the Stampin’ Up! calendar….. Earn FREE products with qualifying orders, extra rewards for hosting a party and an extraordinary joining offer!

All new recruits will receive FIVE PACKS of 6 by 6 designer series paper, (200 sheets)…. That will make a lot of cards…. A great way to get started!

There are some gorgeous paper packs that can be selected as a freebie….. Today’s project features the Oh So Ombre collection along with the Corner Bouquet stamp set.

See how I made these cards in my video tutorial…..

Blackberry Bliss and Bermuda Bay are two of my favourite colours!

And here are the Rococo Rose and Granny Apple Green versions….

Do you have a favourite?

I hope you enjoyed this project.

The supplies used are listed and linked to the online store below.

If your order is less than £150, use the Hostess Code W7ZJNXEV when placing your order to get an extra gift from me!

I would love to be your demonstrator.

Thanks for stopping by today and happy Stampin’!

Verity xx

Product List

Monochromatic Card with *NEW* Dragonfly Garden Bundle

Hello Everyone,

Here’s a first look at the Dragonfly Garden bundle and Dandy Garden Designer Series Paper!

I really love the colours in this paper… I picked out this cute Dandelion design in Bumblebee for the demonstration

See how I made this card in my video tutorial….

The original sample used Misty Moonlight. I really like the inclusion of the In Colours in this paper pack!

Have you shopped the sale yet?

I hope you enjoyed this project.

The supplies used are listed and linked to the online store below.

If your order is less than £150, use the Hostess Code W7ZJNXEV when placing your order to get an extra gift from me!

I would love to be your demonstrator.

Thanks for stopping by today and happy Stampin’!

Verity xx

Product List