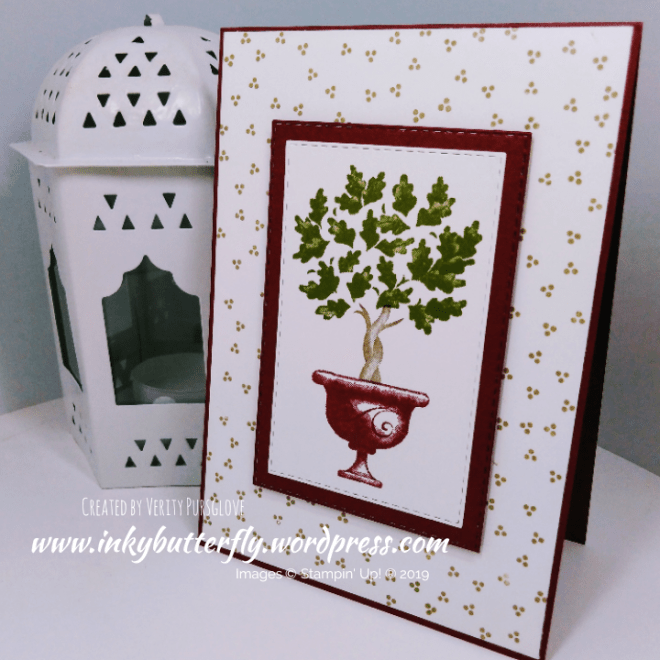
Big on Birthdays

Good Morning,

I am sharing these cute birthday cards with you today.

The stamp set featured is Big on Birthdays.

The card bases are made from Berry Burst and Dapper Denim card stock. Cut at 4-1/8 and scored at 5-7/8 inches.

Card Layers; Lemon Lime Twist and Powder Pink measuring 4 by 5-3/4 inches.

Whisper White measuring 3-3/4 by 5-1/2, and 3 by 3 inches.

Berry Burst and Dapper Denim measuring 3-1/8 by 3-1/8 inches.

The sentiments were stamped in Bermuda Bay and Emerald Envy inks.

Berry Burst and Powder Pink finely woven ribbon was used to decorate.

I hope you enjoyed this project. The supplies used are listed and linked below.

Thanks for stopping by and happy stampin’!

Verity x

Product List

Across the Miles

Hi Crafters,

Here is another simple Christmas card. I have used the Feeling of Christmas stamp set today.

The set includes two large designs. On a 3-1/2 inch square, the sketchy swirl was stamped first with Pear Pizzazz ink. The line art was then stamped over the top in Archival Black and allowed to dry.

Meanwhile, the card base was made from Real Red card stock. I used versamark ink and the Holly Berry Happiness stamp set to create the background.

The sentiment from this set was stamped in Garden Green ink.

The main image was coloured with Stampin’ Write Markers; Garden Green, Real Red and a little Crushed Curry.

The elements were adhered to the card base with dimensionals.

I hope you enjoyed this project. The supplies used are listed and linked below.

Thanks for stopping by and happy stampin’!

Verity x

Product List

Oh Christmas Tree

Hi there,

Today’s project is a simple card that is easy to mass produce. Christmas is a time when we need lots of cards so lets make it easy.

I have used the Season Like Christmas set.

The tree was stamped in Pear Pizzazz and Garden Green ink, with Early Espresso for the trunk. A touch of Soft Sky was added at the base.

The panel was trimmed down to create a deep border from the edge of the card, (I have used a conveniently sized scrap). A slightly larger piece of Cherry Cobbler lifted this from the background.

For some extra festivity, I added some silver tinsel trim behind the panel. I decided not to use a sentiment, the card speaks for itself.


I hope you enjoyed this project the supplies used are listed and linked below.

Thanks for stopping by and happy stampin’!

Verity x


Product List

Our Family To Yours

Good Morning!

Navy and silver are a perfect combination in this card.

The background was made by repeat stamping the triple snowflake image. I have done this using the Stamp-a-ma-jig to help line up the images.

I love this technique and wish it was easier to achieve…. But Stampin’ Up! has come to the rescue.

Introducing…

The Stamparatus!

The tool can be reserved from 9pm, 16th to 20th November, while stocks last, for delivery in February 2018. I can’t wait to get my hands on this revolutionary piece of kit!


The sentiment from the same set was stamped with Night of Navy ink and cut with the Everyday Label punch.

A foil snowflake and a small bow tied from metallic edged ribbon finishes the card.


I hope you enjoyed this project. The supplies used are listed and linked below.

Thanks for stopping by and happy stampin’!

Verity x


Product List

Good Tidings #GDP113

Hi there,

It is a Colour Challenge over at the Global Design Project this week!

Click here to see what the Design Team created to inspire us!

This combo screamed Christmas!

I have used the Good Tidings stamp set to make a background. The layers are stamped with same colour ink, but the first was stamped off to give a lighter shade. This was mounted on to Cherry Cobbler card stock and then on to a Pool Party card base.

The sentiment, I stamped in Pear Pizzazz and used the Layering Square framelit to cut it out.

I wanted a narrow border of red peeking out from behind this, so I cut this with my trimmer.

Finally, this was added to a Pol Party Scalloped square, and the on to the card with dimensionals.

A small bow tied from Pool Party Shimmer ribbon completed the card.

I hope you enjoyed the project today. Thanks for stopping by and happy stampin’!

Verity x

Product List

Many Marvellous Markers

Good Morning Everybody,

Today’s project is a special thank you to my fab upline Sam Hammond …. Not only does she love rainbows, but I have used the Many Marvellous Marker collection which I only have because of her amazing generosity.

I have used the “acrylic block technique” to make this colourful background.

By adding ink from the stampin’ write markers on to the block, lightly spritzing with water and then stamping this on to watercolour paper – that’s it!

Leave it to dry and then cut it to size.

The stampin’ write markers can be used for stamping too! The sentiment from All Things Thanks was coloured with three markers, Smoky Slate, Basic Grey and Basic Black for a gradient effect.

I finished the card with black bakers twine and rhinestones.

I hope you enjoyed this project. To get your hands on these marvellous products click the links below.

Thanks for stopping by and happy stampin’!

Verity x

Product List

Clear Block E

[118484]

£11.00

Half Full

What an amazing weekend! Becoming a Stampin’ Up! Demonstrator was the best decision ever.

Yesterday was a team day put together by my upline Sam Hammond and Caroline Helwigh.

During the day, we had the opportunity to work with the Half Full stamp set.

I made three cards in the time we had… including a Christmas card with not a wine glass in sight!

The images were coloured using blender pens and ink. I can’t wait to try watercolour pencils and Stampin’ Blends with this set too!

Once coloured, the images were layered up and simply attached to card bases.

I hope you enjoyed this project. The supplies used are listed and linked below.

Thanks for stopping by and happy stampin’!

Verity x

Product List

Blender Pens

[102845]

£10.75

Simple Birthday

It is a super exciting day today…..I am surrounded by fellow demonstrators at the Stampin’ Up! On-Stage event!

And on Sunday, I will be training with my upline and my sister demonstrators. Busy busy busy!

In light of this, I am sharing a very simple card today made using the Happiest of Days stamp set.

I have used Sweet Sugarplum ink to randomly stamp the rose design over a Whisper White card layer.

The sentiment was cut in to a banner and embellished with gold mini sequin trim and Sweet Sugarplum striped grosgrain ribbon.

I hope you enjoyed this quick project. Thanks for stopping and happy stampin’!

Verity x

Product List

For Mum

Good Morning!

I made this card especially for my mother-in-law’s birthday last weekend.

I used the beautiful Stampin’ Blends to colour the rose image. The darkest shades of Cherry Cobbler were used in the centre, gradually blending in the lighter shades of Calypso Coral towards the edges.

The leaves were coloured with Old Olive markers. The dark shade was added along the veins of the leaves and then blended with the light marker.

The dies were used to cut a black outline image and the sentiment.

The fine tip glue pen was used to adhere the delicate outline. The sentiment was raised on dimensionals. The panel was added to a Calypso Coral card base.

I hope you enjoyed this project. The supplies used are listed and linked below.

Thanks for stopping by and happy stampin’!

Verity x

Product List

Happy Birthday to You

Good Morning,

I discovered the Happy Celebrations stamp set had this great bold lettering perfect for some Stampin’ Blend colouring!

I stamped the sentiment on to a scrap of Whisper White card stock using Tuxedo Black Memento ink.

Once completely dry, I used Rich Razzleberry Stampin’ Blend markers the colour the image. To achieve this, each letter was coloured individually, starting with the lightest shade. The dark marker was used at the bottom, and blended out to the top with the light marker.

The coloured panel was adhered to a piece of vellum with Fast Fuse adhesive.

The card base was made with Rich Razzleberry card stock. A piece of striped paper from the Birthday Memories designer series paper collection was chosen as the background.

The sentiment was added to the card with dimensionals and some rhinestones provided a bit of sparkle.

I hope you enjoyed this project. The supplies used are listed and linked to the shop below.

Thanks for stopping by and happy stampin’!

Verity x

Product List

Bee Happy #GDP112

Hi folks,

It’s Wednesday, it’s Global Design Project day!

This week the challenge is to case the designer Connie Collins. Take a look at what the Design Team made here.

And this is what I made based upon her design.

A Daffodil Delight card layer was stamped using the bee image from the Dragonfly Dreams stamp set and Daffodil Delight ink.

Some black shimmer ribbon was added to the left hand side before adhering to a black card base.

A piece of Whisper White card stock was cut to 2-3/4 by 4-3/4. Three bees were stamped toward the top, which were coloured using Stampin’ Blends. This was added to a slightly larger black layer. This was added to the card with dimensionals.

The sentiment from the same stamp set was heat embossed with white powder and cut to a banner. This was adhered with Fast Fuse adhesive.

To finish off the card, some clear Wink of Stellar was added to the bees’ wings and a few black rhinestones provided a bit of bling.

I hope you enjoyed this project. The supplies used are listed below.

Thanks for stopping by and happy stampin’!

Verity x

Product List

Count my Blessings

Good Morning,

I thought i would get in another autumn card before winter really starts to bite.

I have used an old favourite stamp set, Vintage Leaves.

On a Whisper White card layer, I stamped small leaves with Old Olive ink. I used first, second and third generation stamping.

The large leaf was stamped in Garden Green ink and then coloured with Old Olive and Pumpkin Pie Stampin’ Blend markers. This was fussy cut and some linen thread was added to the stem.

The sentiment was taken from Count my Blessings and was stamped with Tranquil Tide ink on to a strip of Whisper White card stock. The bottom edge was cut to a banner and the adhered with dimensionals.

The leaf was layered on to the largest Stitched circle die cut and added using Fast Fuse adhesive.

Finally, the panel was adhered to a Tranquil Tide card base.

I hope you enjoyed this project. The supplies used are listed and linked below.

Thanks for stopping by and happy stampin’!

Verity x

Product List

Linen Thread

[104199]

£4.25

Inspire.Create.Challenge #004

Hi there,

The Inspire.Create.Challenge this week is a colour challenge. See what the design team created here

This is my project.

I have used Painted Harvest to make my card.

I started by experimenting with the blue inks. I wasn’t sure that they would go together, but the result was beautiful.

I decided to keep the accompanying leaves plain white.

The sentiment was stamped in Flirty Flamingo and cut with my favourite Starburst punch. I also punched some Flirty Flamingo card stock to lie underneath.

I used a Whisper White card base and added layers of Island Indigo and Calypso Coral.

The white layer was stamped with foliage from the set using both Island Indigo and Soft Sky inks.

Some Flirty Flamingo Striped Grosgrain ribbon was added across the middle. The sentiment and flower were added with dimensionals.


I hope you enjoyed this project. The supplies used are listed below.

Thanks for stopping by and happy stampin’!

Verity x


Product List

Merry and Bright

Good Morning,

A couple of weeks ago I made a card for the Global Design Project using Old Olive, Basic Black and Gold.

I have revisited the layout I used for that project to make 2 cards, this time using Merry Little Christmas designer series paper.

Card bases were A4 cut at 4-1/8 and scored at 5-7/8

DSP cut to 4 by 5-3/4 and 3 by 4-3/4

Card stock cut to 3-1/8 by 4-7/8

The sentiment is taken from the Hearts Come Home stamp set. This was stamped in versamark and heat embossed with gold powder, then die cut using a Stitched Shape framelit.

Shimmer Ribbon was used to make the bows which were added with a glue dot.

I hope you enjoyed this project. The supplies used are listed and linked below.

Thanks for stopping by and happy stampin’!

Verity x

Product List

Time to Party

Good Morning,

I thought I would make something happy and bright for today’s post.

I have used the Confetti Celebration stamp set.

The card base is made with Lemon Lime Twist card stock.

A Whisper White card layer was stamped with Crushed Curry and Berry Burst stars.

Some Bermuda Bay mini chevron ribbon was added across the centre.

The large sentiment was stamped with Bermuda Bay ink and cut with the Starburst punch. The edges were lightly inked with a sponge dauber. This adhered to a Stitched Circle with dimensionals.

Happy Birthday was stamped in Island Indigo ink and cut with the Classic Label punch.

To finish a small bow was added to the card.

I hope you enjoyed this project. The supplies used are listed and linked below.

Thanks for stopping by and happy stampin’!

Verity x

Product List

Celebrate

Hi there,

The launch of Stampin’ Blends also means the Color Me Happy stamp set will be available – but only while stocks last.

The set includes these adorable lanterns.

I have used;

  • Cherry Cobbler
  • Old Olive
  • Pool Party
  • Bermuda Bay
  • Daffodil Delight
  • Rich Razzleberry

The panel was mounted on to a Very Vanilla card base.

A few rhinestones adds some sparkle.

I hope you enjoyed this project. The supplies used are listed and linked below.

Thanks for stopping by and happy stampin’!

Verity x

Product List

Blended Bears

I am so in love with the new Stampin’ Blends and these little bears are so adorable.

The stamp set I have used is A Little Wild, which was stamped with Memento ink on to thick Whisper White card stock.

The colours I have used on each bear are;

  • Bronze and Ivory,
  • Light and Dark Smoky Slate,
  • Dark and Light Crumb Cake,
  • Light Smoky Slate and Colour Lifter.

The coloured bears were fussy cut and adhered to a Stitched Circle.

A Starburst punch shaped was coloured with a coordinating Stampin’ Blend marker. The bears were added with dimensionals.

The Scallop Tag Topper punch was used to cut Whisper White card stock.

Each tag was finished with tiny bees from the same stamp set, and some Natural Trim.

I hope you enjoyed this project. The supplies used are listed and linked to the online shop.

Thanks for stopping by and gappy stampin’!

Verity x

Product List

First Communion #GDP111

Good Morning,

It’s Wednesday – that means its Global Design Project day. This week is a theme challenge.

You can see what the design team created here.

… And this is my interpretation of the challenge…

img_20171031_210931_415_wm-777913213.jpg

I have used the Inspired Events stamp set to make this beautiful card to celebrate a First Communion.

The card base is made with Pink Pirouette card stock. The white card layer was decorated using the fancy corner stamp in Pink Pirouette ink.

A piece of Whisper White was cut 1 inch shorter and narrower. The large decorative stamp was used along the bottom edge and some Powder Pink ribbon was wrapped around it. The sentiment was added to the top right corner.

The flowers were coloured using Stampin’ Blends. Some sparkle was added with Wink of Stella.

To complete the card, I tied a small bow and used rhinestones to decorate the ribbon.


I hope you enjoyed this project. The supplies used are listed below.

Thanks for stopping by and happy stampin’!

Verity x


Product List

Stampin’ Blends

I am so excited to share these cards that I made using the brand spanking shiny new alcohol markers from Stampin’ Up!

There are 12 colours to choose from, a light and dark shade of each. In addition, there is a Bronze and Ivory marker which are great for skin tones. The Colour Lifter helps with blending, erasing small mistakes or adding highlights.

To demonstrate the effects that can be achieved,I picked out the Remarkable You stamp set.

The images were stamped with Memento (water based) ink. Starting at the bottom, I used:

Dark and Light Calypso Coral.

Light Calypso Coral and Pumpkin Pie.

Light Pumpkin Pie and Daffodil Delight.

Dark and Light Daffodil Delight.

To create the blend, the image was coloured with the lightest shade first, added shadow and then blended this out with the light shade again.

A softer look can also be achieved too. Applying some colour in small areas and using the colour lifter to blend creates an illusion of depth on white objects. A halo of Pool Party also blended with the colour lifter provides definition from the white background.

I hope this has given you some ideas.

Get your markers from 1st November, or join the Stampin’ Up! family and add them to your starter kit.

Look out for more projects coming soon.

Thanks for stopping by and happy stampin’!

Verity x

Product List

DSP Note Card Mix

Hi folks,

I shared some note cards a couple of days ago which were very popular. So here are some more using some of the papers included in the paper sale which ends on 31st October – so there’s still time to get yours.

These 4 use A Whole Lot of Lovely to cover the card with a simple black sentiment from the coordinating stamp set Lots of Love.


Birthday Memories was used for these cards. I used the same layout as the original post. The sentiments are taken from Happy Birthday Gorgeous.


Here is Pick a Pattern. This is quite a quirky designer paper, but looks great here. The pieces were cut on the diagonal for a different look. The sentiments are taken from Patterns and Pieces and cut and mounted in different ways.


Finally, I used Christmas Around the World. This pack has some very bold designs on one side, but the other side has some more traditional designs which I used on these cards. I teamed this with Foil Snowflakes and a sentiment from Hearts Come Home.


So I hope this gives you some ideas.

Thanks for stopping by an happy stampin’!

Verity x


Product List