InspireINK Blog Hop – Birthdays

Good Morning Everybody,

Welcome to this month’s InspireINK blog hop. This time we have a theme challenge.

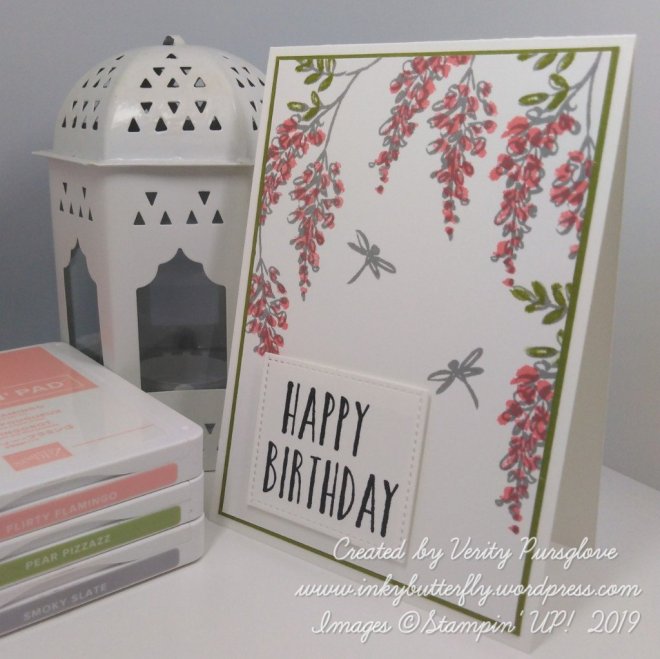
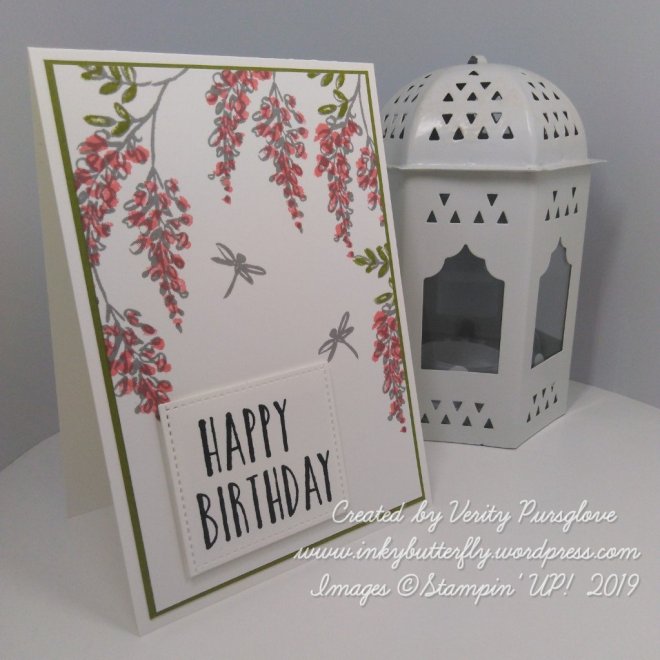
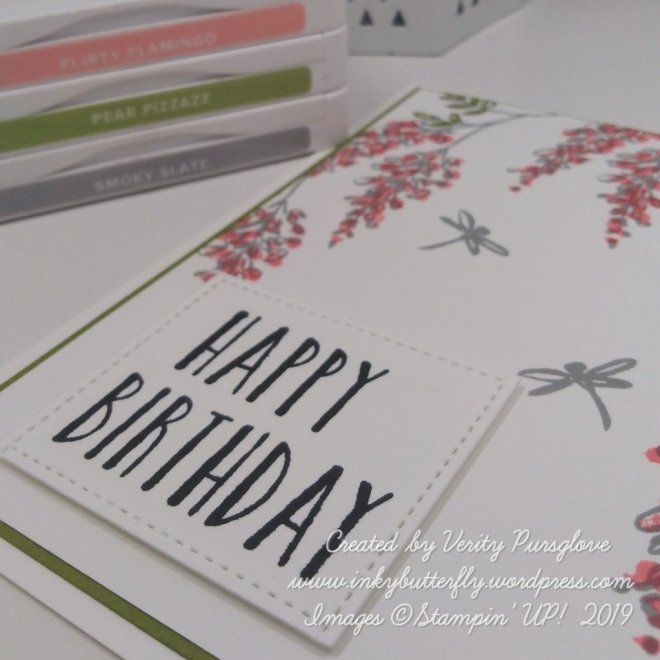
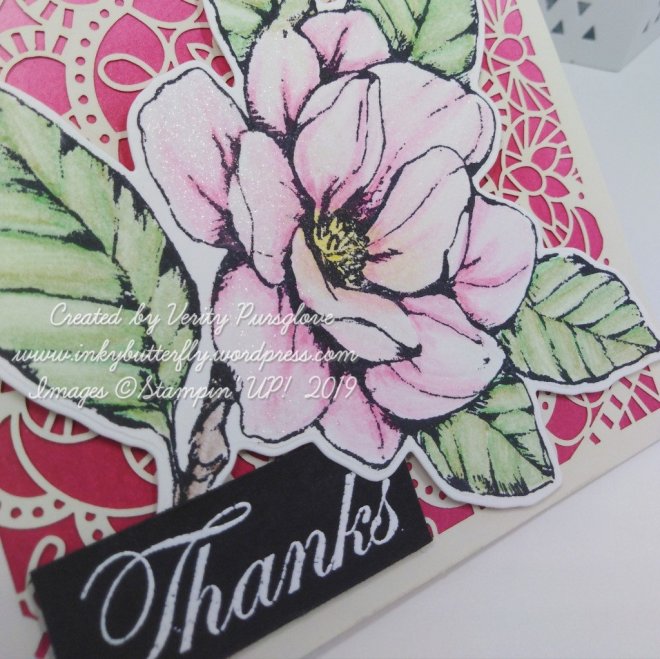
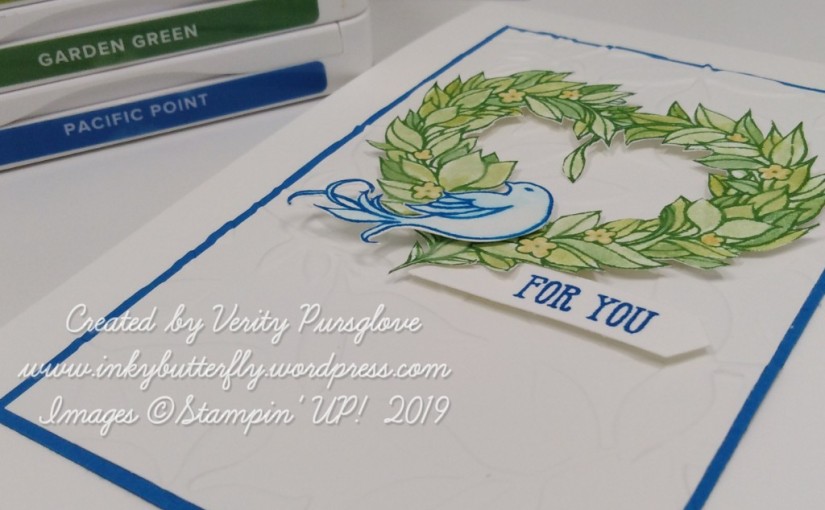
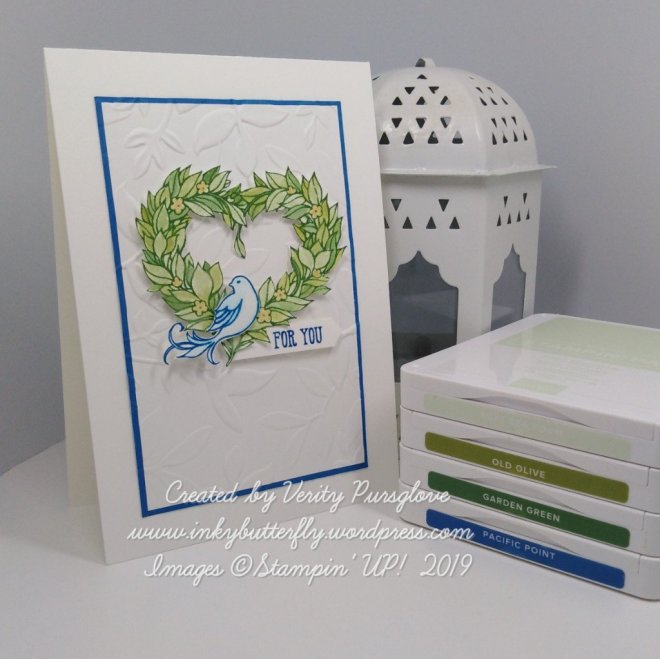
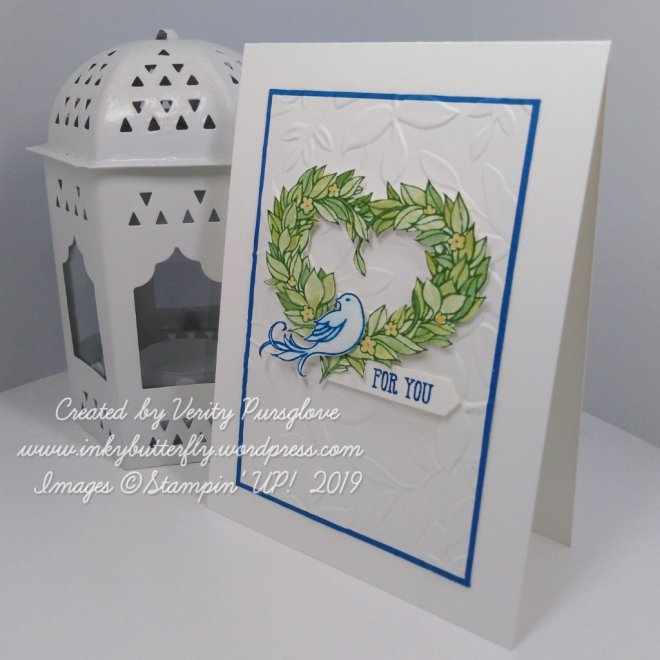
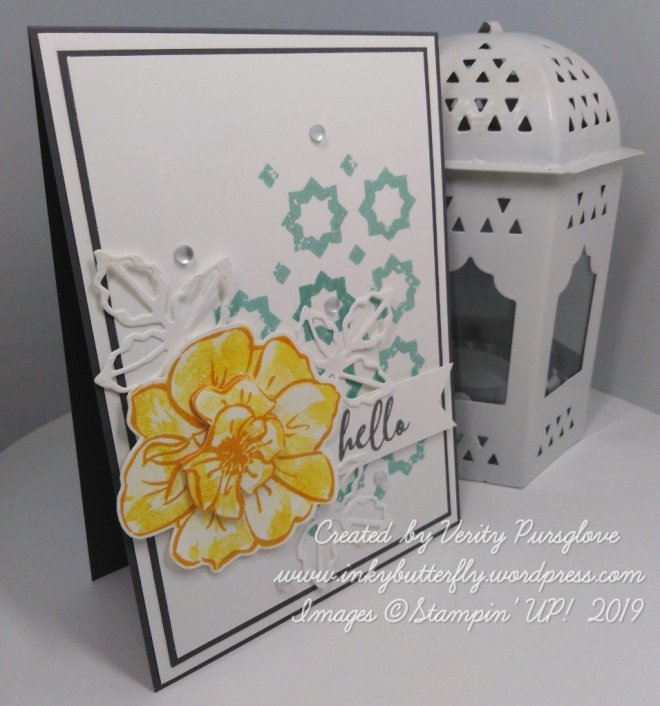
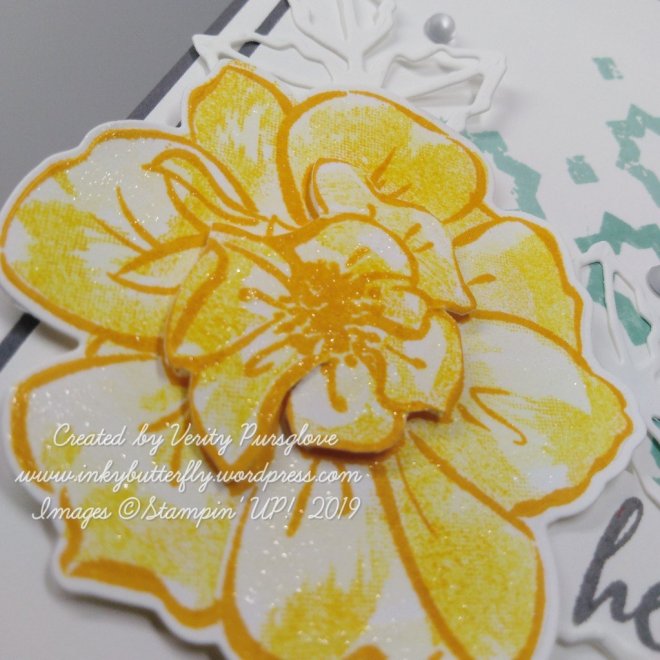
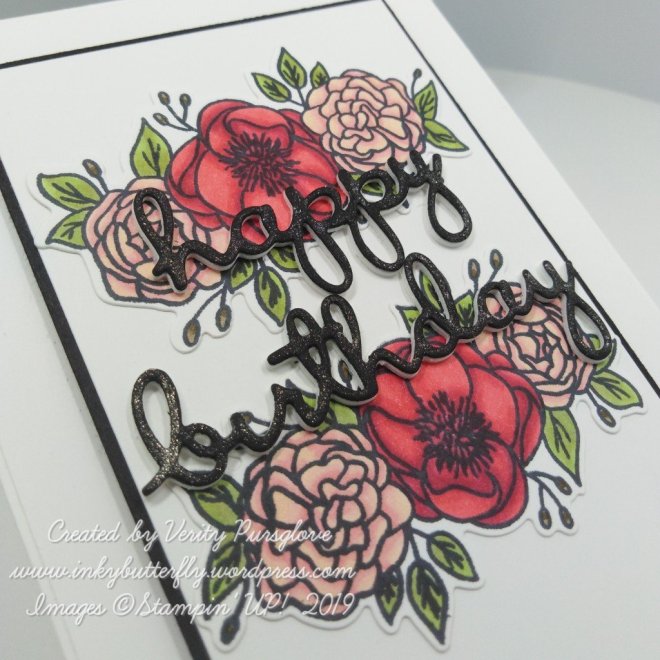
I have chose to work with the Bloom and Grow bundle for this challenge.

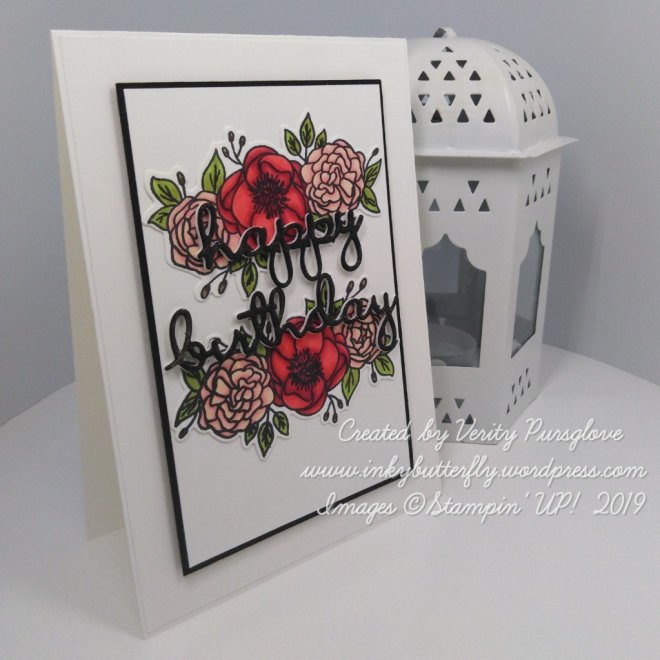
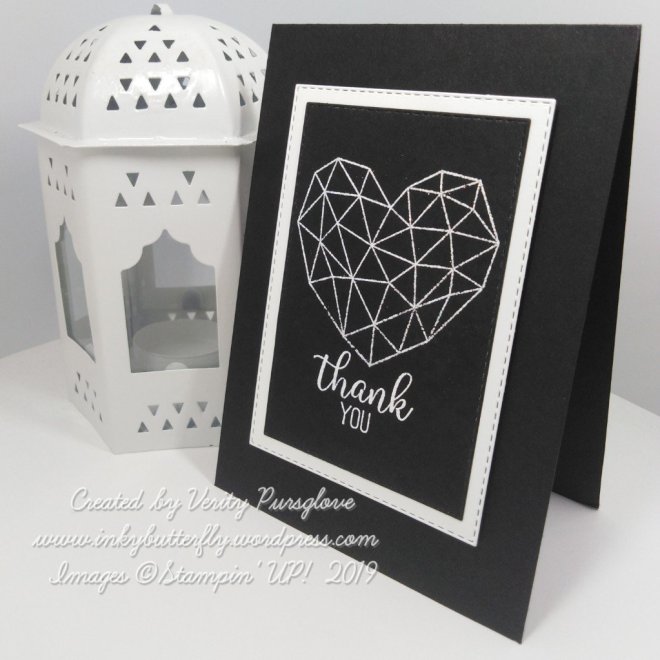
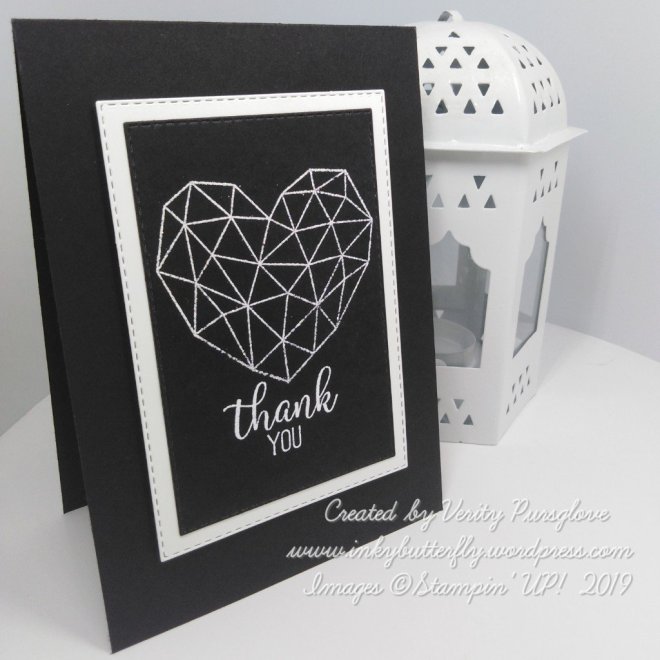
The florals were stamped with Memento Ink to allow Colouring with Stampin’ Blends Markers.

The combinations I used were;

Dark Cherry Cobbler, Dark Real Red, and Dark Poppy Parade

Light Flirty Flamingo, Dark Petal Pink, and Light Petal Pink

Dark Mossy Meadow, Dark Shaded Spruce, and Dark Old Olive.

The coloured images were die cut ready to adhere to the card.

Happy Birthday was die cut from white fun foam and Basic Black card stock and adhered together.

Black and White card layers were prepared and added to a white card white card base.

The decorative elements were laid out on the card before adhering with Multipurpose glue.

Wink of Stella Glitter was added to the lettering as a finishing touch.

Please be sure to click through all the projects in the hop by clicking at the bottom of this post.

Click here for the other projects in the hop!

You are invited to the Inlinkz link party!

Click here to see the other projects

I hope you enjoyed this project. The supplies used are listed below.

Thanks for stopping by today and happy Stampin’!

Verity xx

Product List

Embossed Modern Heart

Hello Everyone.

Those of you who follow me, will know I usually use white card bases, so today I am switching it up…. with black!

I fancied trying to emboss this lovely heart image with white powder. I really liked the look but thought it needed some layers to carry it off.

I added the sentiment first also heat embossed in white, the die cut with a Stitched Rectangle.

This was layered on to a white rectangle cut from white card stock before adhering to the card base.

I hope you enjoyed this project. The supplies used are listed and linked to the online store below.

I would love to be your demonstrator.

Thanks for stopping by today and happy Stampin’!

Verity xx

Product List

Happy Birthday with Soft Spring

Hello Everyone,

Today’s card features the Soft Spring hostess stamp set.

You can get this stamp set with an order of £150 or more…. Club together with friends or just treat yourself!

The outline image was stamped with Smoky Slate ink around the top of a Whisper White card layer.

Flirty Flamingo and Pear Pizzazz inks were used to fill in the spaces.

The large happy birthday was taken from the Perennial Birthday stamp set. I cut this with a Stitched Square Die.

The panel was layered on to Pear Pizzazz card stock and then on to a Whisper White card base.

I hope you enjoyed this project. The supplies used are listed and linked to the online store below.

I would love to be your demonstrator.

Thanks for stopping by today and happy Stampin’!

Verity xx

Product List

Time for Tags!

Hello Everyone,

Something a bit different today with these cute tags.

The stamp set is only available on orders over £150 – club together with friends or just treat yourself!

Each image was stamped with Memento Ink so that I could use my Stampin’ Blends Markers to colour them in.

Three markers were used for most sections – I didn’t necessarily stick to the same colour – for the red in the balloon I used dark Cherry Cobbler, light Real Red and light Poppy Parade.

Try out the colours on scrap card first to see if they work.

The images were cut with the matching punch.

I cut strips of Whisper White card stock 1-1/2 by 3-1/2 inches and 2 by 4-1/4 inches. The strips were cut with the tag Topper punch. The largest tag was sponged with Pool Party Ink.

White Flax ribbon was looped through the top of the tags with the coloured images added with dimensionals.

I hope you enjoyed this project. The supplies used are listed and linked to the online store below.

I would love to be your demonstrator.

Thanks for stopping by today and happy Stampin’!

Verity xx

Product List

Magnolia Thanks

Hello Everyone,

There’s lots going on with this card, it was so much fun to make.

The Magnolia was stamped with Stazon Ink and coloured with watercolour pencils and die cut.

I wanted to use one of the laser cut note cards. I inked a piece kf Whisper White card stock with Melon Mambo ink and adhered this behind the front panel.

I added the Magnolia with dimensionals. The sentiment was heat embossed on black card stock.

I hope you enjoyed this project. The supplies used are listed and linked to the online store below.

I would love to be your demonstrator.

Thanks for stopping by today and happy Stampin’!

Verity xx

Product List

Watercoloured Shimmer Petals

Hello Everyone,

The Shimmer White Embossing powder was a new addition to the 2019 catalogue… I can’t believe I have waited so long to use it.

These watercoloured flowers look amazing….

The flowers were stamped with versamark ink on to watercolour paper and embossed with Shimmer White powder.

I used a selection of inks to paint the Petals. Once dry, they were cut out with the coordinating punch.

I prepped a card base with the speckles from the Waterfront stamp set using Grey Granite ink.

The flowers were arranged in a circle to form a rainbow.

The sentiment, also from the Waterfront set, was stamped on to a 2 inch circle and added to the centre of the card with dimensionals.

I hope you enjoyed this project. The supplies used are listed and linked to the online store below.

I would love to be your demonstrator.

Thanks for stopping by today and happy Stampin’!

Verity xx

Product List

Aqua Painters

[103954]

£16.00

So Much to Love

Hello Everyone,

Today I am using die cuts to create a faux embossed look.

The die I have used for the background is from the Wild Rose set. It was cut 4 times and adhered to the card evenly spaced. The overhanging pieces were then trimmed away.

I picked out a sentiment from the Abstract Impressions stamp set. This was heat embossed with silver powder and cut with a Stitched Rectangle Die.

I didn’t like the sentiment on the card as it was, so I added a layer of vellum behind it which looked much better.

I hope you enjoyed this project. The supplies used are listed and linked to the online store below.

I would love to be your demonstrator.

Thanks for stopping by today and happy Stampin’!

Verity xx

Product List

Keeping it Simple – Part 4

Hello Everyone,

Welcome to part 4 of this series all about keeping it simple. Limited supplies doesn’t mean limited options!

So today, it is the layout that has been changed, opting for a square stamped panel as the focal point.

As before, I used Rich Razzleberry Ink to stamp the leaves from the Tropical Chic stamp set and layered this on to matching card stock.

The tulle ribbon was wrapped and tied around the panel before adhering to a white card base with dimensionals.

Also, as before, the sentiment was cut with the Tailored Tag Punch and some rhinestones finished the card.

I hope you enjoyed this project. The supplies used are listed and linked to the online store below.

I would love to be your demonstrator.

Thanks for stopping by today and happy Stampin’!

Verity xx

Product List

Here’s a reminder of the previous cards made with these supplies!

For You

Hello Everyone,

How do you like this colour combination? This was quite accidental but think it looks great.

The process started with the wreath which was stamped with Garden Green ink. The leaves were watercoloured using Sof Sea Foam and Old Olive ink.

The bidr was stamped with Pacific Point ink. A Wink of Stella Glitter brush pen pulled the colour from the outline to colour the image.

Both were allowed to dry before fussy cutting them out.

The background panel was layered with Pacific Point card stock and embossed with the Layered Leaves folder.

The fussy cut pieces were added with dimensionals with a tiny sentiment tag tucked in underneath.

I hope you enjoyed this project. The supplies used are listed and linked to the online store below.

I would love to be your demonstrator.

Thanks for stopping by today and happy Stampin’!

Verity xx

Product List

Aqua Painters

[103954]

£16.00

Paper Snips

[103579]

£9.25

Free as a Bird Thank You card

Hello Everyone,

So I admit it…. I have been avoiding using this set. At launch there were so many lovely things being made with this set, but now I want to share a card with you.

It’s nothing fancy but like how it turned out.

I started with main image which I stamped with Memento Ink and coloured with Stampin’ Blends. I used a reference image to make my birds in to bluetits.

I die cut the image with a Nested Die and also cut the small thank you sentiment.

Leaves were stamped and coloured on a card layer before adhering the birds with dimensionals.

I hope you enjoyed this project. The supplies used are listed and linked to the online store below.

I would love to be your demonstrator.

Thanks for stopping by today and happy Stampin’!

Verity xx

Product List

Inspire.Create #049

Hello Everyone,

Welcome to my blog. Every other Monday I share my project that I have used as my entry for the Inspire.Create challenge.

This time it’s a colour challenge. The design team have made some wonderful samples as inspiration. You can see them here.

And this is what I created!

I prepared a Basic Grey card base and added a white card layer.

A smaller layer was used to stamp a background with Pool Party Ink using the Verdant Garden stamp set. This was matted on to more Basic Grey card stock and adhered to the card base.

Mango Melody ink was used to stamp the floral from the To a Wild Rose stamp set. The centre portion was stamped again and layered onto the first.

The sentiment was stamped with Basic Grey ink and tucked behind the flower.

As finishing touches, I added some die cut leaves, frosted epoxy dots and some Wink of Stella Glitter.

I hope you enjoyed this project. The supplies used are listed and linked to the online store below.

I would love to be your demonstrator.

Thanks for stopping by today and happy Stampin’!

Verity xx

Product List

Wonderful Rococo Rose

Hello Everyone,

Do you like the flowers I have used on my card today?

Read on to find out how I made them.

I started by making a Whisper White card base and embossed it with the Subtle embossing folder.

The background leaves were cut from vellum using a die from the, Well Written Die set.

I chose the sentiment from the Rooted in Nature stamp set and cut this with a Stitched Rectangle Die.

For the flowers I first cut circles with the Scalloped circle punches. The circles were then cut again using the Medium Daisy Punch.

The smaller flower was adhered to the larger one and a Rococo Rose faceted gem was added to the centre.

Some Soft Sea Foam leaves completed the card.

I hope you enjoyed this project. The supplies used are listed and linked to the online store below.

I would love to be your demonstrator.

Thanks for stopping by today and happy Stampin’!

Verity xx

Product List

Leaf Punch

[144667]

£15.00

Project Share Project

Hello Everyone,

Welcome to this week’s Project Share. As always my friends have created some lovely work. Please use the links to visit their blogs and read more about their projects.

Jill made this rainbow background for her card… I really like it, though Jill doesn’t agree in her blog post! What do you think?

Visit Jill’s blog here

Heather has made this cute little project with the Follow Your Art suite. Find out what inspired her along with all the measurements in her blog post!

Visit Heather’s blog here

Gez’s project holds some treats for those avoiding chocolate. Who said low cal snacks had to be boring?!

Visit Gez’s blog here

I hope you enjoyed these projects. The supplies used are listed and linked to the online store below.

I would love to be your demonstrator.

Thanks for stopping by today and happy Stampin’!

Verity xx

Product List

Time to Shine

Hello Everyone,

Today’s card uses ink blending to create a background.

Sponge daubers were used to apply three shades of ink to a card layer. This was allowed to dry completely.

The leaf from the Daisy Lane stamp set was stamped with versamark ink and embossed using clear powder.

The sentiment was stamped on to vellum and embossed with white powder and wrapped around the blended panel.

This was then matted on to white card stock and adhered to a white card base with dimensionals.

I hope you enjoyed this project. The supplies used are listed and linked to the online store below.

I would love to be your demonstrator.

Thanks for stopping by today and happy Stampin’!

Verity xx

Product List

Blissful Future

Hello Everyone,

I really love using coordinating punches with stamps to make dimensional elements for my cards.

Today I am using the Floral Essence bundle.

Blushing Bride Ink was used to stamp the petals and punched. A ball tool was used to shape each part before adhering together with Multipurpose glue.

I also stamped and punched some leaves.

A pearlized doily was added to a white card base. The sentiment was stamped with Basic Gray ink and adhered with dimensionals.

The flowers were added next overlapping the sentiment, followed by the leaves.

A clear faceted gem was placed in the centre of the flowers to complete the card.

I hope you enjoyed this project. The supplies used are listed and linked to the online store below.

I would love to be your demonstrator.

Thanks for stopping by today and happy Stampin’!

Verity xx

Product List

Leaf Punch

[144667]

£15.00

Keeping it Simple – Part 3

Hello Everyone,

Here’s another keep it simple card….

This time I have added a punch to the supply list and used a simple stamping technique to get more from a single ink pad.

The background panel has been stamped with second generation ink…. This means inking the stamp, stamping on to scrap card and then using the second impression on the project. This gives a lighter shade without buying extra ink colours.

The Tailored Tag Punch was used to cut the sentiment.

I hope you enjoyed this project. The supplies used are listed and linked to the online store below.

I would love to be your demonstrator.

Thanks for stopping by today and happy Stampin’!

Verity xx

Product List

Embossed Delightful Birthday

Hello Everyone,

I thought I would get my embossing powders out today to create these simple stamping cards.

For the background stamping I used the Artisan Textures stamp set with a trio of ink colours, working from light to dark.

An embossing buddy ensured the ink was completely dry before adding the sentiment with versamark ink.

Embossing powder was sprinkled over the stamped sentiment and heated until melted.

The toppers were adhered to white card bases with dimensionals.

I hope you enjoyed this project. The supplies used are listed and linked to the online store below.

I would love to be your demonstrator.

Thanks for stopping by today and happy Stampin’!

Verity xx

Product List

Garden of Life

Hello Everyone,

I love the colour palette that made this card…. Rococco Rose fits in perfectly.

I used A Big Thank You to stamp the background and layered this on to Rich Razzleberry card stock.

The sentiment was cut using the Pretty Label Punch.

Petal Pink ribbon tied in a bow completed the card.

I hope you enjoyed this project. The supplies used are listed and linked to the online store below.

I would love to be your demonstrator.

Thanks for stopping by today and happy Stampin’!

Verity xx

Product List

Make a Wish

Hello Everyone,

Today’s card features the Broadway Birthday stamp set.

I love the little dot detail stamps that can be used to add some showbiz bling to the bold lettering. I decided to heat emboss these with gold powder.

I hope you enjoyed this project. The supplies used are listed and linked to the online store below.

I would love to be your demonstrator.

Thanks for stopping by today and happy Stampin’!

Verity xx

Product List

More Perennial Birthday

Hello Everyone,

Perennial Birthday is a great go to set for a beautiful but quick birthday card.

For today’s card I have used combined some of the new In Colours with a favourite from the Stampin Up colour palette.

The flowers were stamped on to a card layer using Seaside Spray and Mint Macaron inks.

This was layered with Pretty Peacock card stock and adhered to a Whisper White card base.

Pretty Peacock ink was used to stamp the sentiment.

I hope you enjoyed this project. The supplies used are listed and linked to the online store below.

I would love to be your demonstrator.

Thanks for stopping by today and happy Stampin’!

Verity xx

Product List