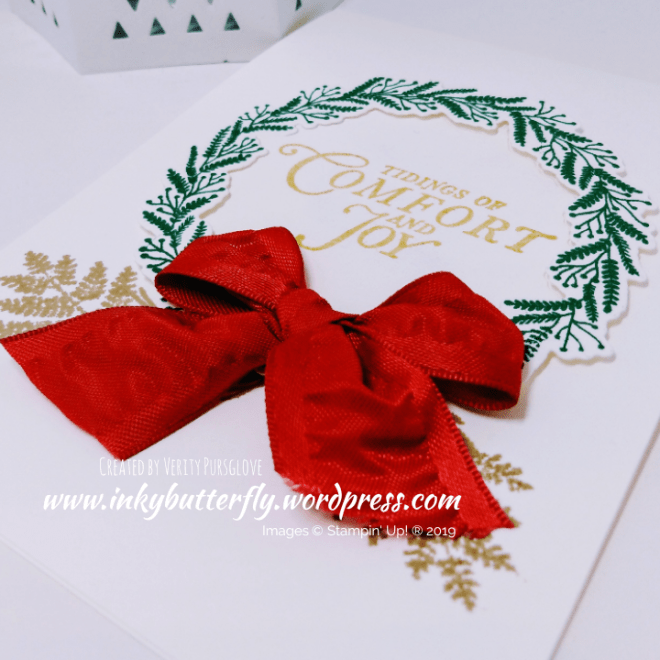
Keeping it Simple – Part 4

Hello Everyone,

Welcome to part 4 of this series all about keeping it simple. Limited supplies doesn’t mean limited options!

So today, it is the layout that has been changed, opting for a square stamped panel as the focal point.

As before, I used Rich Razzleberry Ink to stamp the leaves from the Tropical Chic stamp set and layered this on to matching card stock.

The tulle ribbon was wrapped and tied around the panel before adhering to a white card base with dimensionals.

Also, as before, the sentiment was cut with the Tailored Tag Punch and some rhinestones finished the card.

I hope you enjoyed this project. The supplies used are listed and linked to the online store below.

I would love to be your demonstrator.

Thanks for stopping by today and happy Stampin’!

Verity xx

Product List

Here’s a reminder of the previous cards made with these supplies!

Project Share Project

Hello Everyone,

Welcome to this week’s Project Share. As always my friends have created some lovely work. Please use the links to visit their blogs and read more about their projects.

Jill has made something a little different with this twisted easel fancy fold. I like the way the Daisy forms the stopper and the cute background.

Visit Jill’s blog here

Heather has been playing with a card kit. It’s so tempting to just create the cards as intended but with a bit of imagination there is so much more that can be done.

Visit Heather’s blog here

Gez has made this floating frame card. This technique is very popular at the moment, made easy using a product available in America… So she picked some up whilst on holiday!

Visit Gez’s blog here

I hope you enjoyed these projects. The supplies used are listed and linked to the online store below.

I would love to be your demonstrator.

Thanks for stopping by today and happy Stampin’!

Verity xx

Product List

For You

Hello Everyone,

How do you like this colour combination? This was quite accidental but think it looks great.

The process started with the wreath which was stamped with Garden Green ink. The leaves were watercoloured using Sof Sea Foam and Old Olive ink.

The bidr was stamped with Pacific Point ink. A Wink of Stella Glitter brush pen pulled the colour from the outline to colour the image.

Both were allowed to dry before fussy cutting them out.

The background panel was layered with Pacific Point card stock and embossed with the Layered Leaves folder.

The fussy cut pieces were added with dimensionals with a tiny sentiment tag tucked in underneath.

I hope you enjoyed this project. The supplies used are listed and linked to the online store below.

I would love to be your demonstrator.

Thanks for stopping by today and happy Stampin’!

Verity xx

Product List

Aqua Painters

[103954]

£16.00

Paper Snips

[103579]

£9.25

Free as a Bird Thank You card

Hello Everyone,

So I admit it…. I have been avoiding using this set. At launch there were so many lovely things being made with this set, but now I want to share a card with you.

It’s nothing fancy but like how it turned out.

I started with main image which I stamped with Memento Ink and coloured with Stampin’ Blends. I used a reference image to make my birds in to bluetits.

I die cut the image with a Nested Die and also cut the small thank you sentiment.

Leaves were stamped and coloured on a card layer before adhering the birds with dimensionals.

I hope you enjoyed this project. The supplies used are listed and linked to the online store below.

I would love to be your demonstrator.

Thanks for stopping by today and happy Stampin’!

Verity xx

Product List

Inspire.Create #049

Hello Everyone,

Welcome to my blog. Every other Monday I share my project that I have used as my entry for the Inspire.Create challenge.

This time it’s a colour challenge. The design team have made some wonderful samples as inspiration. You can see them here.

And this is what I created!

I prepared a Basic Grey card base and added a white card layer.

A smaller layer was used to stamp a background with Pool Party Ink using the Verdant Garden stamp set. This was matted on to more Basic Grey card stock and adhered to the card base.

Mango Melody ink was used to stamp the floral from the To a Wild Rose stamp set. The centre portion was stamped again and layered onto the first.

The sentiment was stamped with Basic Grey ink and tucked behind the flower.

As finishing touches, I added some die cut leaves, frosted epoxy dots and some Wink of Stella Glitter.

I hope you enjoyed this project. The supplies used are listed and linked to the online store below.

I would love to be your demonstrator.

Thanks for stopping by today and happy Stampin’!

Verity xx

Product List

Wonderful Rococo Rose

Hello Everyone,

Do you like the flowers I have used on my card today?

Read on to find out how I made them.

I started by making a Whisper White card base and embossed it with the Subtle embossing folder.

The background leaves were cut from vellum using a die from the, Well Written Die set.

I chose the sentiment from the Rooted in Nature stamp set and cut this with a Stitched Rectangle Die.

For the flowers I first cut circles with the Scalloped circle punches. The circles were then cut again using the Medium Daisy Punch.

The smaller flower was adhered to the larger one and a Rococo Rose faceted gem was added to the centre.

Some Soft Sea Foam leaves completed the card.

I hope you enjoyed this project. The supplies used are listed and linked to the online store below.

I would love to be your demonstrator.

Thanks for stopping by today and happy Stampin’!

Verity xx

Product List

Leaf Punch

[144667]

£15.00

Project Share Project

Hello Everyone,

Welcome to this week’s Project Share. As always my friends have created some lovely work. Please use the links to visit their blogs and read more about their projects.

Jill made this rainbow background for her card… I really like it, though Jill doesn’t agree in her blog post! What do you think?

Visit Jill’s blog here

Heather has made this cute little project with the Follow Your Art suite. Find out what inspired her along with all the measurements in her blog post!

Visit Heather’s blog here

Gez’s project holds some treats for those avoiding chocolate. Who said low cal snacks had to be boring?!

Visit Gez’s blog here

I hope you enjoyed these projects. The supplies used are listed and linked to the online store below.

I would love to be your demonstrator.

Thanks for stopping by today and happy Stampin’!

Verity xx

Product List

Blissful Future

Hello Everyone,

I really love using coordinating punches with stamps to make dimensional elements for my cards.

Today I am using the Floral Essence bundle.

Blushing Bride Ink was used to stamp the petals and punched. A ball tool was used to shape each part before adhering together with Multipurpose glue.

I also stamped and punched some leaves.

A pearlized doily was added to a white card base. The sentiment was stamped with Basic Gray ink and adhered with dimensionals.

The flowers were added next overlapping the sentiment, followed by the leaves.

A clear faceted gem was placed in the centre of the flowers to complete the card.

I hope you enjoyed this project. The supplies used are listed and linked to the online store below.

I would love to be your demonstrator.

Thanks for stopping by today and happy Stampin’!

Verity xx

Product List

Leaf Punch

[144667]

£15.00

Keeping it Simple – Part 3

Hello Everyone,

Here’s another keep it simple card….

This time I have added a punch to the supply list and used a simple stamping technique to get more from a single ink pad.

The background panel has been stamped with second generation ink…. This means inking the stamp, stamping on to scrap card and then using the second impression on the project. This gives a lighter shade without buying extra ink colours.

The Tailored Tag Punch was used to cut the sentiment.

I hope you enjoyed this project. The supplies used are listed and linked to the online store below.

I would love to be your demonstrator.

Thanks for stopping by today and happy Stampin’!

Verity xx

Product List

Embossed Delightful Birthday

Hello Everyone,

I thought I would get my embossing powders out today to create these simple stamping cards.

For the background stamping I used the Artisan Textures stamp set with a trio of ink colours, working from light to dark.

An embossing buddy ensured the ink was completely dry before adding the sentiment with versamark ink.

Embossing powder was sprinkled over the stamped sentiment and heated until melted.

The toppers were adhered to white card bases with dimensionals.

I hope you enjoyed this project. The supplies used are listed and linked to the online store below.

I would love to be your demonstrator.

Thanks for stopping by today and happy Stampin’!

Verity xx

Product List

Garden of Life

Hello Everyone,

I love the colour palette that made this card…. Rococco Rose fits in perfectly.

I used A Big Thank You to stamp the background and layered this on to Rich Razzleberry card stock.

The sentiment was cut using the Pretty Label Punch.

Petal Pink ribbon tied in a bow completed the card.

I hope you enjoyed this project. The supplies used are listed and linked to the online store below.

I would love to be your demonstrator.

Thanks for stopping by today and happy Stampin’!

Verity xx

Product List

Project Share Project

Hello Everyone,

Welcome to this week’s Project Share. As always my friends have created some lovely work. Please use the links to visit their blogs and read more about their projects.

Jill has made this lovely card. Sympathy cards are so difficult to make. The soft colour palette of the Magnolia Lane paper is perfect for this delicate occasion.

Visit Jill’s blog here

Heather has also used Designer Series Paper as the base for her card. This goes together with the Crafting Forever stamp set. This is a great card to send to crafting friends.

Visit Heather’s blog here

Gez is a whizz with a one sheet wonder. This is a great way to make multiple cards in a short space of time. The hand stamped paper can be made with any stamp set and ink colour.

Visit Gez’s blog here

I hope you enjoyed these projects. The supplies used are listed and linked to the online store below.

I would love to be your demonstrator.

Thanks for stopping by today and happy Stampin’!

Verity xx

Product List

Make a Wish

Hello Everyone,

Today’s card features the Broadway Birthday stamp set.

I love the little dot detail stamps that can be used to add some showbiz bling to the bold lettering. I decided to heat emboss these with gold powder.

I hope you enjoyed this project. The supplies used are listed and linked to the online store below.

I would love to be your demonstrator.

Thanks for stopping by today and happy Stampin’!

Verity xx

Product List

More Perennial Birthday

Hello Everyone,

Perennial Birthday is a great go to set for a beautiful but quick birthday card.

For today’s card I have used combined some of the new In Colours with a favourite from the Stampin Up colour palette.

The flowers were stamped on to a card layer using Seaside Spray and Mint Macaron inks.

This was layered with Pretty Peacock card stock and adhered to a Whisper White card base.

Pretty Peacock ink was used to stamp the sentiment.

I hope you enjoyed this project. The supplies used are listed and linked to the online store below.

I would love to be your demonstrator.

Thanks for stopping by today and happy Stampin’!

Verity xx

Product List

Inspire.Create #048

Hello Everyone,

Welcome to my blog. Every other Monday I share my project that I have used as my entry for the Inspire.Create challenge.

This time it’s a theme challenge. The design team have made some wonderful samples as inspiration. You can see them here.

And this is what I created!

I have used the Beautiful Day stamp set for a simple feminine card.

The butterfly was coloured with watercolour pencils and a blender pen.

The image is easy to cut out. The wings were shaped with a bone folder. Dimensionals were placed behind the wings to keep the shape.

For a multi coloured sentiment, the stamp was inked with Stampin’ Write Markers.

Double dimensionals added extra lift against the butterfly.

I hope you enjoyed this project. The supplies used are listed and linked to the online store below.

I would love to be your demonstrator.

Thanks for stopping by today and happy Stampin’!

Verity xx

Product List

Blender Pens

[102845]

£11.25

Let your Dreams Soar

Hello Everyone,

I really love the Above the Clouds stamp set.

So here’s another simple card usjng this set and the coordinating punch.

The layout began with the sentiment which was stamped with black ink and cut with a Stitched Rectangle Die. This was layered on to Purple Posy card stock.

I used Rococo Rose ink (stamped off) for the balloon which was cut with the punch.

The elements were adhered to the card with dimensionals. Some smaller balloons were added to the background.

I hope you enjoyed this project. The supplies used are listed and linked to the online store below.

I would love to be your demonstrator.

Why not join my team and enjoy discounted prices on your favourite Stampin’ supplies!

Thanks for stopping by today and happy Stampin’!

Verity xx

Product List

Keeping it Simple – Part 2

Hello Everyone,

You may well remember a recent post where I used minimal supplies – Keeping it simple.

Today’s card uses the same products, but added coloured card stock and an extra embellishment.

I stamped the leaves first overlapping the edges of a small card layer. This was adhered to Rich Razzleberry card stock.

The Tulle ribbon was added toward the bottom and tied in a knot.

This topper was adhered using dimensionals to a Rich Razzleberry card base pre-prepared by adding a white card layer.

The sentiment was stamped next on to a strip of card stock and adhered with dimensionals.

Some scattered rhinestones added some bling to complete the card.

I hope you enjoyed this project. The supplies used are listed and linked to the online store below.

I would love to be your demonstrator.

Why not join my team and enjoy discounted prices on your favourite Stampin’ supplies!

Thanks for stopping by today and happy Stampin’!

Verity xx

Product List

Project Share Project

Hello Everyone,Welcome to this week’s Project Share. As always my friends have created some lovely work. Please use the links to visit their blogs and read more about their projects.

This week is all about Designer Series Paper!

Jill’s lovely little treat holders look good enough to eat with the Noble Peacock foiled DSP.Visit Jill’s blog here.

Heather has used the gorgeous Magnolia Lane paper for her card. All it needs is a sentiment.Visit Heather’s blog here.

Gez has combined the Mosaic Mood stamp bundle and coordinating papers to create her layered card.Visit Gez’s blog here.

I hope you enjoyed these projects. The supplies used are listed and linked to the online store below.I would love to be your demonstrator.

Thanks for stopping by today and happy Stampin’!

Verity xx

Product List

Quick Card with Pressed Petals

Hello Everyone,

I don’t know about you, but I am super busy at the moment… So making quick cards is the order of the day.

Using Designer Series Paper is a perfect way to do this!

I picked this lovely photo realistic design from the Pressed Petals collection.

This was layered on to some Whisper White card stock and Polka Dot Tulle ribbon was tied in a knot. I adhered this layer to a white card base.

A simple sentiment was added using the Darling Label punch box and Merry Merlot ink.

I hope you enjoyed this project. The supplies used are listed and linked to the online store below.

I would love to be your demonstrator.

Thanks for stopping by today and happy Stampin’!

Verity xx

Product List

Birthday Sails

Hello Everyone,

I hope you has a great weekend!

Today’s project features the Lilypad Lake stamp set with a sentiment from Well Said.

I wanted a soft colour palette so I stamped the outline of the boats with Basic Grey ink. The sails were coloured with Stampin Blends markers.

Pool Party ink was used to stamp the ‘water’ on to a card layer.

The sentiment was stamped and die cut and adhered to the card first, followed by the boats, using dimensionals.

I hope you enjoyed this project. The supplies used are listed and linked to the online store below.I would love to be your demonstrator.

Why not join my team and enjoy discounted prices on your favourite Stampin’ supplies!

Thanks for stopping by today and happy Stampin’!

Verity xx

Product List

Lakeside Dies

[146351]

£25.00