Double Texture with Die Cuts and Embossing Folders!

Hello Everyone!

Today I am using the Nested Essentials dies with the Dotted Circles 3D embossing folder to create a background packed with texture!

You can see how I made this card in my video tutorial….

Balmy Blue, Azure Afternoon and Blueberry Bushel inks were added over the embossed panel.

The sentiment was stamped in Crumb Cake ink to match the card base.

A rainbow blend can be achieved with any red, yellow and blue ink. I used Poppy Parade, Daffodil Delight and Azure Afternoon!

The supplies used are listed and linked to the online store below.

I would love to be your demonstrator.

Thanks for stopping by today and happy Stampin’!

Verity xx

Product List

Encircled in Nature Three Ways!

Hello Everyone!

I have had this bundle on my shelf for ages, I can’t believe I haven’t inked this because it is fabulous…. And is now on the last chance list!

Sooooo … I’m cramming THREE ideas in today’s post – get it before it is gone for good!

***** ***** *****

This one is my favourite.

The scene was created on a Nested Essential die cut leaving the edge white.

The same ink was used on the card base layer and then added some iridescent striped ribbon.

***** ***** *****

I used the larger single tree image for this forest of Pretty in Pink, Petunia Pop, Berry Burst and Blackberry Bliss.

This is on Very Vanilla cardstock for a different look.

***** ***** *****

For this one I used the dies to create an aperture in some designer series paper.

More die cuts embellished the frame along with some Pecan Pie stitched ribbon.

The supplies used are listed and linked to the online store below.

I would love to be your demonstrator.

Thanks for stopping by today and happy Stampin’!

Verity xx

Product List

Inspire Create Challenge #173 – Colour Challenge!

Hello Everyone,

Today’s card is made for the latest Inspire Create Challenge Design Team!

For Challenge #173 we are using a colour challenge!

You can see the other design team projects and take part in the challenge by clicking below!

I am working with Layers of Beauty masks to create my card today

I chose Blueberry Bushel, Garden Green and Crushed Curry, (Regals), to create this card.

The image was die cut using the Deckled Rectangles and embossed with the Painted Texture folder.

For a different look, I twisted the ribbon before wrapping around the front.

For this version I used Balmy Blue, Soft Sea Foam and Lemon Lolly, (subtles).

I would love to be your demonstrator.

Thanks for stopping by today and happy Stampin’!

Verity xx

Product List

Monochrome Friday – Berry Burst!

Hello Everyone,

Today I’m bringing you the card I made for this week’s Monochromatic Instahop!

You can hop through all the projects from my post @stampinwithinkybutterfly

This week…. Berry Burst! 🌸

I have used the Layers of Beauty decorative masks to make the panel which I layered on to Berry Burst cardstock.

Some sheer ribbon was wrapped around the panel before adding to the card base.

The sentiment was heat embossed in white and cut with the Unbounded Love dies.

The supplies used are listed and linked to the online store below.

I would love to be your demonstrator.

Thanks for stopping by today and happy Stampin’!

Verity xx

Product List

Inspire Create Challenge #168 – Colour Challenge!

Hello Everyone,

Today’s card is made for the latest Inspire Create Challenge Design Team!

Challenge #168 is a Colour Challenge with a twist!

You can see the other design team projects and take part in the challenge by clicking below!

I chos to work with the Sketched Butterflies stamp set, isn’t it gorgeous!

After some experiments with various colours and techniques, I am using Real Red, Melon Mambo and Gorgeous Grape to create an ink blended background

You can see how I made it in my You Tube video tutorial…

A spritz of water lifts some ink which looks so cool.

I love the Unbounded Love dies, these can used a

Here’s an alternative design with the red and pink tones covering more of the background. I have also switched the ribbon I used too.

I hope you enjoyed this project.

The supplies used are listed and linked to the online store below.

I would love to be your demonstrator.

Thanks for stopping by today and happy Stampin’!

Verity xx

Product List

Ink Blended Background using the Layered Florals Embossing Folder

Hello Everyone,

Have you seen this amazing embossing folder? I absolutely love it… And it’s perfect for making super quick but stunning cards!

This is 3D folder, so make sure you follow the directions on your die cutting machine to get the right sandwich!

I just used Basic White cardstock so I could add colour, but this could easily have been subbed for any cardstock of your choice.

You can see how I made this card in my video tutorial…

I’ve added colour with blending brushes, selecting areas of the embossing for each colour.

This combo is Granny Apple Green, Berry Burst and Fresh Freesia with Gray Granite.

The sentiment is from a Sale-a-bration set and cut with these cute Everyday Details dies.

Here’s another version using Soft Sea Foam, Lemon Lolly and Bubble Bath with Crumb Cake… A much softer look!

And here’s another with bold blue flowers! This technique is definitely one to have fun with!

I hope you enjoyed this project.

The supplies used are listed and linked to the online store below.

I would love to be your demonstrator.

Thanks for stopping by today and happy Stampin’!

Verity xx

Product List

More Autumnal Cards with Abundant Beauty Masks

Hello Everyone,

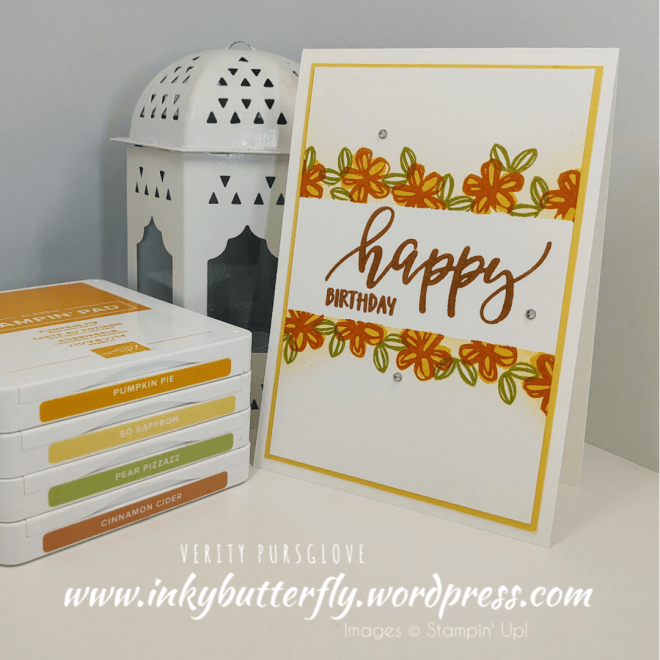
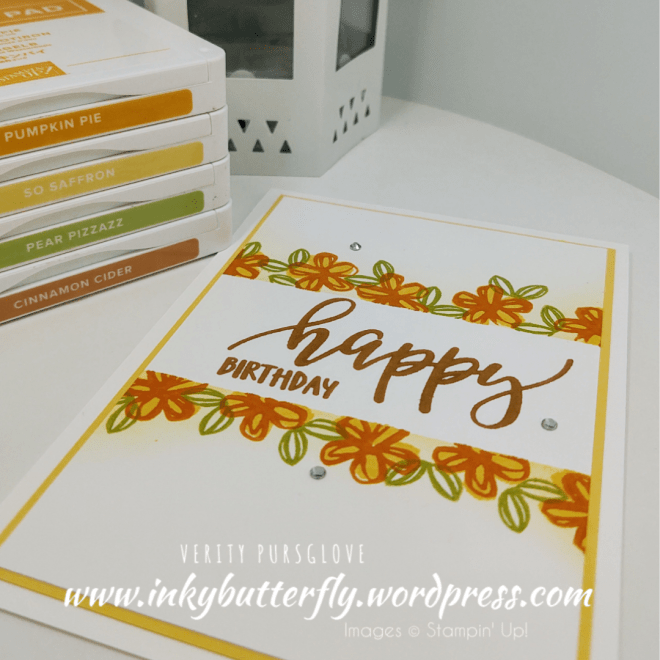
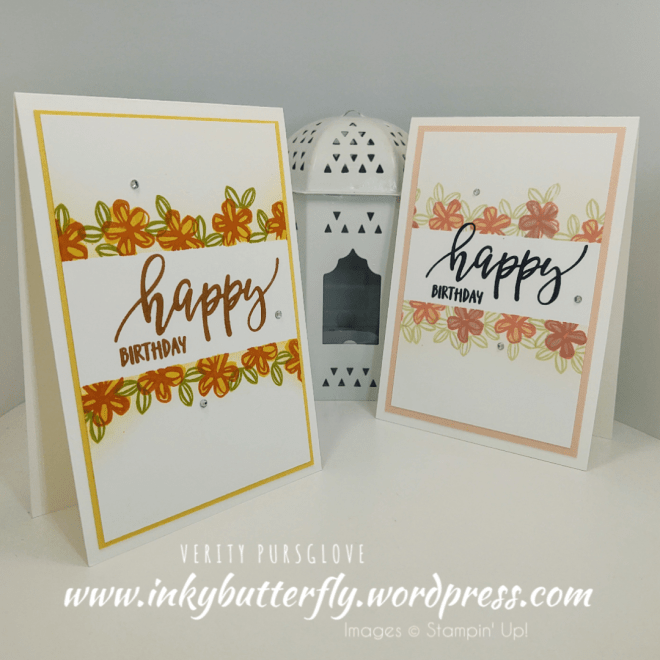
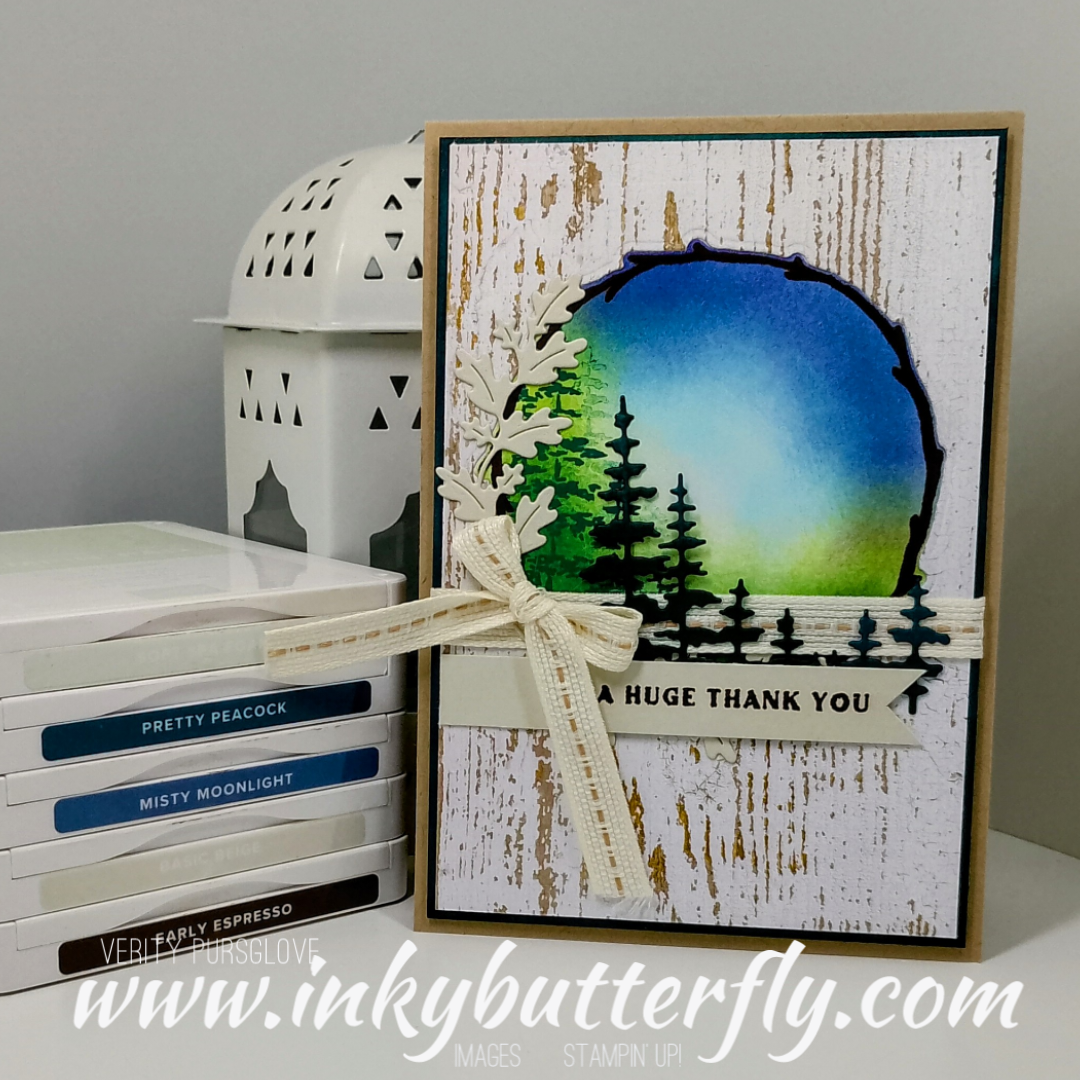
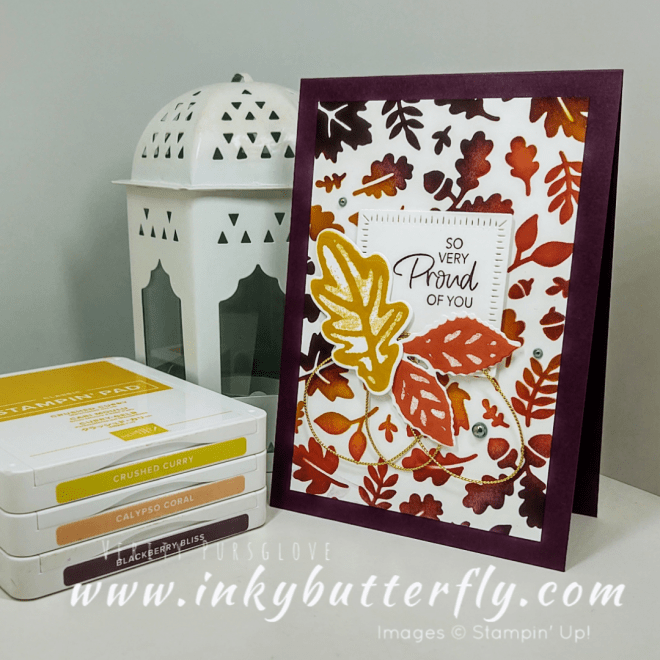
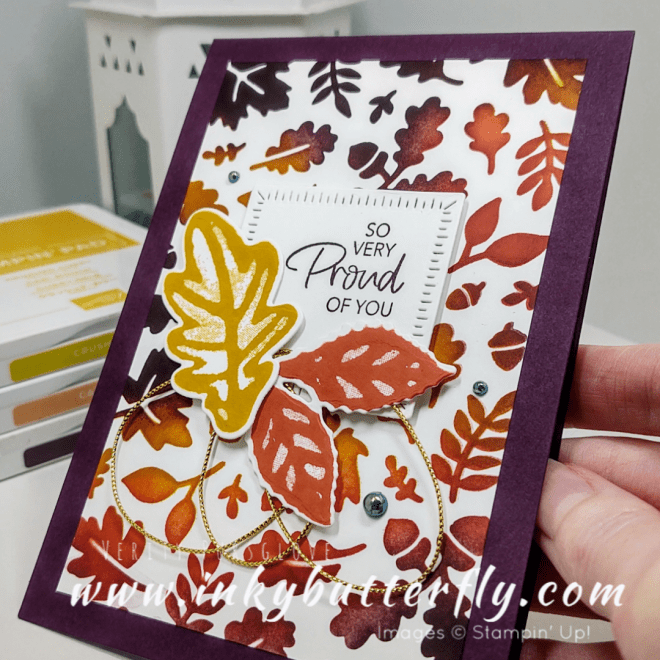
More Autumn cards today incorporating the Abundant Beauty Masks and the Autumn Leaves stamp set.

You can see how I made this card in my video tutorial…

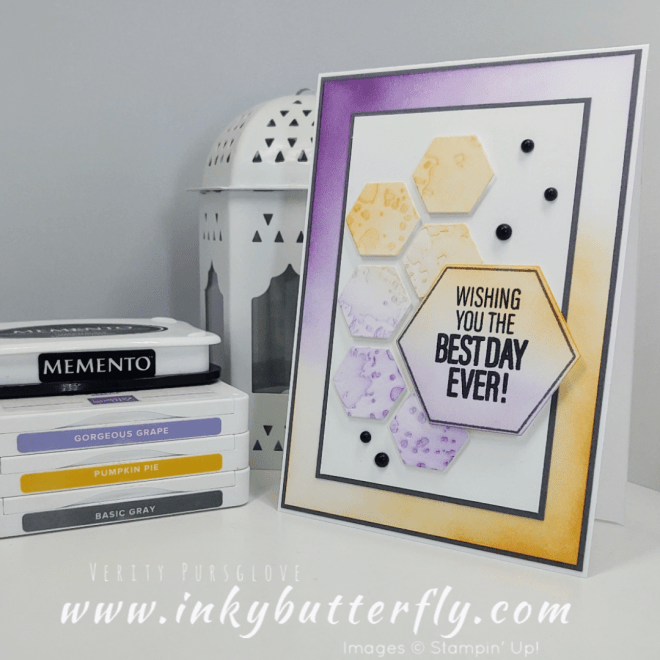
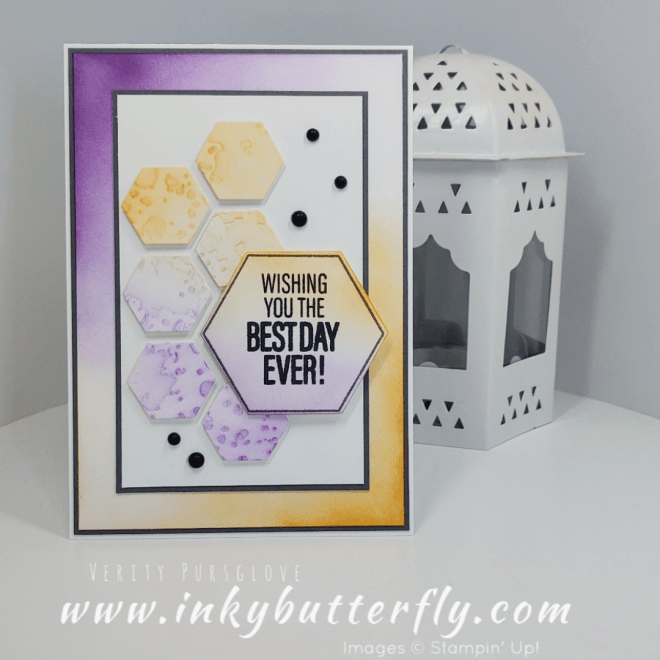
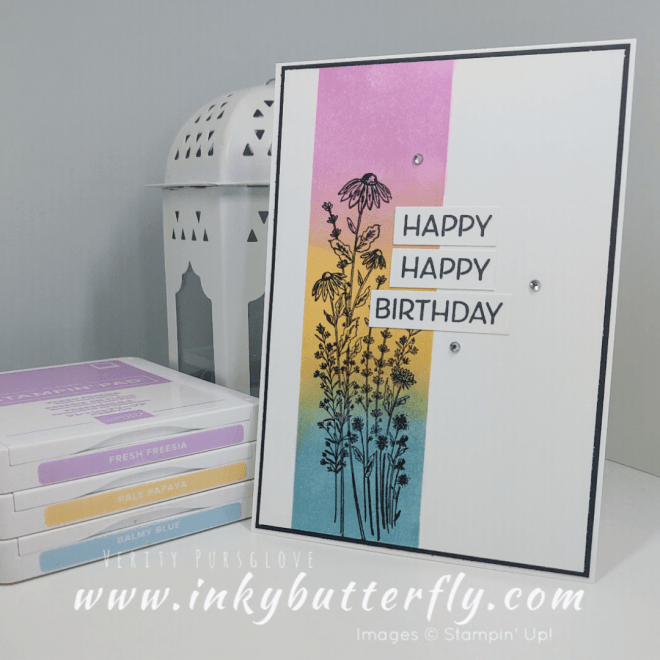
The colour combo for these cards is Crushed Curry, Calypso Coral and Blackberry Bliss – not everyone’s favourites – but they look so good with this mask!

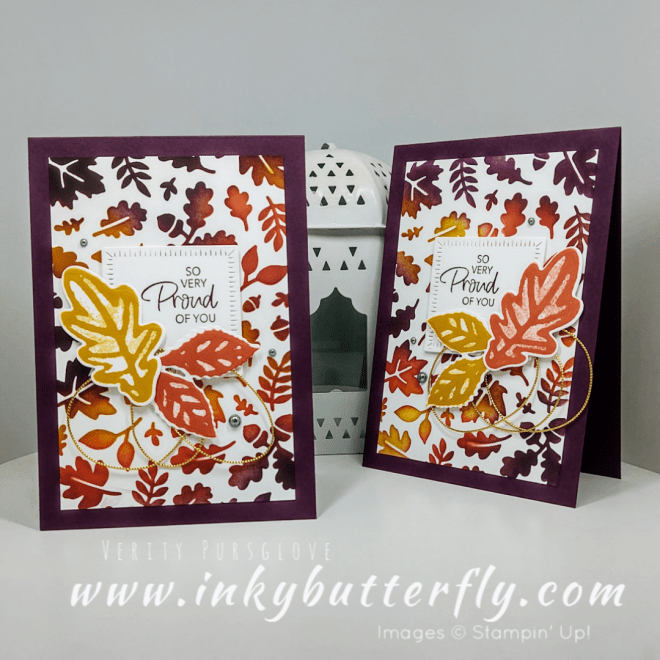
Here’s an alternative layout using a single blended panel to make two cards.

This combo used Wild Wheat, Copper Clay, Old Olive and Moody Mauve.

The sentiment was stamped with the Biggest Wish stamp set.

I hope you enjoyed this project.

The supplies used are listed and linked to the online store below.

I would love to be your demonstrator.

Thanks for stopping by today and happy Stampin’!

Verity xx

Product List

Pootlers Team Video Hop!

Hello Everyone,

Today I am joining some of my fellow Pootler Teammates in a video hop featuring the New Stampin’ Up colours and In Colours…

You can start by watching my video. Links to the other projects are listed in video description… Please Like and Subscribe!

I love how this design turned out with Pebbled Path. I think this would make a great sympathy card too.

Here are the Boho Blue and Wild Wheat versions…

And here is Moody Mauve and Copper Clay

I hope you enjoyed this project.

The supplies used are listed and linked to the online store below.

I would love to be your demonstrator.

Thanks for stopping by today and happy Stampin’!

Verity xx

Product List

Inspire.Create.Challenges #133 – Theme Challenge – New to You!

Hello Everyone,

Welcome to my blog and to my Inspire.Create.Challenge design team project!

Click the button below to see the other design team inspiration projects. You can also take part and add a photo of your creation here too!

I chose to work with a brand new stamp bundle called Dainty Delight.

You can see how I made my card in my video tutorial….

I combined colours from the bright and subtle colour families for the layering and chose a matching ink for the sentiment.

The image was coloured very simply with Stampin’ Blends.

A touch of ink blending in the background makes the die cut elements pop.

I opted not to add extra embellishments.

I hope you enjoyed this project.

The supplies used are listed and linked to the online store below.

I would love to be your demonstrator.

Thanks for stopping by today and happy Stampin’!

Verity xx

Product List

Emily Makes a Halloween Card

Hello Everyone,

Emily is sharing how she made this Halloween Card today! …

We took some ideas from Jo Blackman and Heather Forgan to create the idea.

You can see how Emily made this card in her video tutorial….

I think it turned out so well, and the ink blending for the background is amazing!

I hope you enjoyed this project.

The supplies used are listed and linked to the online store below.

I would love to be your demonstrator.

Thanks for stopping by today and happy Stampin’!

Verity xx

Product List

Inspire.Create.Challenges #128 – Colour Challenge!

Hello Everyone,

Welcome to my blog today. This project is my design team inspiration for our next change… And it’s my fave… A colour challenge!

You can take par by visiting he Inspire.Create.Challenges blog HERE where you will also find the other design team ideas!

I have pulled out the Framed Occasions stamp set and the Splatters and Stripes embossing folders to use.

I added colour to the layering panel and embossing using blending brushes. I was careful not to overlap … That would make brown!

I hope you enjoyed this project.

The supplies used are listed and linked to the online store below.

I would love to be your demonstrator.

Thanks for stopping by today and happy Stampin’!

Verity xx

Product List

Inspire.Create.Challenges #123 – Sketch Challenge with Dragonfly Garden

Hello Everyone,

Welcome to my blog today sharing with you my design team project for the Inspire.Create.Challenges blog!

Our challenge this time is to use this card sketch.

See the other design team creations HERE

I chose to use some ink blending to create the vertical panel.

You can see how I made this card in my video tutorial…..

This colour combo reminds of a sunset on a summer’s evening!

The black layer ties the embossing and sentiment together.

This card takes on a completely different look by using these deeper colours. White embossing would look good too!

I hope you enjoyed this project.

The supplies used are listed and linked to the online store below.

I would love to be your demonstrator.

Thanks for stopping by today and happy Stampin’!

Verity xx

Product List

Creating Backgrounds with the Artistic Mix Masks

Hello Everyone,

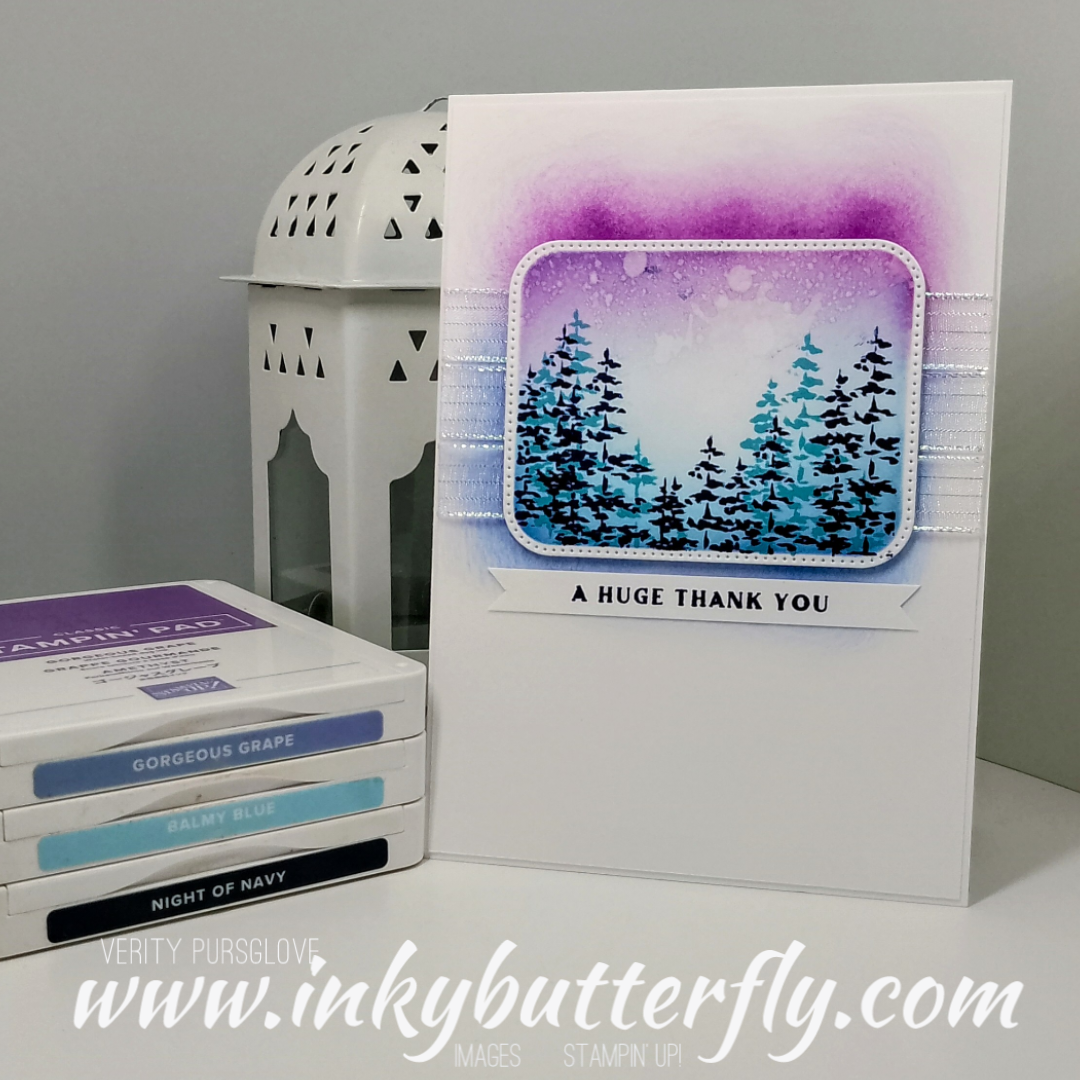
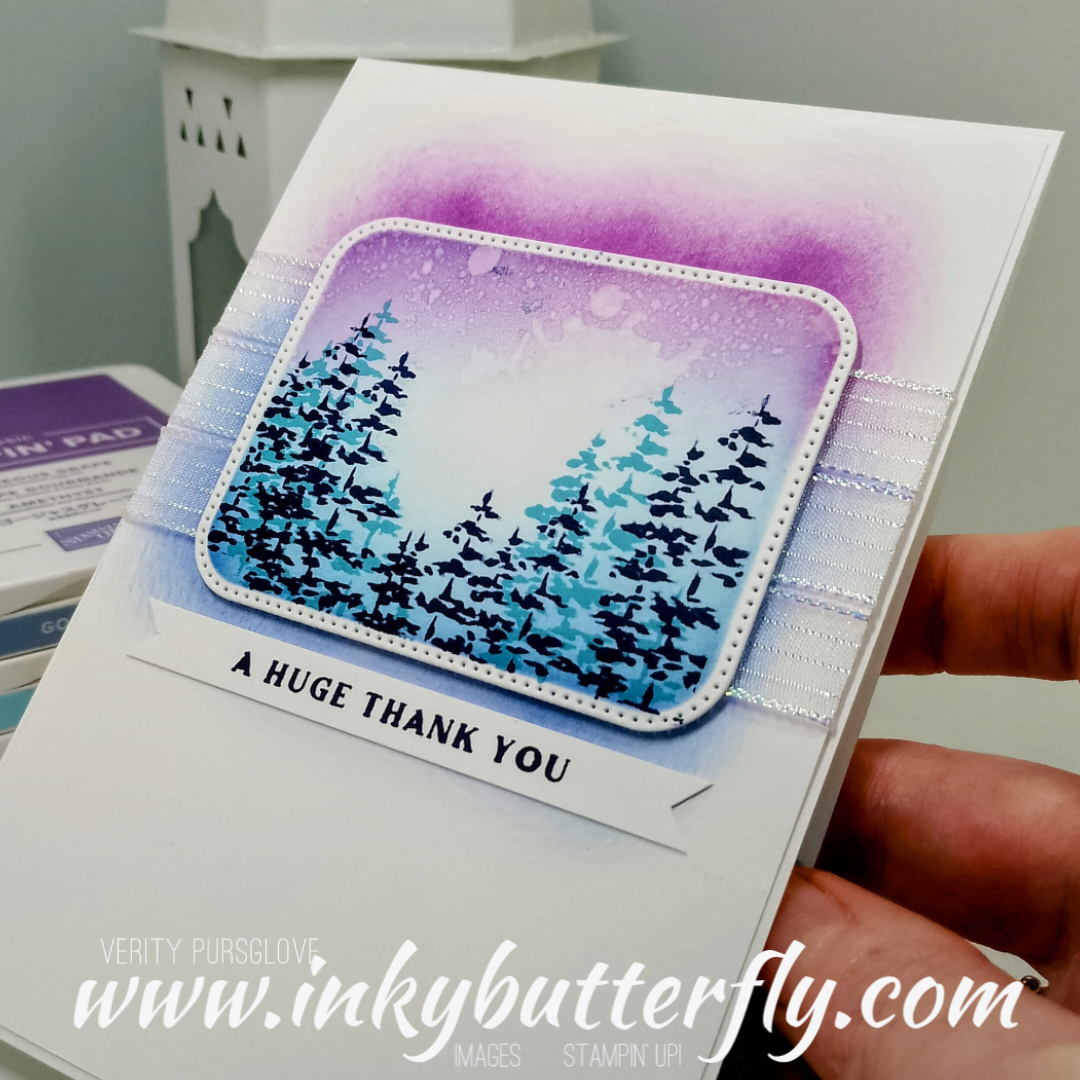
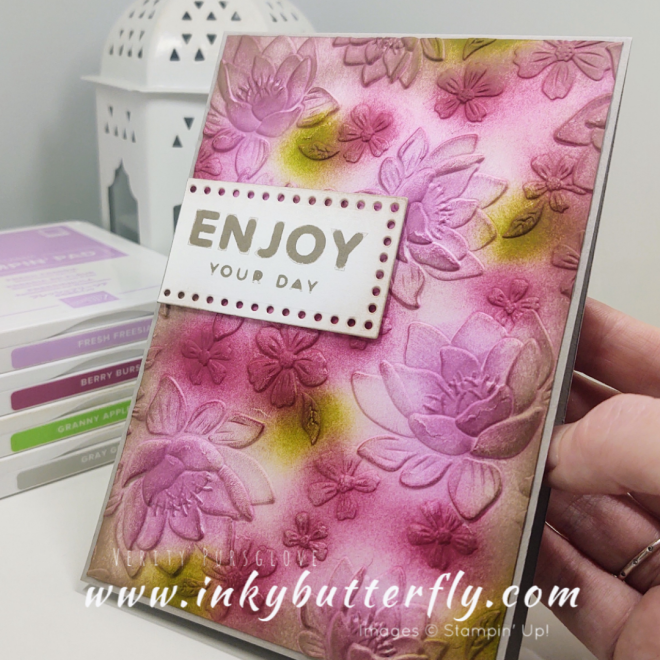
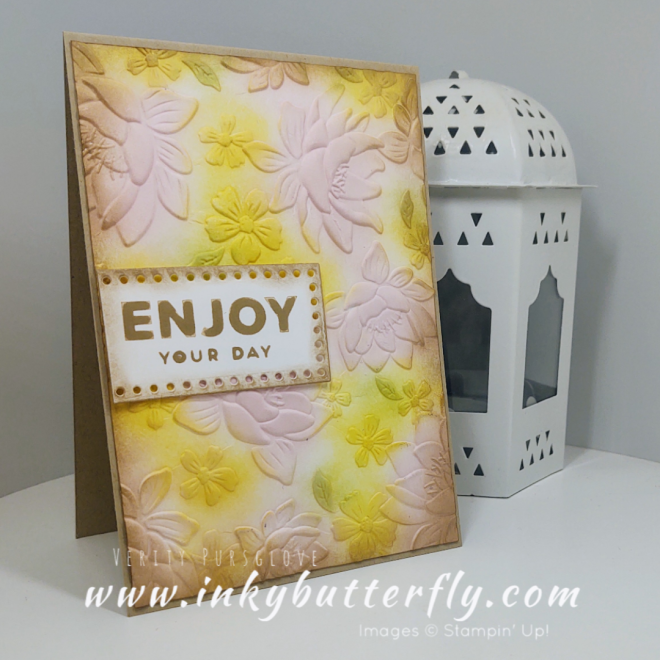
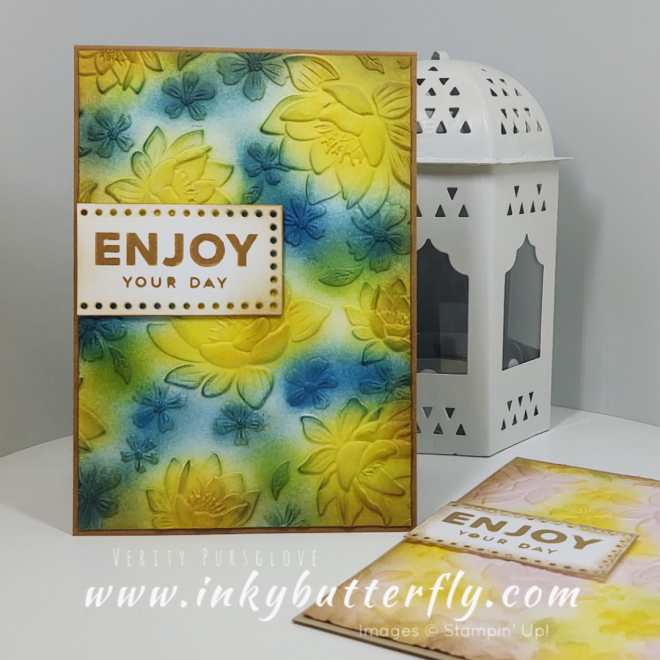
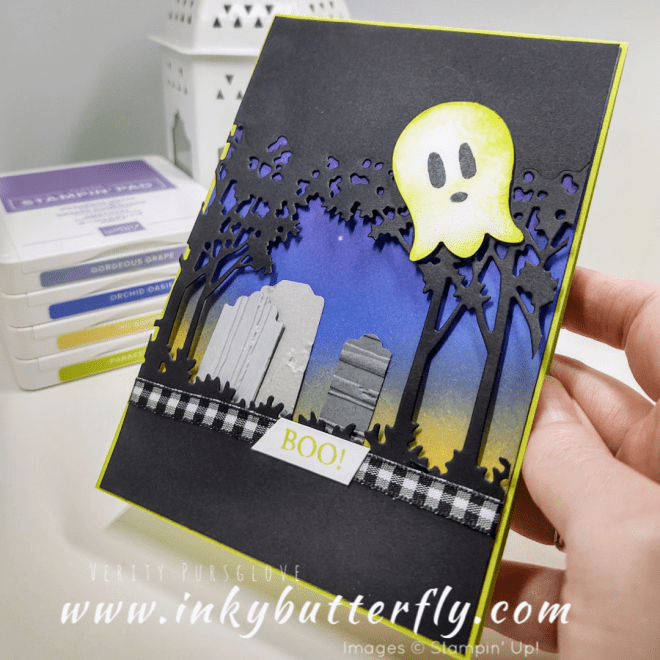
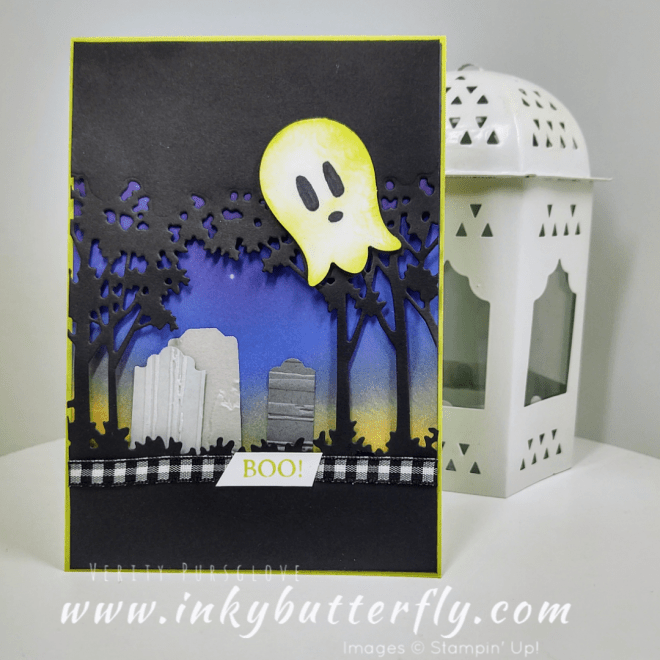
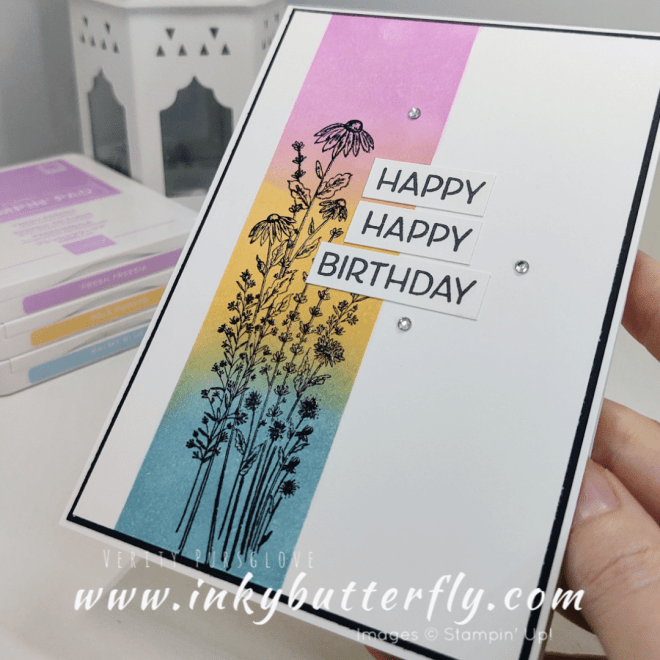
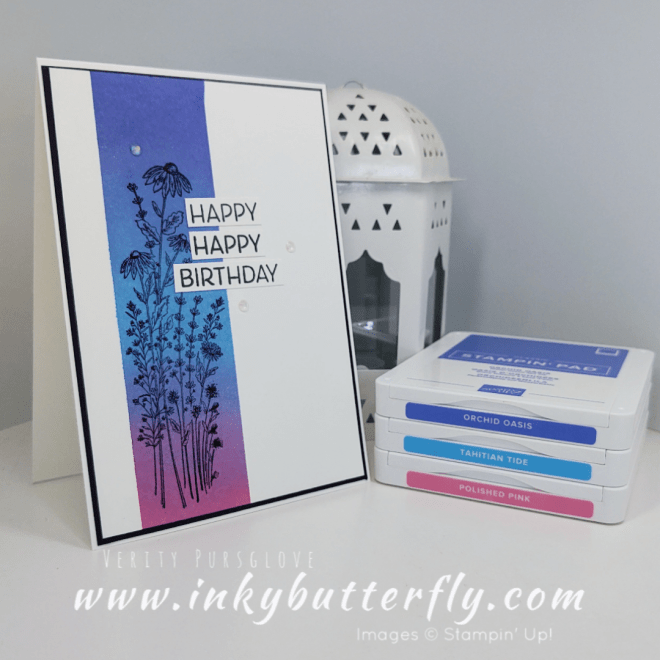
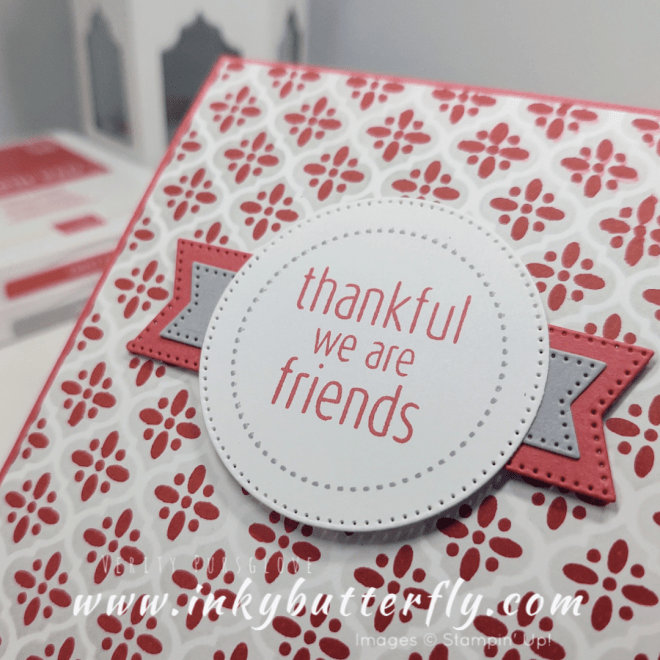
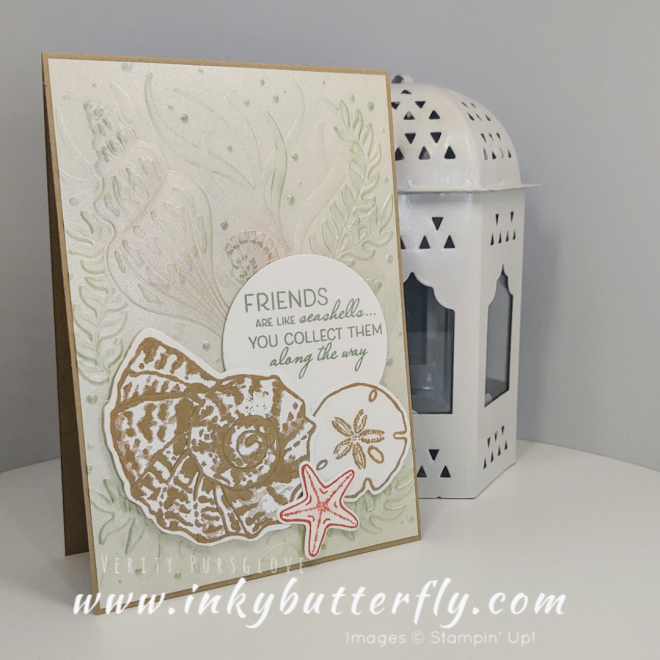
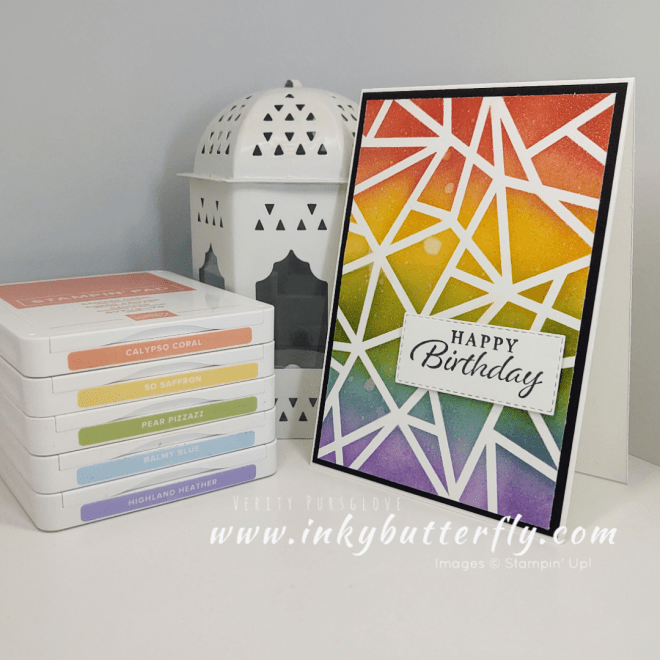
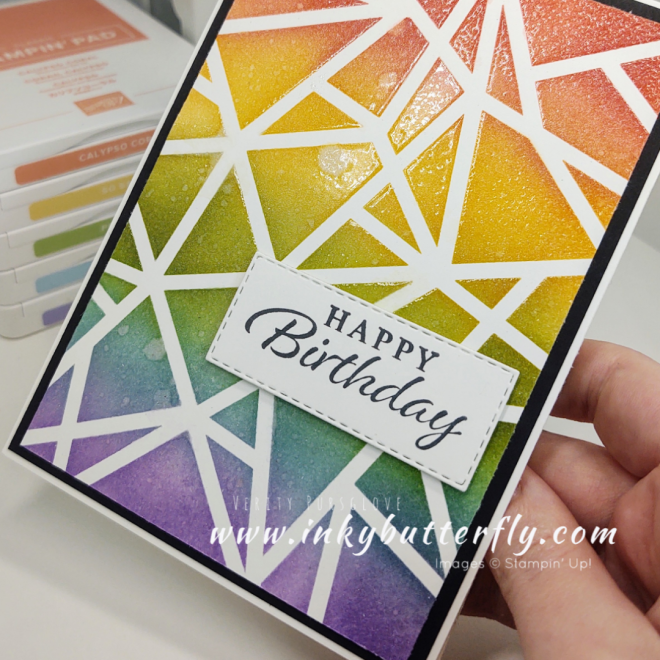
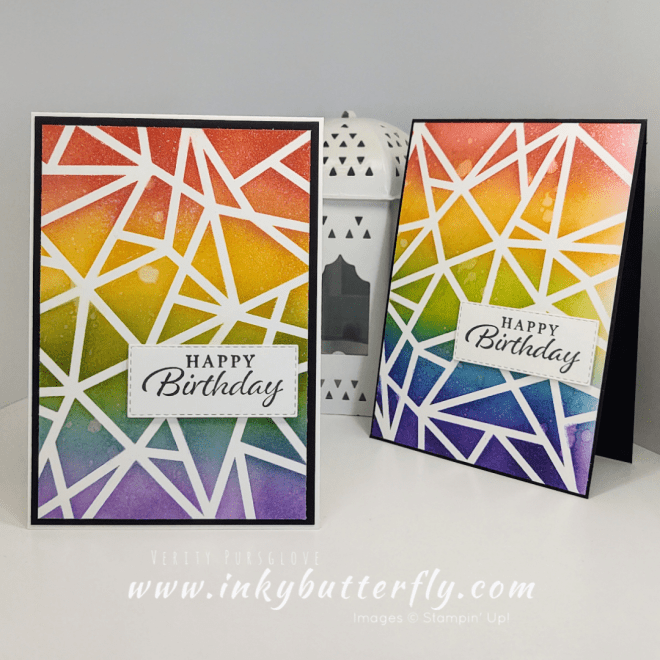
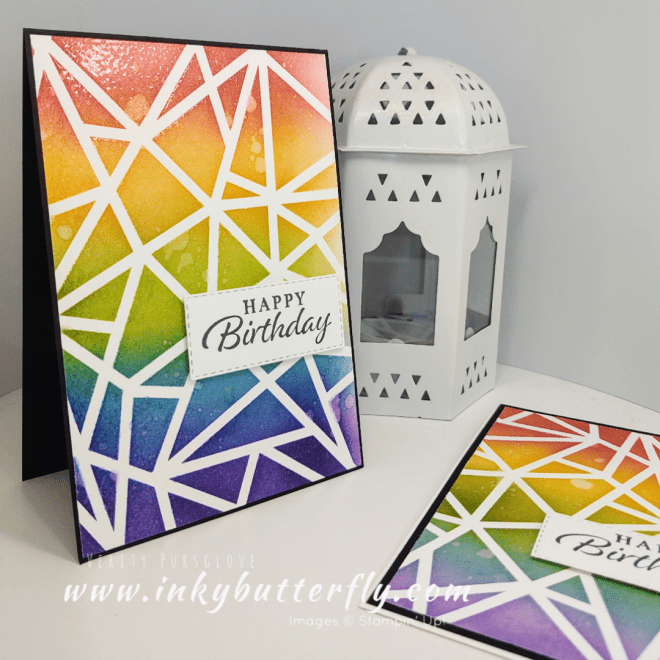
Today’s card project is all about the background. This is so easy to do with the Artistic Mix masks and totally customisable for the needs of the project!

The masks overlay each other to create the design, but could equally be used individually.

You can see how I made this card in my video tutorial….

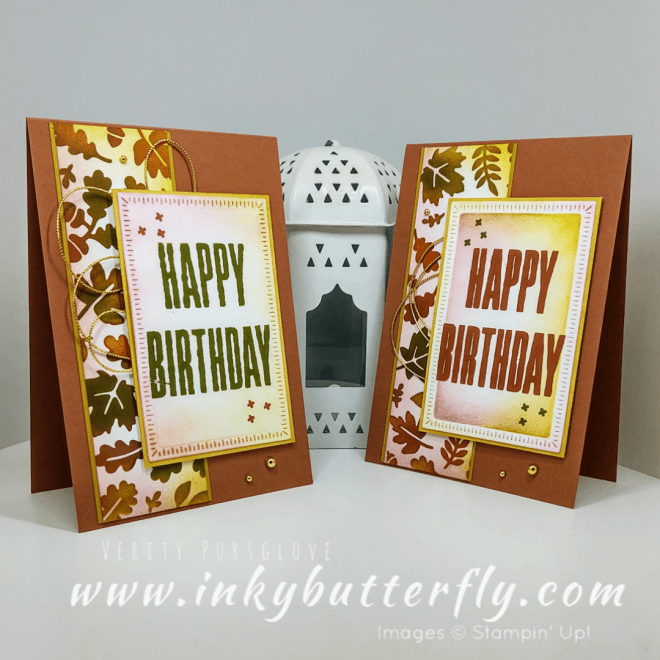
I added simple sentiments accented with Stylish Shapes die cuts.

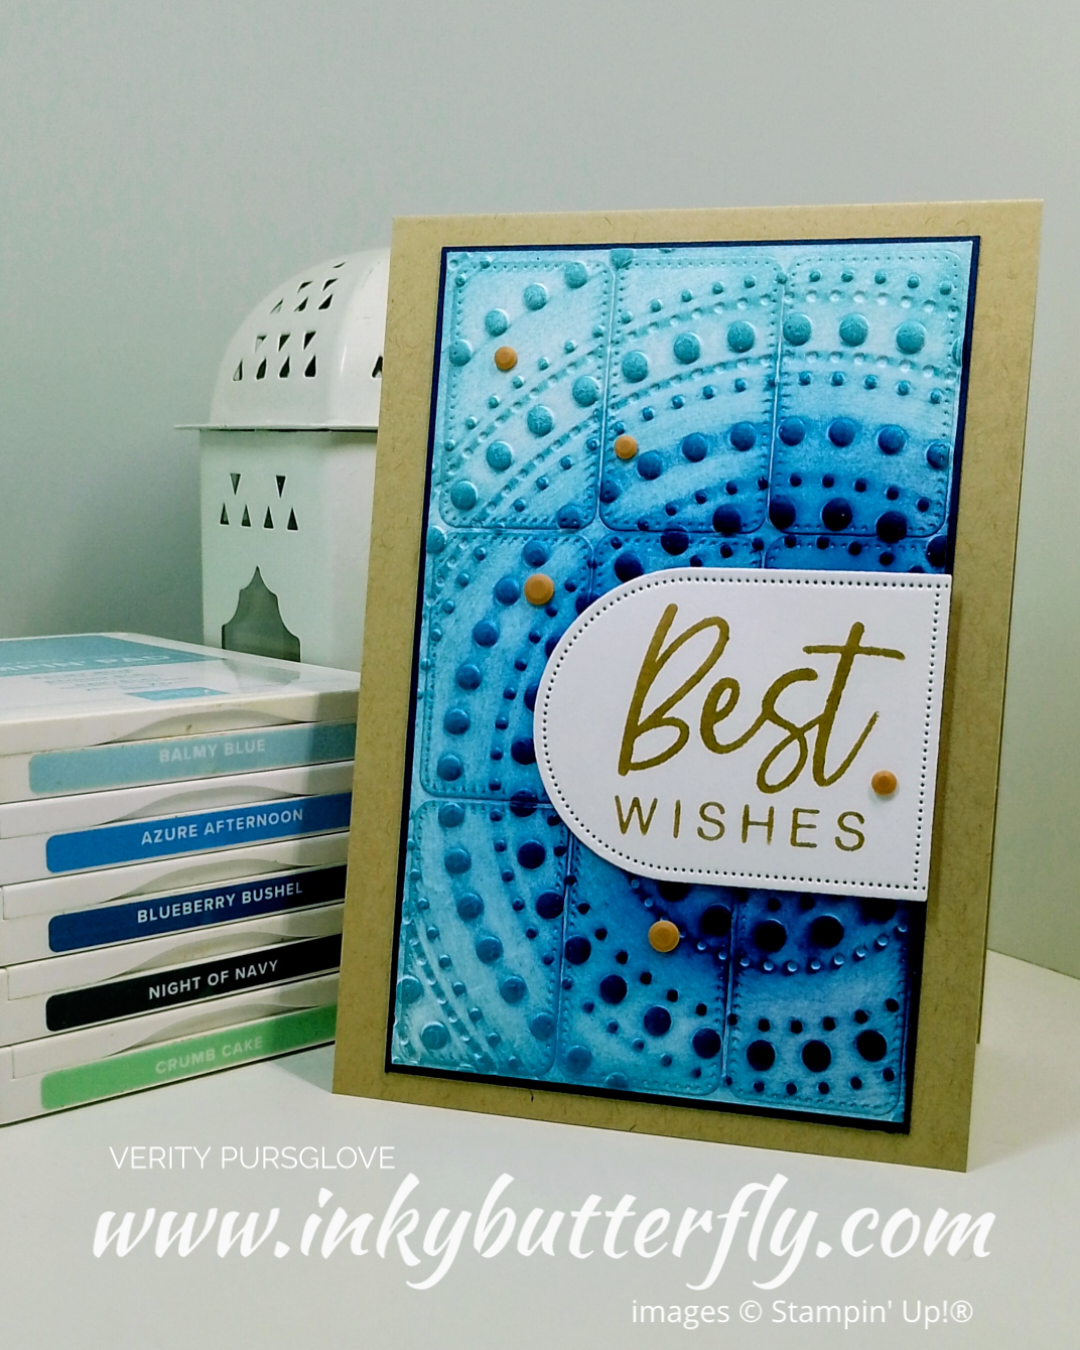
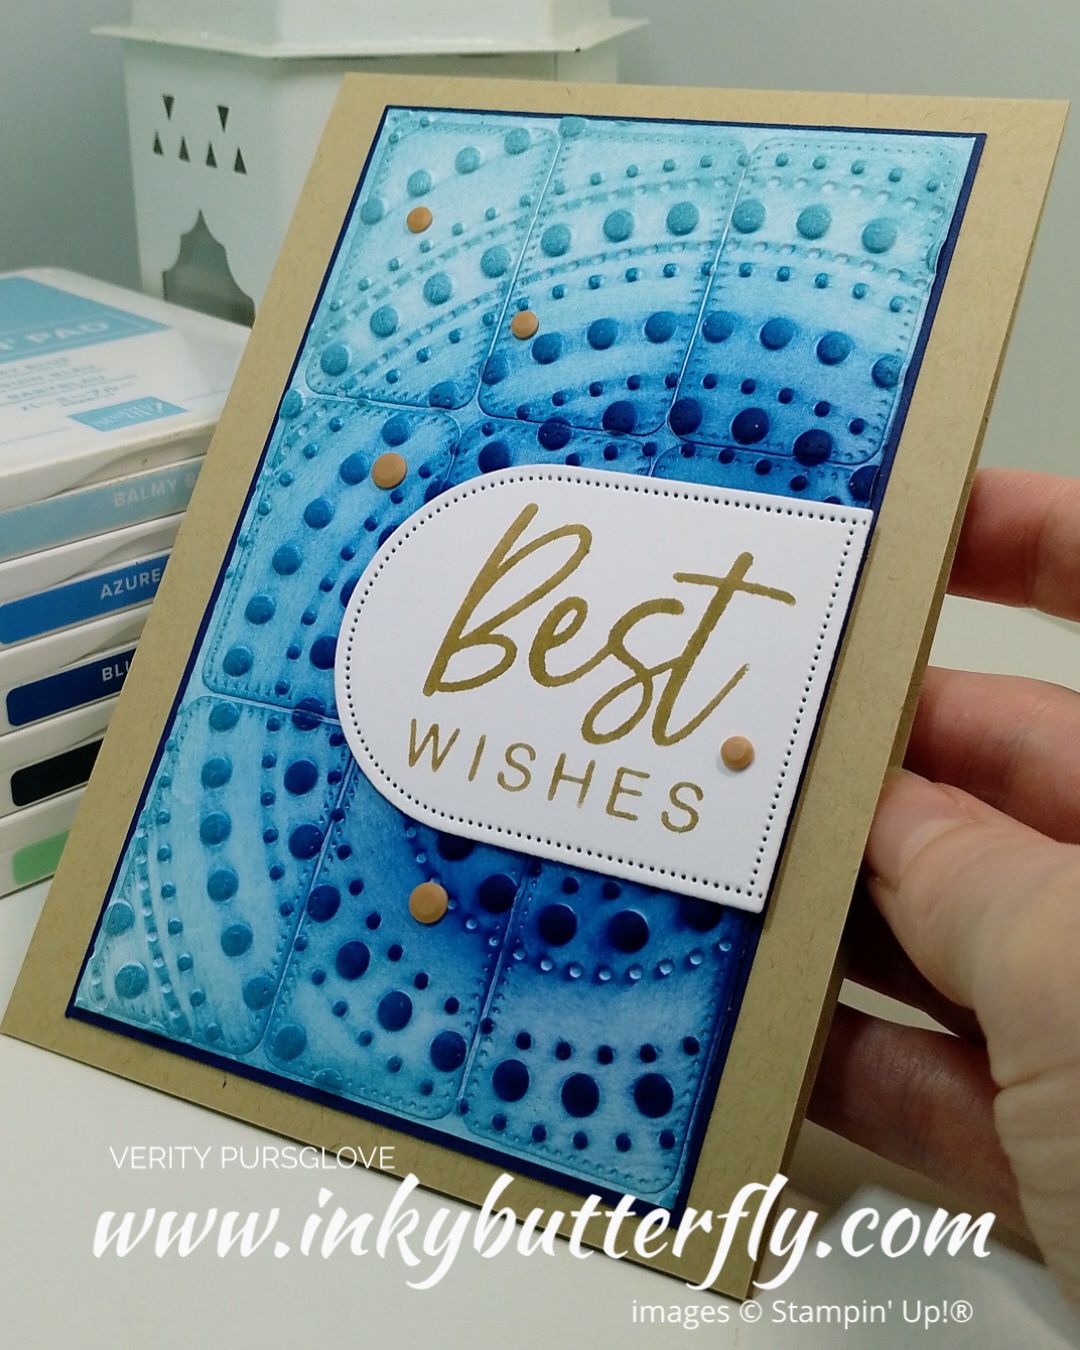
This version uses Sahara Sand and Starry Sky inks for a more masculine look.

Which colour combination would you use?

I hope you enjoyed this project.

The supplies used are listed and linked to the online store below.

I would love to be your demonstrator.

Thanks for stopping by today and happy Stampin’!

Verity xx

Product List

Pootlers Video Hop – New Product Showcase – Merry Snowflakes!

Hello Everyone,

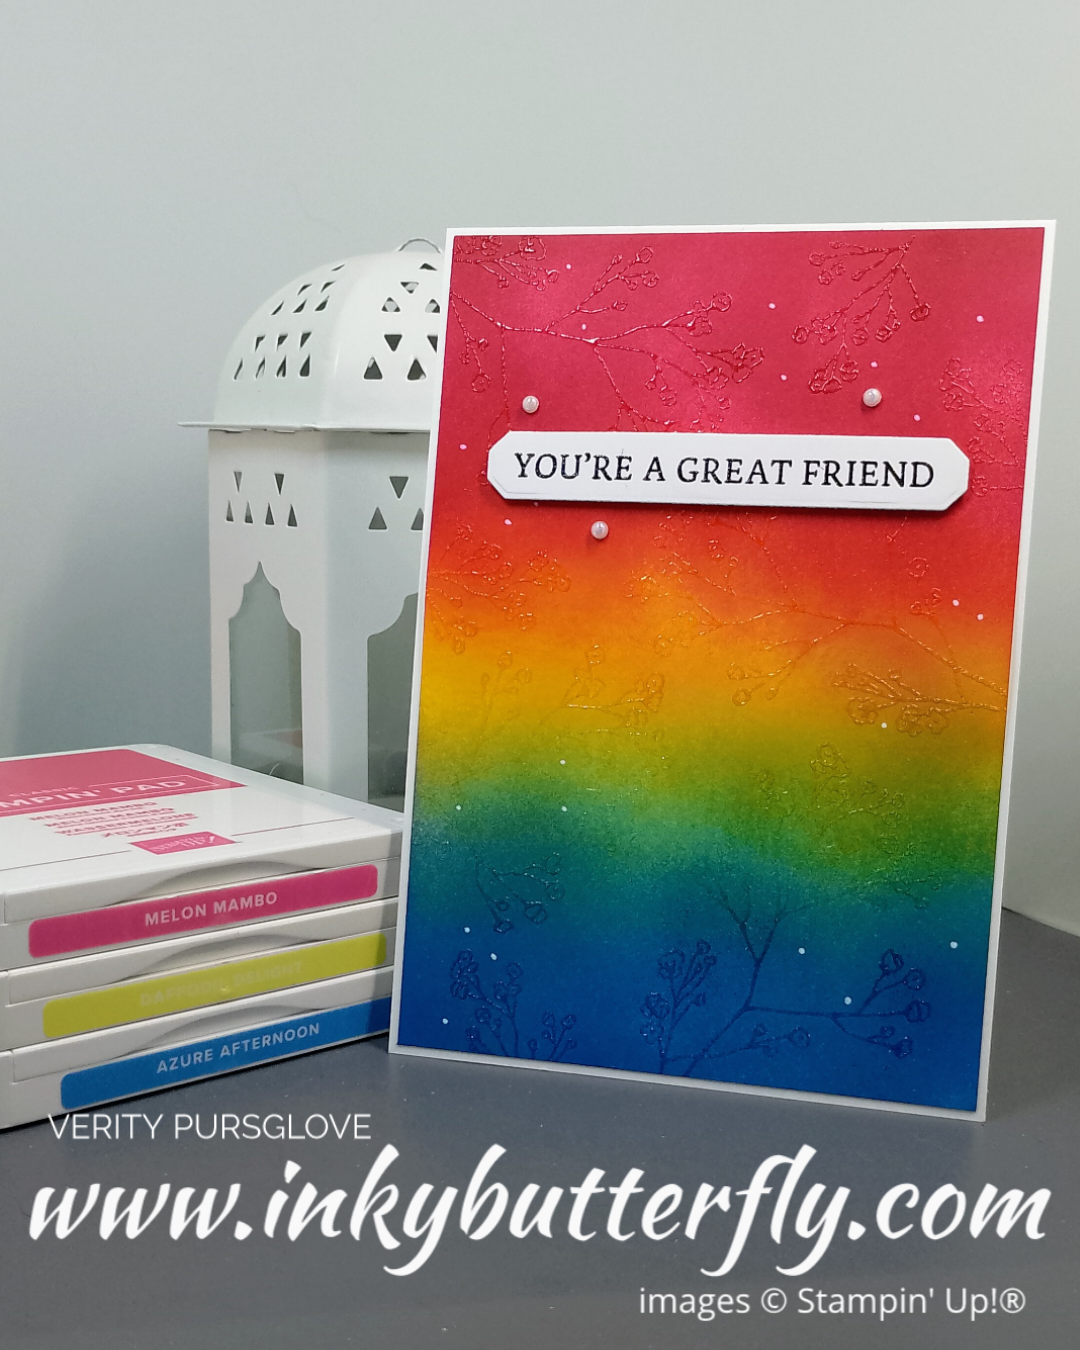
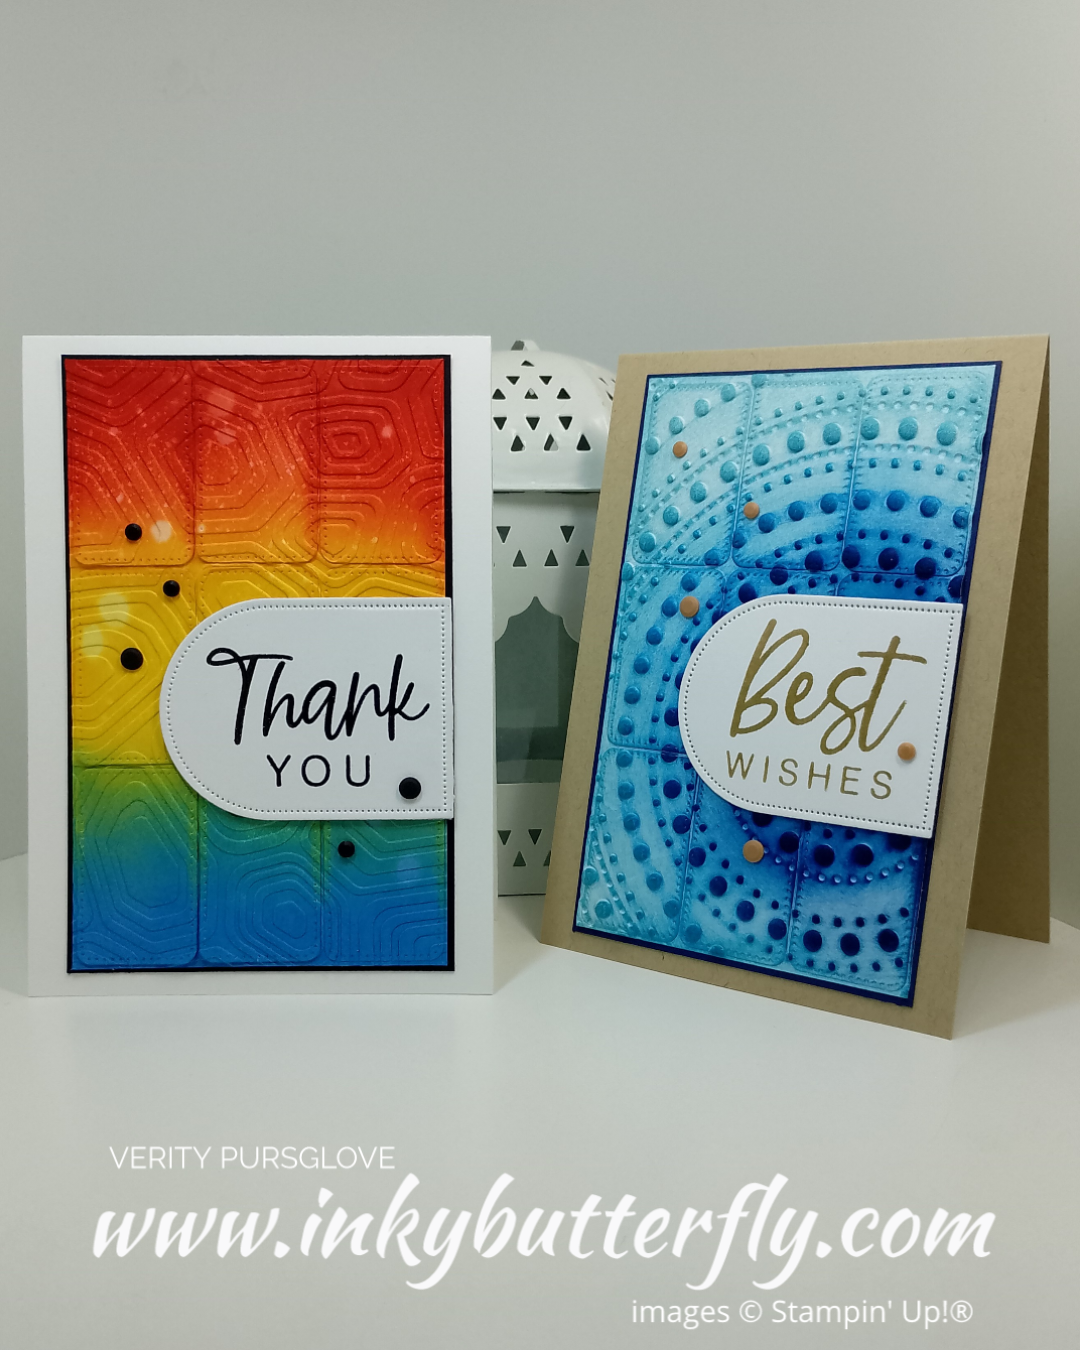
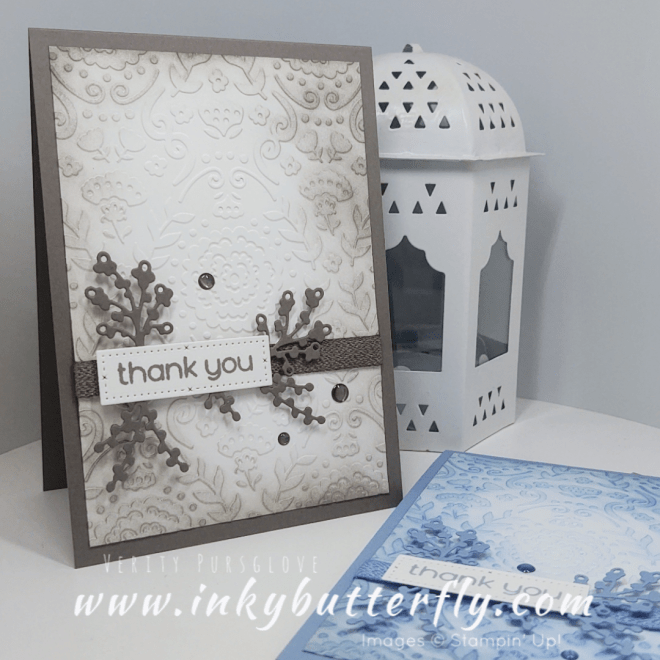
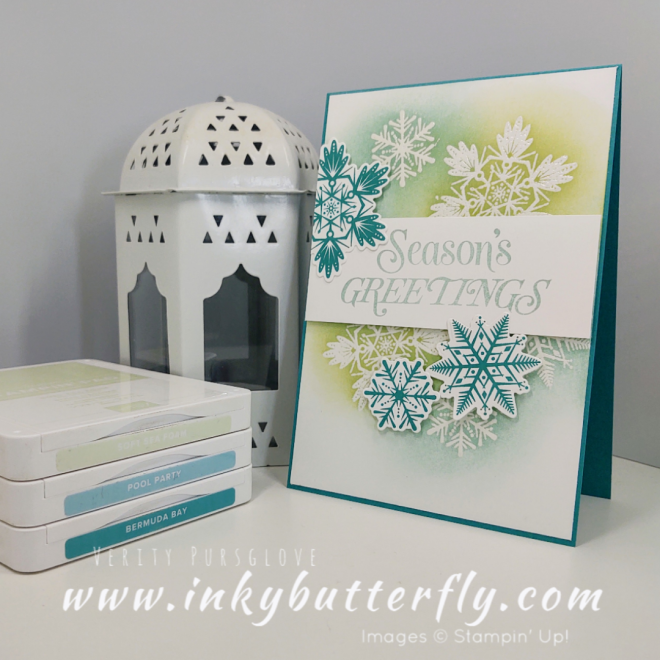
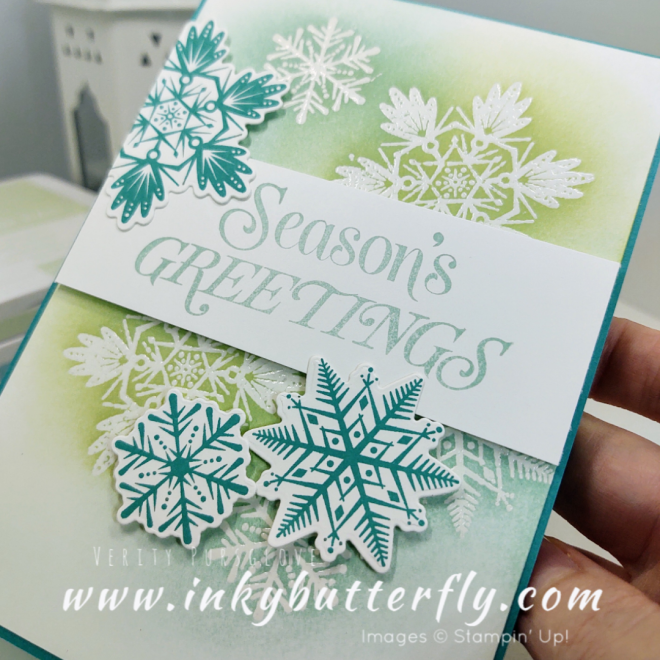
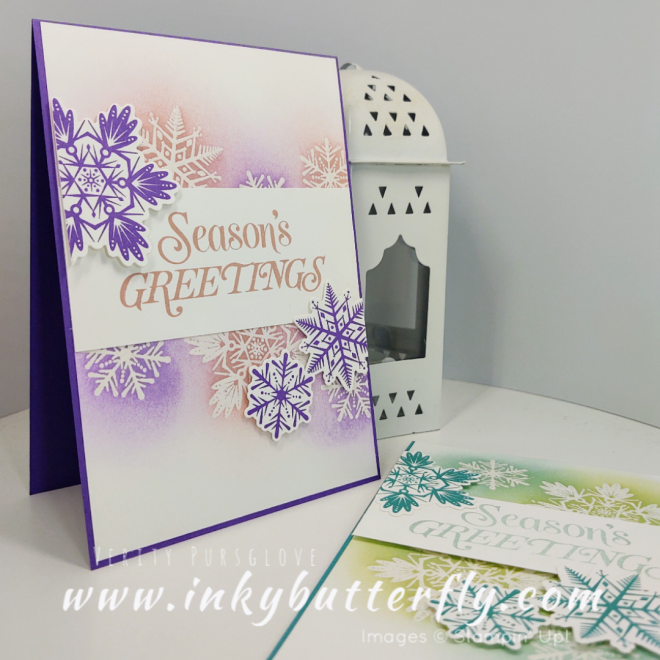
I’m showcasing some new products in a You Tube Video Hop today! There are a number of ladies in our team participating, it would be great if you would take the time to view their channels, like and subscribe!

You can start with my video tutorial featuring the Merry Snowflakes bundle…..

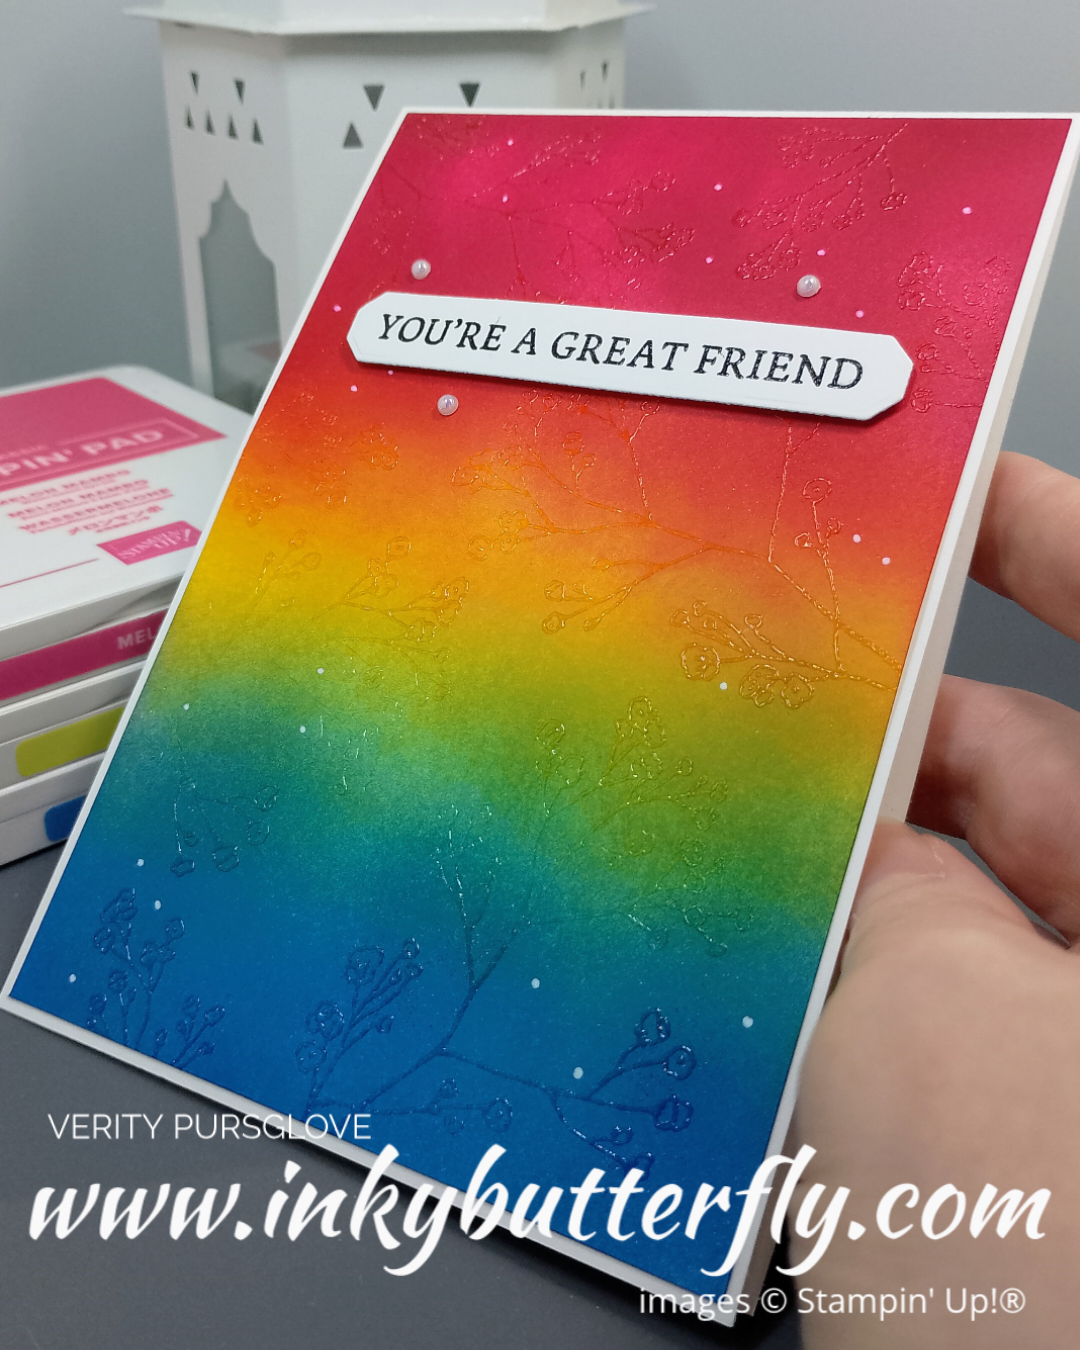
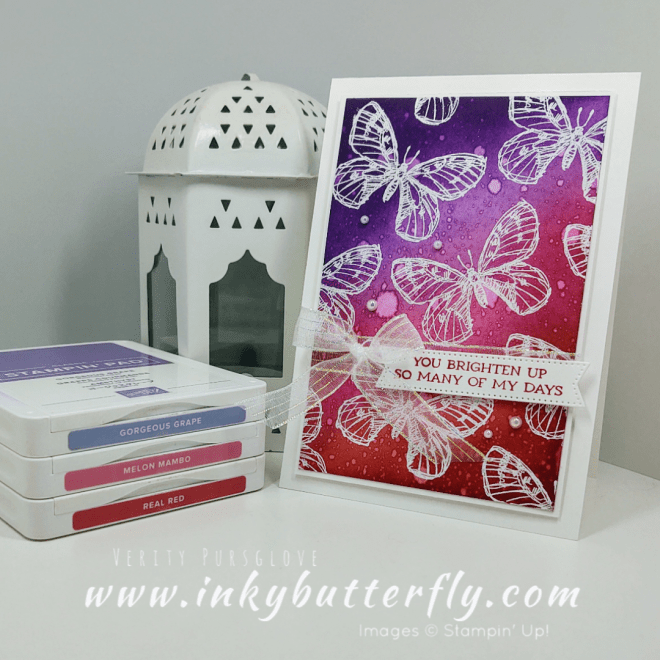
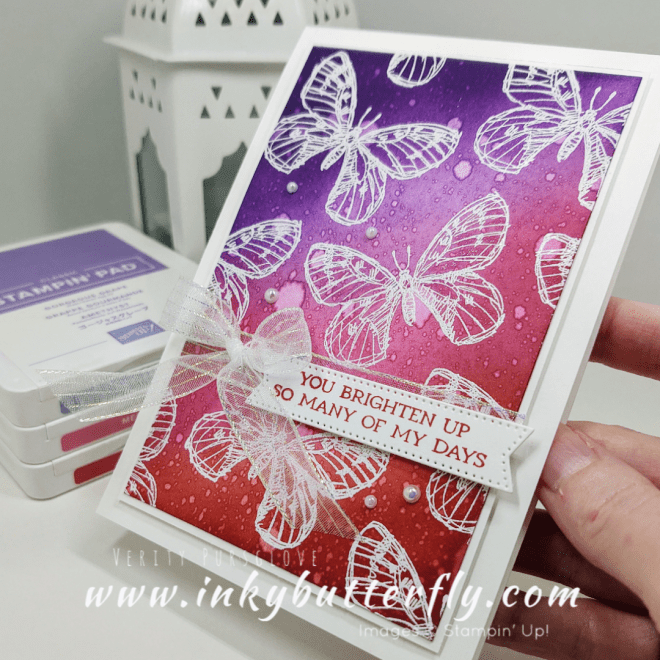
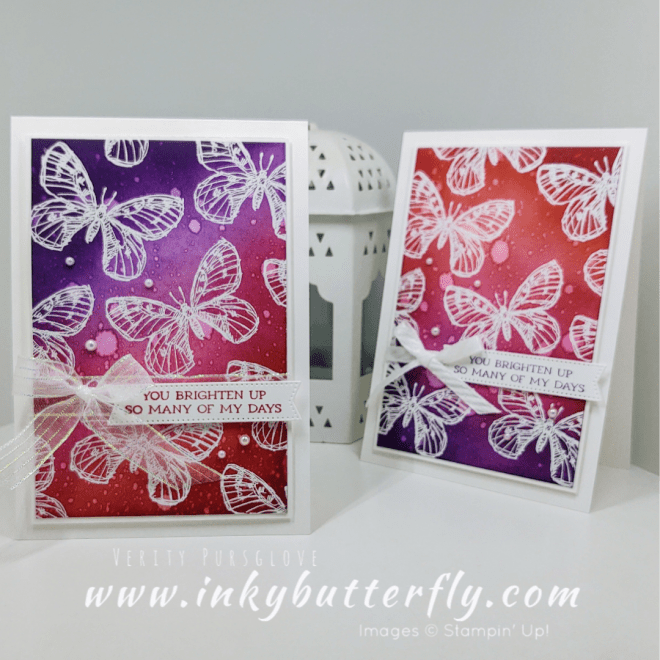
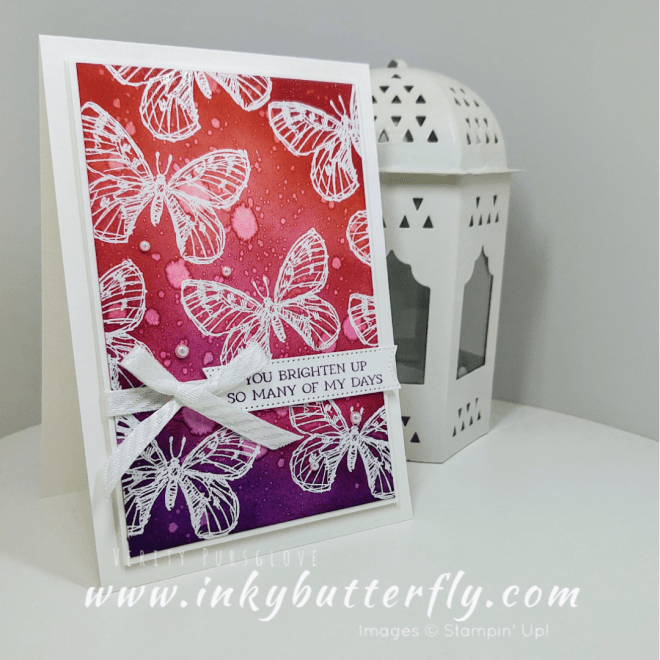
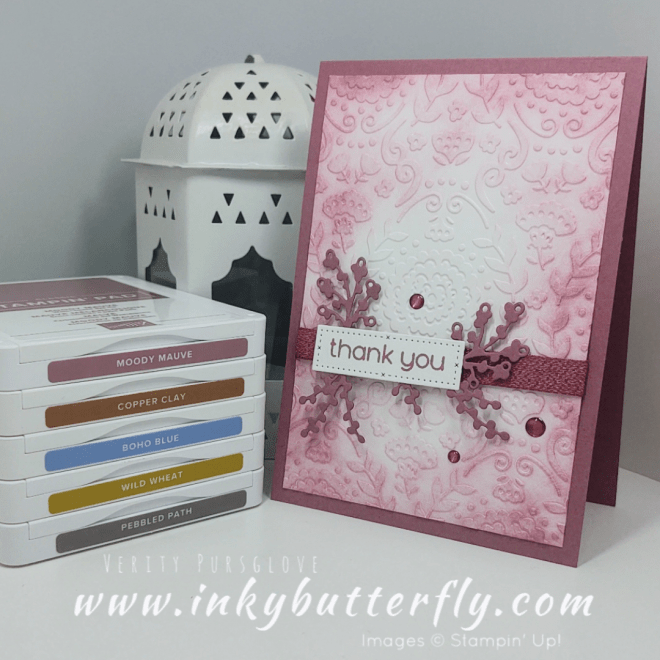
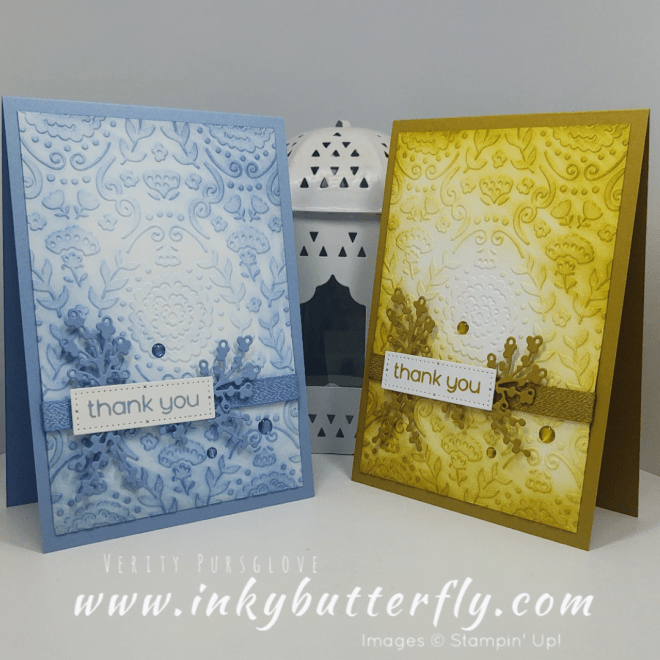
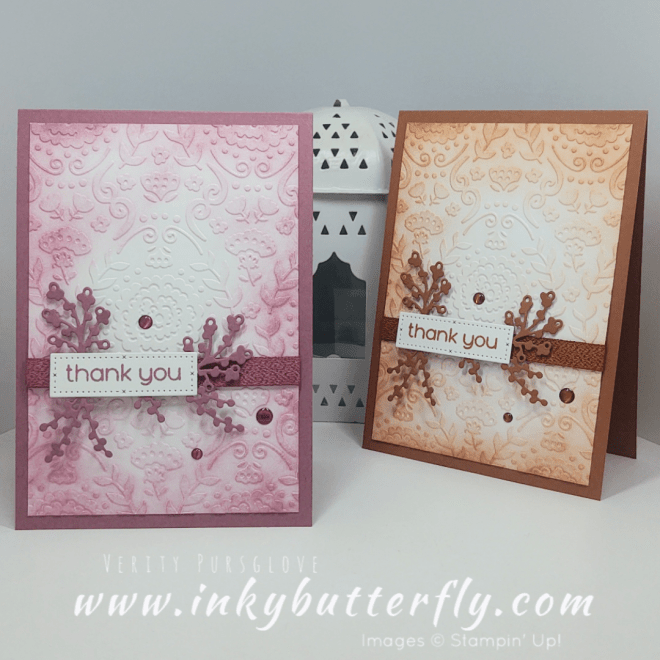
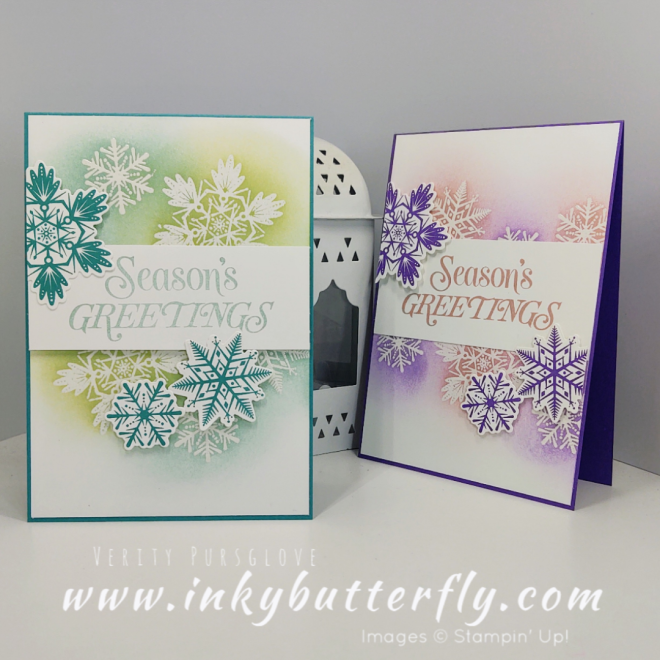
I love the emboss resist technique. It’s simple to do but so effective!

I’d love to know which card is your favourite!

For this sample I used Blushing Bride, Highland Heather and Gorgeous Grape!

I hope you enjoyed this project.

The supplies used are listed and linked to the online store below.

If your order is less than £150, use the Hostess Code YESHEZSG when placing your order to get an extra gift from me!

I would love to be your demonstrator.

Thanks for stopping by today and happy Stampin’!

Verity xx

Product List

Something Different with the Friends Are Like Seashells Bundle

Hello Everyone,

I’m trying something different with gorgeous Pearlescent Speciality Paper which has carried over to the 2021 Annual Catalogue!

You can see how I made this card in my video tutorial…

I definitely prefer the addition of the Calypso Coral to the seashells and card base.

My original sample using Crumb Cake ink and gives a much more subtle effect.

I hope you enjoyed this project.

The supplies used are listed and linked to the online store below.

If your order is less than £150, use the Hostess Code QACFP2SJ when placing your order to get an extra gift from me!

I would love to be your demonstrator.

Thanks for stopping by today and happy Stampin’!

Verity xx

Product List

Using Masks to Make a Fun Geometric Embossed Rainbow Card

Hello Everyone,

I had some fun today with this awesome new mask, inks and embossing powder!

This card used colours from the Subtles collection;

  • Calypso Coral
  • So Saffron
  • Pear Pizzazz
  • Balmy Blue
  • Highland Heather

You can see how I made this card in my video tutorial…

I was really pleased with how this turned out.

It occurred to me later that the Stitched Triangles would have continued the geometric theme.

This card uses the Brights collection.

Mix and match your supplies and create a completely different look!

I hope you enjoyed this project.

The supplies used are listed and linked to the online store below.

If your order is less than £150, use the Hostess Code QACFP2SJ when placing your order to get an extra gift from me!

I would love to be your demonstrator.

Thanks for stopping by today and happy Stampin’!

Verity xx

Product List

One Card, Three Ways with the Art in Bloom Bundle

Hello Everyone,

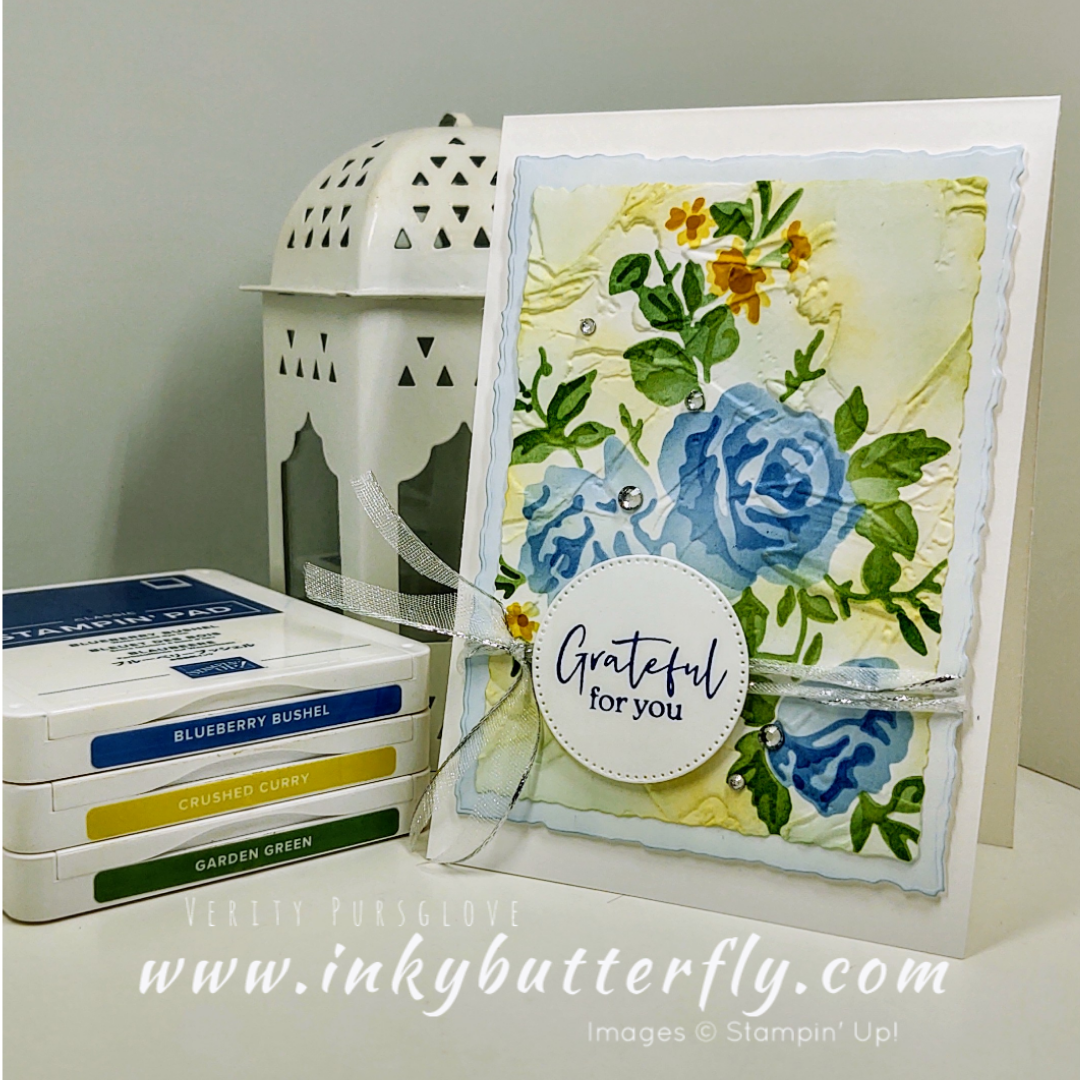
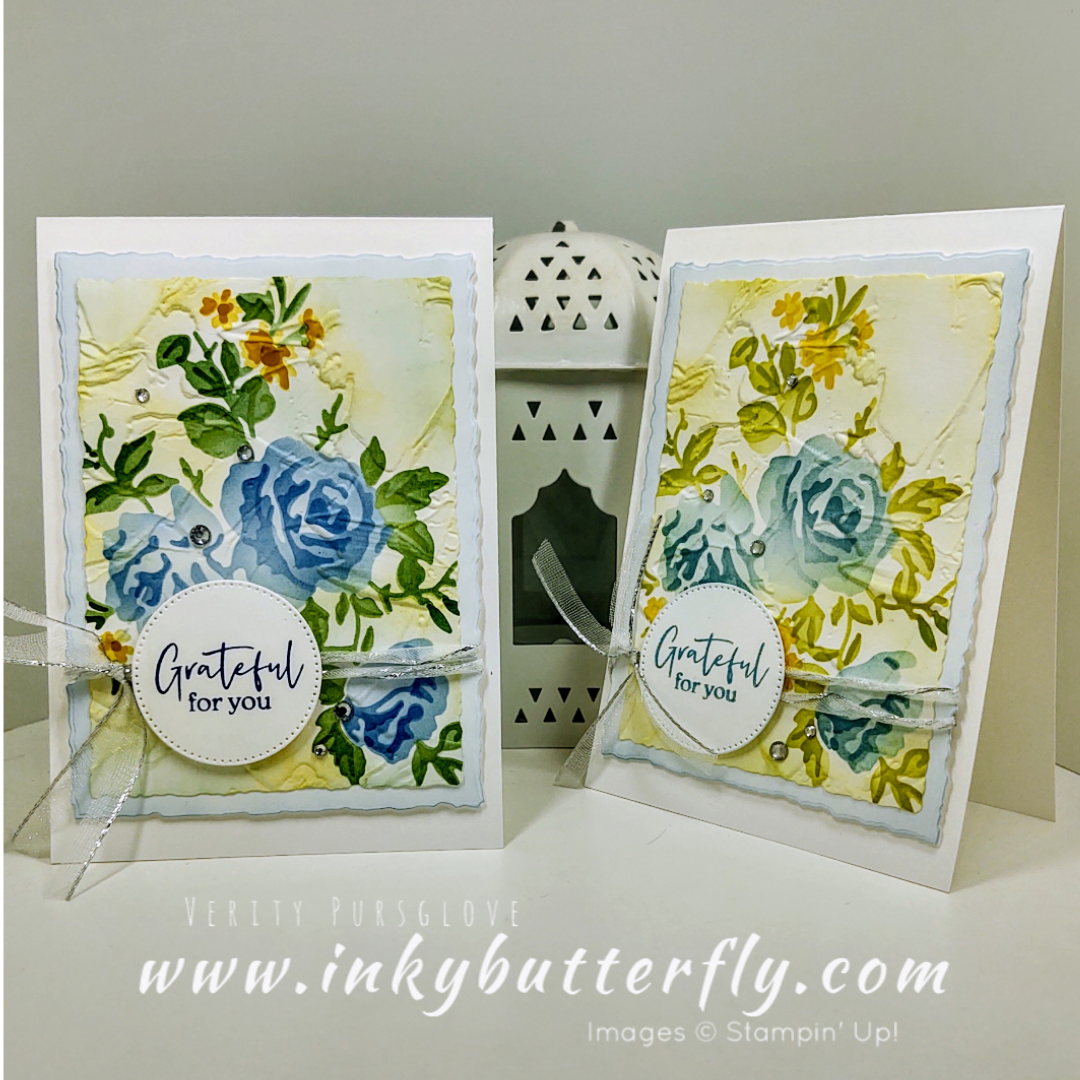
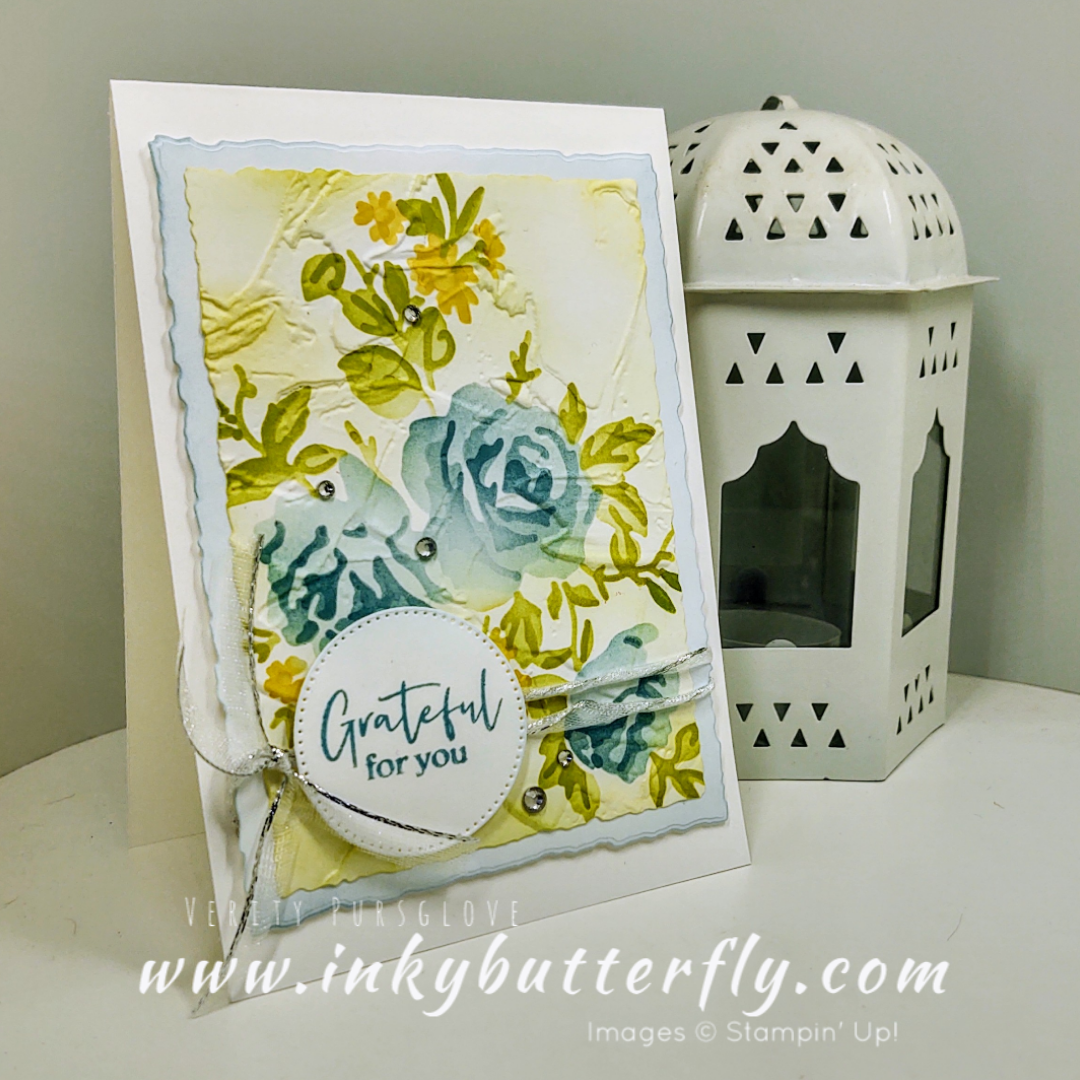
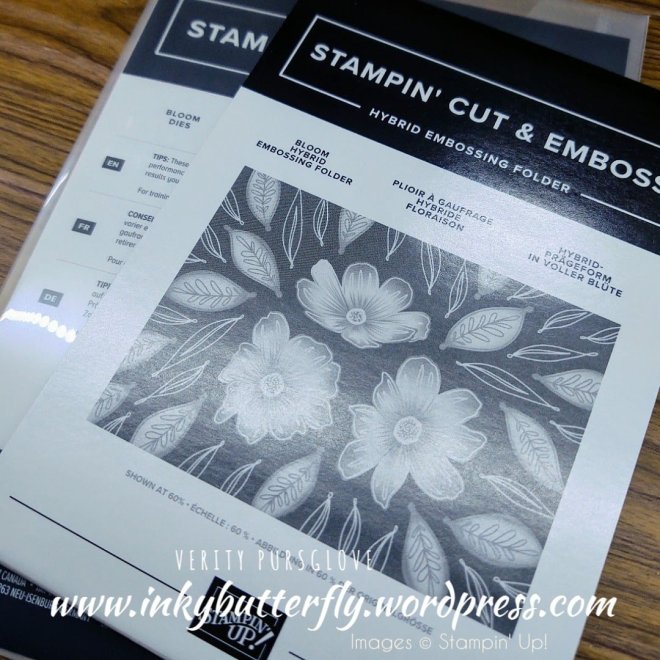
I am so excited about this new product from Stampin’ Up!

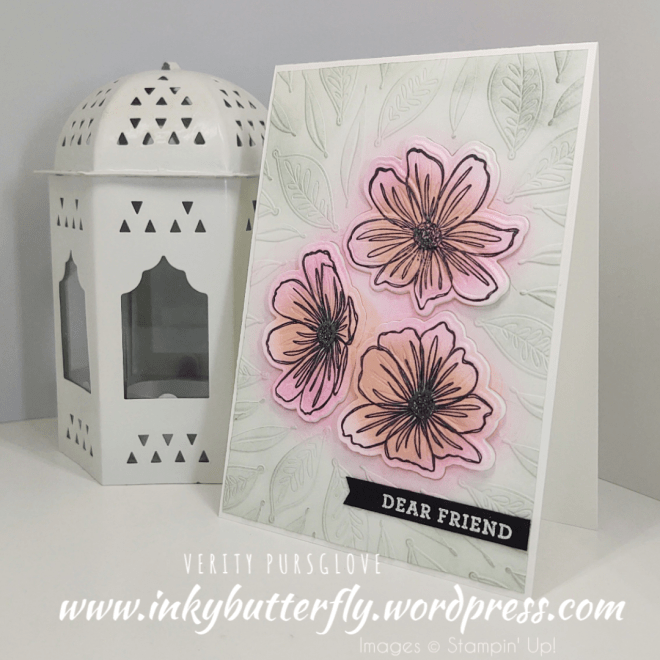
The Art in Bloom bundle includes a stamp set, dies and a hybrid embossing folder!

The products can be used independently or in combination to make simple effective cards.

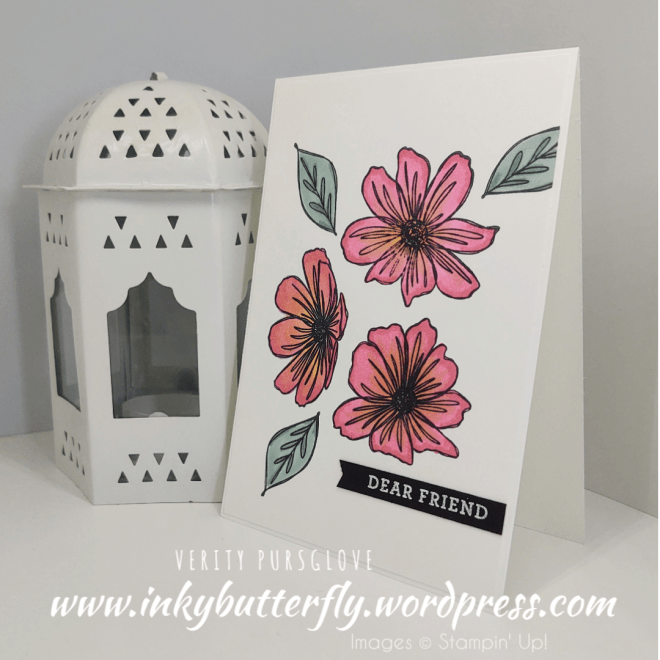
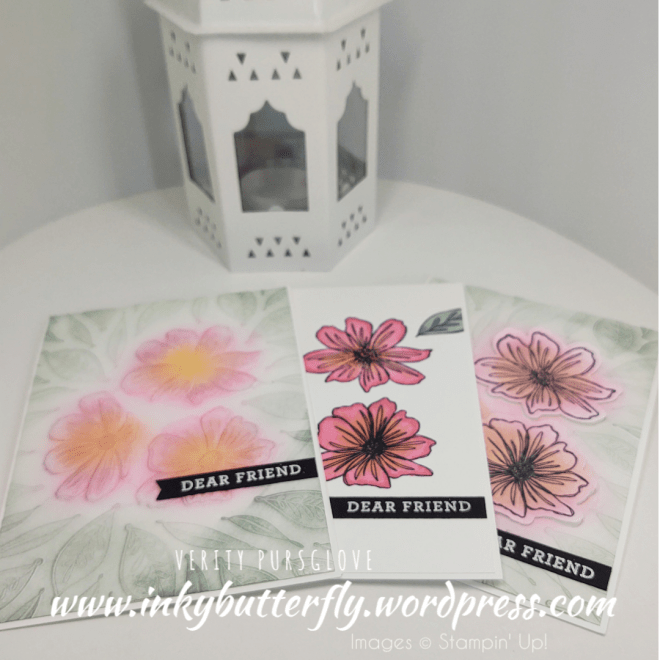
1. Simple stamping – use the stamps alone and colour them with your favourite medium or the two-step elements in the stamp set! I used Stampin’ Blends for my card.

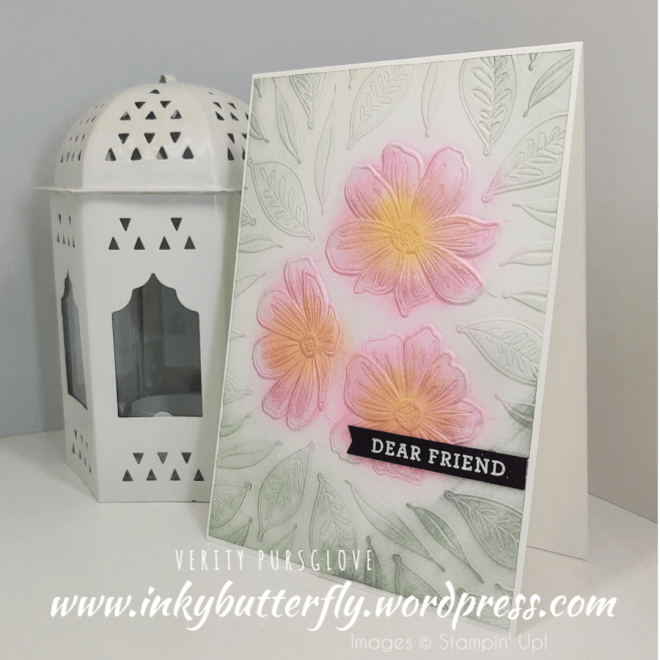
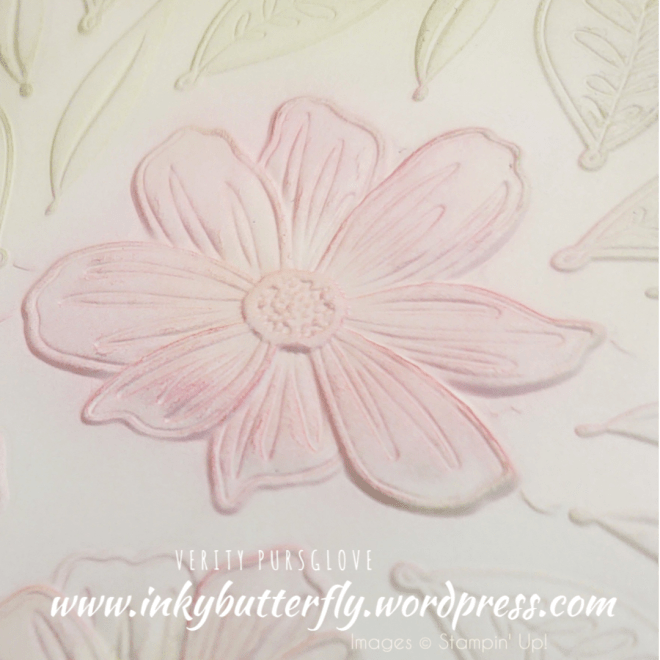
2. Just emboss – use your Stampin’ Cut and Emboss to emboss your card stock. I’ve used Basic White and added colour with Blending Brushes. Why not try other card stock colours?

The ink picks out the embossed details.

3. Stamp, cut & emboss – easily line up your stamped images with the die and embossing folder. The die sits inside the folder which is specifically designed so that it is not damaged in the process – it’s so clever!

(Do not try this with your other embossing folders)

I raised the die cut pieces up on to dimensionals.

You can see how I made these cards in my video tutorial….

This shows just 3 options, but there are so many other combinations to try!

I hope you enjoyed this project.

The supplies used are listed and linked to the online store below.

If your order is less than £150, use the Hostess Code F2QFV2PT when placing your order to get an extra gift from me!

I would love to be your demonstrator.

Thanks for stopping by today and happy Stampin’!

Verity xx

Product List

Ink Blended Background with the Wild Roses stamp

Hello Everyone,

Have ever wondered how to use background stamps in a different way? Me too!

I came up with this idea to use with the Wild Roses stamp, and it gave me the opportunity to do some ink blending again.

You can see how I made this card in my video tutorial….

The font in the Happy Thoughts stamp set is so pretty!

I hope you enjoyed this project.

The supplies used are listed and linked to the online store below.

If your order is less than £150, use the Hostess Code UYZ33U2J when placing your order to get an extra gift from me!

I would love to be your demonstrator.

Thanks for stopping by today and happy Stampin’!

Verity xx

Product List

More Stampin’ with Pretty Perennials

Hello Everyone,

I just love making cards with the Pretty Perennials stamp set.

Today, I have combined some simple stamping with some masking and a bit of ink blending!

See how I made this card in my video tutorial….

This layout can be used with lots of different stamp sets!

I hope you enjoyed this project.

The supplies used are listed and linked to the online store below.

If your order is less than £150, use the Hostess Code UYZ33U2J when placing your order to get an extra gift from me!

I would love to be your demonstrator.

Thanks for stopping by today and happy Stampin’!

Verity xx

Product List

Simple Stampin’ with Borders and Backgrounds

Hello Everyone,

It’s all about the stamping for today’s card project.

Here I have used the Borders to Backgrounds stamp set. The colour inspiration is from a just for fun Facebook colour challenge.

The sentiment is from Sweet Ice Cream, but of course this can be swapped for something else in your crafty stash!

See how I made this card in my video tutorial….

Blending over the stamped sentiment ties the design together beautifully!

I hope you enjoyed this project.

The supplies used are listed and linked to the online store below.

If your order is less than £150, use the Hostess Code W7ZJNXEV when placing your order to get an extra gift from me!

I would love to be your demonstrator.

Thanks for stopping by today and happy Stampin’!

Verity xx

Product List