Detailed with Love

Good Morning,

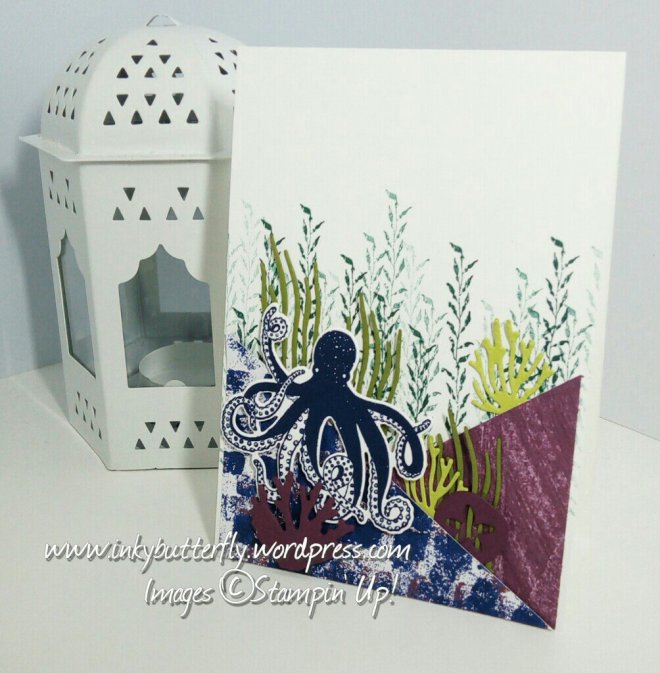
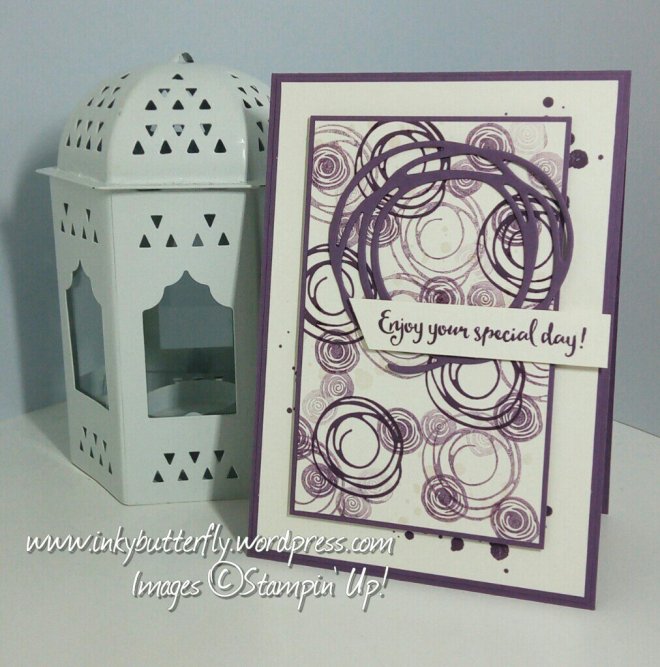
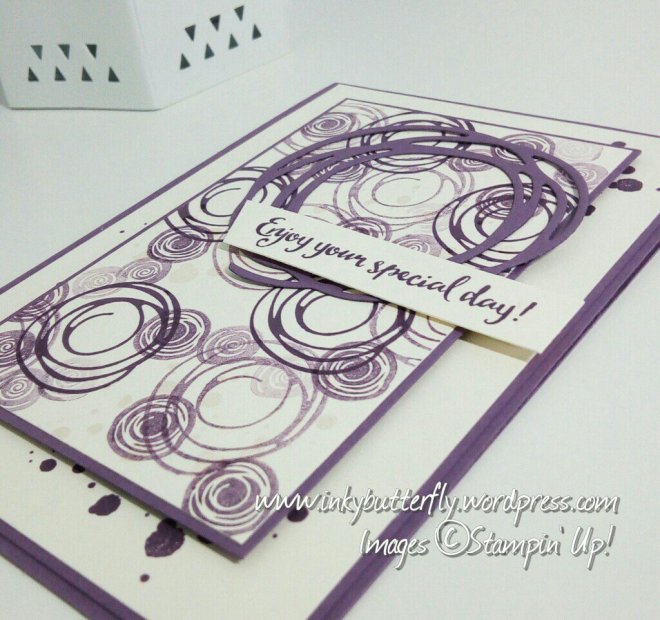
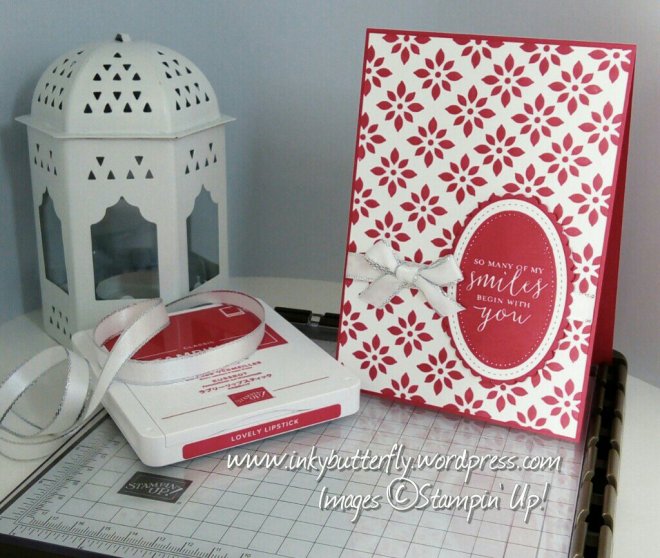
I have created my very own background for today’s card. Ordinarily, this would have been very challenging but using the Stamparatus made it so much easier.

I would recommended practising first.

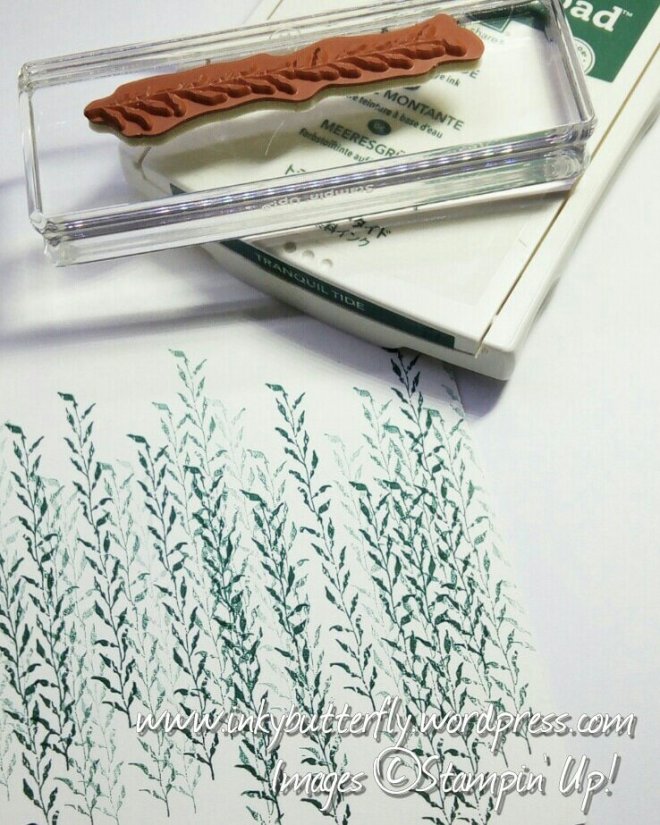
To begin, the stamp was placed on the left hand edge of the white card stock.

The stamp was picked up on the door of the Stamparatus, inked up with Lovely Lipstick ink and stamped on to the card.

Using the hinge step technique, the stamp was repeated along the card.

The stamp was repositioned to create the next row, and so on until the card was covered.

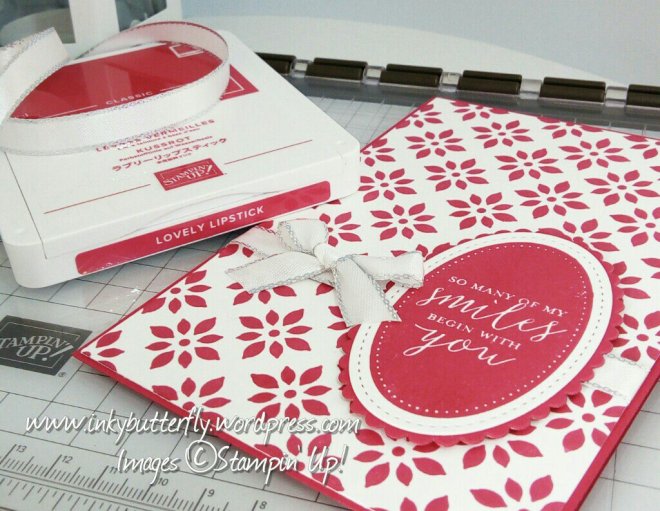
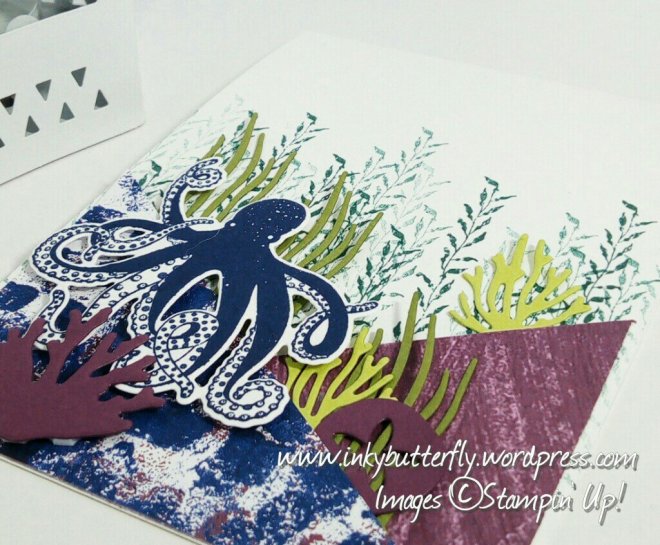
Some metallic edge ribbon was attached below centre before adhering to a Lovely Lipstick card base.

The feature stamp was inked with Lovely Lipstick and stamped on to Whisper White card stock. This was die cut using the Layering Ovals framelits. These were also used to cut a scalloped layer too.

Once assembled, this was was attached to the card with dimensionals.

A small bow was added to the ribbon to complete the card.

I hope you enjoyed this project. The supplies used are listed and linked to the online store below.

The hostess code for June is 4QCQ4HPT.

Thanks for stopping by today and happy Stampin’!

Verity x

Product List

Stamparatus

[148187]

£46.00

Bloom with Happiness #FMS340

Hi All,

The Freshly Made Sketches team have provided some lovely inspiration for this card sketch. You can see them all here!

I have used the Varied Vases bundle to make my card today.

A 2-1/2 inch strip of Whisper White card stock was stamped using Gray Granite ink and the flower image.

Balmy Blue ink was used to fill in the flower heads and add the sentiment.

The vases were punched from white card stock and adhered over the stems.

The panel was added to a 2-3/4 inch strip of Balmy Blue card stock and then on to a Gray Granite card base.

Finally, some Wink of Stella clear glitter was added to the flowers.

I hope you enjoyed this project. The supplies used are listed below.

Thanks for stopping by today and happy Stampin’!

Verity x

Product List

Artisan Congrats

Good Morning!

Loving the colour combination on this card today. They are all part of the Neutrals colour family! Following the “Colour Revamp” Mossy Meadow has returned, Night of Navy has moved from the Regal colour family and there is the fabulous new Merry Merlot and Gray Granite!

I have used the Artisan Textures stamp set, (love this set) and combined it with the Lined Alphabet set to create my own bold sentiment.

The letters were stamp first with clear Versamark ink and heat embossed with clear powder.

Each of the inks were used to stamp over the top of the embossed letters, then the excess gently wiped away. This added to the grungy effect.

Gray Granite was used to add some extra texture. The panel was trimmed down and mounted on to black card stock.

Some Linen Thread was wrapped around the bottom of the panel before adhering to the card base.

The additional portion of the sentiment was taken from the Itty Bitty Greetings set. This was also stamped in clear Versamark ink on to black card. This was heat embossed with white powder. This was added to the card using dimensionals.

I hope you enjoyed this project. The supplies used are listed and linked to the online store below.

I would love you to shop with me!

Use the hostess code 4QCQ4HPT if your order is less than £150 to get a little something extra from me in July!

Would you like to join Stampin’ Up!? Find out more here!. It would be great to have you on my team!

Thanks for stopping by today and Happy Stampin’!

Verity x

Product List

Linen Thread

[104199]

£4.25

You are Wonderful #GDP141

Good Morning Everyone,

The Global Design Project this week has a colour challenge going on.

The Design Team have created some stunning samples that can be seen here!

I thought these colours were very autumnal, so I pulled out the Rooted in Nature stamp set.

I opted to use Rich Razzleberry as the base for the card.

A white layer was embossed with the Petal Burst embossing folder.

Three leaves were stamped with Pumpkin Pie ink and die cut.

Three squares were also die cut from white card stock, these could also be cut using a trimmer.

The sentiment was stamped with Real Red ink and trimmed down to get an even border.

The elements were arranged on the front of the card and secured with dimensionals.

I hope you enjoyed this project. The supplies used are listed below.

Thanks for stopping by today and Happy Stampin’!

Verity x

Product List

June Hostess Code: 4QCQ4HPT

Accented Blooms

Good Morning Everyone,

The Accented Blooms stamp set is a new addition to the Stampin’ Up! catalogue.

The image was stamped on to a 3-1/2 inch square of Whisper White card stock with Black Stazon ink.

I used water colour pencils and a blender pen to colour the flowers. A Clear Wink of Stella glitter brush added some sparkle.

The Tailored Tag punch was used cut the sentiment. This was stamped with Sahara Sand ink.

The panel was layered on to some Sahara Sand card before adhering to a Basic Black 4 inch square card base. The sentiment was then add using dimensionals.

I hope you enjoyed this project. The supplies used are listed and linked to the online store below.

Thanks for stopping by today and Happy Stampin’!

Verity x

Product List

Blender Pens

[102845]

£10.75

June Hostess Code: 4QCQ4HPT

Inspire.Create #019

Hi there,

Today’s post is my entry in the Inspire.Create. Challenge.

The theme is the new Stampin’ Up! In Colours.

You can see what the design team have created by clicking here!

I have kept the design simple teaming these bright colours with neutrals.

I have used Touches of Texture and All Things Thanks stamp sets.

I started with Pineapple Punch to stamp the splatter image in the background.

The flower was inked with Grapefruit Grove and adding some Lovely Lipstick to the centre and edges with a sponge dauber.

I added the stem using Call Me Clover ink.

Blueberry Bushel ink was used to stamp the sentiment.

The Detailed Trio punch was used to round the corners of the card stock.

Some Polka Dot Tulle ribbon was tied around the bottom before adhering to a Grey Granite card base.

I hope you enjoyed this project. The supplies are listed below.

Thanks for stopping by today and Happy Stampin’!

Verity x

Product List

June Hostess Code: 4QCQ4HPT

Big Time

Good Morning Everybody,

I fancied doing some colouring so I pulled out this Animal Outing stamp set.

As I was using Stampin’ Blends to colour, I stamped the images with Memento ink on to a 3-1/2 square of Whisper White card stock.

The rhino was coloured with Smoky Slate and Ivory;

The frog is Rich Razzleberry;

The bird is Pool Party and Bermuda Bay;

Old Olive and Bronze were used for the branch.

The card base was made from Call Me Clover card stock which was cut to 8 by 4 inches, scored at 4 inches.

A 2 inch strip of In Colour DSP was added to the right hand side of the card, then embossed with the Layered Leaves Dynamic Textures embossing folder.

Layering Squares framelits were used to make a small frame of card stock which was adhered at an angle with mini dimensionals. Some Wink of Stella glitter pen added some sparkle.

The stamped panel adhered over the top of this.

The cute sentiment was stamped with Call Me Clover ink and cut with a 1-1/4 inch circle punch. This was added to a 1-3/8 scallop circle cut from the same DSP.

I hope you enjoyed this project. The supplies used are listed below. Click the picture to be directed to the online store.

The hostess code for orders less than £150 is 4QCQ4HPT. I would love to be your demonstrator.

If you wish to place an order of more than £99, consider joining Stampin’ Up! This means you can choose £130 worth of product to build your custom starter kit. There is no obligation to sell. Find out more here!

If you want a free copy of the catalogue please contact me, otherwise a PDF copy is available to view in the menu.

Thanks for stopping by today and Happy Stampin’!

Verity x

Product List

Cue the Confetti

Good Morning!

Welcome to another InspireInk blog hop! This is a group of crafty friends giving inspiration based on a theme.

I have taken advantage of the bright new In Colours for my design and nothing says fun better than a shaker card!

The Pick a Pennant stamp set was used to add banners across to top of the card base using Blueberry Bushel, Call Me Clover and Grapefruit Grove ink.

The shaker element is made using the layering squares framelits. I decided to use a double frame cut from Lovely Lipstick and Pineapple Punch card stock. Iridescent sequins were used in the shaker.

The sentiment was stamped with Blueberry Bushel ink. The Tailored Tag punch was used to shape the end.

Finally, the Balloon Bouquet punch was used to cut balloons in all five colours and arranged on the card.

I hope you enjoyed this project.

Please click below to move on to the lovely Sam’s project!

Thanks for stopping by today and Happy Stampin’!

Verity x

Product List

Hostess Code: 4QCQ4HPT

Textures of the Sea #FMS339

Hello Everyone,

This week’s sketch challenge has been set by Jen Brum.

The design team have made some great projects as inspiration; you can see them all on the Freshly Made Sketches blog, here!

This is my entry for the challenge;

I really wanted to use Sea of Textures on this card. I thought the shape could be a coral reef on the sea bed.

I picked out some paper from the coordinating designer series paper collection. The paper was cut diagonally, one piece was flipped over to create the “V” shape.

Before adhering to the card, I stamped the tall sea weed across the background with Tranquil Tide ink.

The papers were added to the card, leaving space for other pieces to be positioned behind them.

Other seaweed and coral elements were die cut from Old Olive, Lemon Lime Twist and Fresh Fig. These were tucked in place.

Finally, the octopus was stamped with Night of Navy ink, die cut and adhered with dimensionals.

I hope you enjoyed this project. The supplies used are listed below.

Thanks for stopping by today and Happy Stampin’!

Verity x

Product List

Getting There

Hello Everyone,

The project for today uses the new Lilypad Lake bundle.

I like to use the “small stamps” to make cards as they can get overlooked.

This card features the little sail boats, I thought the sentiment was just right.

I have used Whisper White card stock to stamp on measuring 3-3/4 by 5-1/4 inches.

A combination of Coastal Cabana and Balmy Blue ink was used to stamp the water. First, second and third generation stamping added depth and texture.

The sentiment was stamped so the first half lay on the horizon, with the second part off set to the right.

The boats were stamped with Poppy Parade and Gorgeous Grape inks. A blender pen was used to move the ink slightly to add a hint of colour to the sails.

These were die cut and adhered to the card, using a combination of snail and dimensionals.

The panel was added to Tranquil Tide card stock and then on to a Very Vanilla card base.

I hope you enjoyed this project. The supplies used are listed below. They will be available to purchase from 1st June.

If you don’t have a copy of the new catalogue, please contact me and I will send one out to you free of charge!

Thanks for stopping by today and Happy Stampin’!

Verity x

Product List

Blender Pens

[102845]

£10.75

Thinking of You #GDP140

Good Morning Everyone!

This week the Global Design Project team are casing this wonderful card from Brian King.

You can see all their cards here!

This is my interpretation using the new Rooted in Nature bundle.

A piece of Whisper White card stock was cut to 3 by 4-3/4 inches.

The bottom portion was stamped with leaves using second generation Soft Sea Foam and Mint Macaron inks.

The sentiment was added over top with black ink.

The Rooted in Nature dies include some elements that will emboss rather the cut. The coordinating stamped leaves were embossed with the Big Shot.

The panel was adhered to some Soft Suede card stock. This was then added to a Tranquil Tide card base using dimensionals.

The beautiful tree as stamped twice with Blackberry Bliss ink and die cut. The lighter image was adhered flat, the other was raised using mini dimensionals.

As a final touch, some Grapefruit Grove twine was added to the tree trunk.

I hope you enjoyed this project. The supplies used are listed below, and available from 1st June.

Thanks for stopping by today and Happy Stampin’!

Verity x

Product List

Big Shot

[143263]

£99.00

Varied Vases

Good Morning!

Introducing Varied Vases stamp set and punch bundle!

As a demonstrator, I get to order brand new goodies ahead of time. These products will be available in the upcoming Stampin’ Up! Annual catalogue which goes live for customers on Friday 1st June. Find out how to join my team here!

I have kept this card very simple.

I started by stamping the shelves in Sahara Sand ink.

As I was using the punch to add the vases, I added the flower outlines with Memento ink. The corresponding blooms were added using the beautiful Mango Melody and Petal Pink inks.

The vases were stamped with Balmy Blue and Highland Heather inks and cut with coordinating punch. These were added to the card with dimensionals.

The little sentiment was add with black ink and the panel added to some Wild Wasabi card before adhered to a white card base.

This is such a lovely set, I am sure I will be doing a lot more with this!

Have you got your copy of the new catalogue? Drop me a message and I will send one out to you, FREE of charge!

Have noticed the brand new ink pad design and colours??

The launch of this year’s catalogue also brings a colour revamp!

There are also some return favourites too. The new colour families will look this this!

As always products used in the projects are listed below, or will be available in the online store from 1st June.

Thanks for stopping by today and Happy Stampin’!

Verity x

Product List

Hello – Just Add Ink #410

Good Morning!

The challenge this week is to use this colourful image as inspiration for a project.

You can see what the design team have made by clicking here!

For me, it was the colours that stood out, along with the bunting and the word ‘hello’.

And this is what I came up with.

The deep green of the wall in the image was mirrored by the Tranquil Tide card base. Clear Versamark ink was used to stamp bunting from the new Pick a Pennant stamp set across the background.

I picked out Pineapple Punch, Grapefruit Grove and the brand new Petal Pink inks to stamp more bunting across a piece of white card stock. This was layered onto Berry Burst and Tempting Turquoise card stock.

I used the Lined Alphabet stamp set to create the word ‘hello’. This was stamped in Versamark ink and then heat embossed with gold powder. The letters were coloured with Bermuda Bay watercolour pencil.

To finish the card, I took the idea of the spots in the background, and added Tranquil Tide pearls from the set of Artisan Pearls.

I hope you enjoyed this project. Some of the supplies used are listed below and are available from 1st June.

Thanks for stopping by today and Happy Stampin’!

Verity x

Product List

Blender Pens

[102845]

£10.75

In Colours 2018

Hello Everyone!

It’s almost here! The new Stampin’ Up! Annual Catalogue 2018 will go live this Friday 1st June.

We will be saying goodbye to the In Colours that joined in 2016….. But that means there are new ones!

Introducing…..

Lovely Lipstick, Grapefruit Grove, Pineapple Punch, Call Me Clover and Blueberry Bushel.

Aren’t they divine!

So for today’s post, I have made five identical cards to showcase these colours and the coordinating card stock and Designer Series Paper.

I have used white card stock to make the card bases and added In Colour DSP to each.

White card stock was cut to 3 by 4-3/4 inches and stamped with matching ink using Touches of Texture.

The Starburst Punch was used to cut the card stocks and adhered to a circle of vellum. This was adhered to the card with dimensionals.

Perennial Birthday was used to stamp the sentiment on to one inch strips of white card. These were trimmed to size using the Triple Banner Punch.

I hope you enjoyed this project. More projects featuring new catalogue items coming over the next week!

Have you got a new catalogue?? If not let me know and I will post one out to you absolutely FREE!

Thanks for stopping by today and Happy Stampin’!

Verity x

Product List

Mini Tag Album

Hi Everyone,

This cute little project I have cased from the lovely Liz Yuille at Old Stables Crafts. You can see Liz’s version of this project here!

Start with a 12 by 12 sheet of designer series paper. I chose a sheet from the Eastern Palace collection.

I used my Stampin’ Trimmer to cut and score the paper, but you could equally use the Simply Scored and some scissors.

Score the paper at 3, 6 and 9 inches.

Turn the paper and score at 2 and 10 inches.

Keeping the paper in this orientation, score at the 6 inch mark down to the first score line, (3 inches). Without moving the paper, cut up to the same score line, (9inches).

To form the book shape, fold in the 2 inch portions. Secure the ends with a little wet glue.

Fold along the short centre score line so that the 2 inch section is visible. Concertina fold along the remaining score lines.

There will be some “loose pages” that can be secured with some double sided tape.

To make the cover, I cut some Dapper Denim card stock to 4-1/8 by 6-1/2 inches. The long side was scored at 3-1/8 inches from both ends to create the “spine”.

Some grosgrain ribbon was adhered to the inside of the cover before securing the pages.

The front was decorated with more patterned paper and Eastern Medallion die cuts.

The tags were made by cutting 2 inch strips of card stock with the Tag Topper punch. These were threaded with Lemon Lime Twist mini striped ribbon.

I hope you enjoyed this project. The supplies used are listed below.

Thanks for stopping by today and Happy Stampin’!

Verity x

Product List

Bone Folder

[102300]

£6.25

Wine with Friends #FMS338

Hi there,

Heres another sketch challenge from the Freshly Made Sketches team.

You can see the inspiration from the design team here!

I chose to use the Half Full stamp set.

The bottles were stamped directly on to a Whisper White card base using Garden Green ink.

Old Olive and Rich Razzleberry watercolour pencils and blender pens were used to colour the images.

A sentiment from the same set was stamped with Rich Razzleberry ink. This was trimmed to size and added to the card with dimensionals.

I hope you enjoyed this project. The supplies used are listed below.

Thanks for stopping by today and Happy Stampin’!

Verity x

Product List

Blender Pens

[102845]

£10.75

Bone Folder

[102300]

£6.25

Enjoy!

Hi Everyone,

Today’s card was made with minimal supplies.

The card base was made with Perfect Plum card stock.

A Very Vanilla layer was stamped with the splatter image from the Swirly Bird stamp set using Perfect Plum ink before adhering to the card base.

The smaller layers were cut one inch smaller the the base layers.

A selection of swirl images were stamped on to the Very Vanilla card stock. First, second and third generation ink were used to create texture.

A Perfect Plum die cut swirl was secured to the upper right portion, with the sentiment banner added over the top.

I hope you enjoyed this project. The supplies used are listed and linked to the online store below.

Thanks for stopping by today and Happy Stampin’!

Verity x

Product List

Sorry… #GDP139

Good Morning Everyone,

As it is Wednesday, today’s project is my entry the Global Design Project.

This week is a themed challenge;

You can see what the design team created as inspiration here!

This is my project;

I have used a simple layout using retiring card stock and paper.

The base uses the beautiful Soft Sky, cut at 4-1/4 inches and scored at 5-7/8 inches.

A three inch strip of designer series paper from the Naturally Eclectic collection was adhered to some Peekaboo Peach card stock and then on to Wild Wasabi card stock.

This was adhered to the card base with Fast Fuse.

The sentiment uses the Sorry for Everything stamp set. This set will carry over to the new catalogue!

Old Olive ink was used to stamp the sentiment on to white card stock and cut to size with the Stampin’ Trimmer. This was adhered with dimensionals.

Some clear rhinestones completed the card.

I hope you enjoyed this project. The supplies used are listed below.

Thanks for stopping by today and Happy Stampin’!

Verity x

Product List

A Special Note

Good Morning!

I love how this card turned out. I used a different colour combo than I would do normally. The bright blue really pops the rest of the design.

The base is made with Berry Burst card stock and layered with Tempting Turquoise and Fresh Florals DSP.

The same layers were used to make a square topper. The DSP was flipped to reveal the complimentary pattern for added interest. This was adhered to the card with dimensionals.

Three daisies were punched from Berry Burst card stock and adhered together. This was added to the bottom right corner of the topper. Leaves punched from Wild Wasabi card were added.

S cluster of rhinestones were added to the centre of the flower.

Floral Phrases was used for the sentiment which was stamped with Tempting Turquoise ink.

I hope you enjoyed this project. The supplies used are listed and linked to the online store below.

Thanks of stopping by today and Happy Stampin’!

Verity x

Product List

Daisy Punch

[143713]

£16.00

Leaf Punch

[144667]

£14.50

Lovely Happy Birthday

Good Morning!

I’ve made another large card for today’s project. This one features the Whole Lot of Lovely designer series paper.

The base was made from Tangerine Tango card stock which was cut lengthways at 5-7/8 inches and then folded in half. Keep the leftover strip for later.

A 5-3/4 inch square of patterned paper was added to the front.

Two 3-3/4 inch squares of Tangerine Tango were cut to make the topper. One was covered with patterned paper.

The plain square was adhered flat to the card base with Snail adhesive. The patterned piece was added at an angle with dimensionals.

Using the strip of leftover card stock, punch out six flowers with the Pansy punch. Also cut three sets of leaves from Old Olive card stock with the Leaf Punch.

Each of the flowers were lightly spritzed with water and scrunched. Once dry, two flowers were layered together with glue dots.

The flowers and leaves were arranged in the corner. Black rhinestones were added to the centres.

I used my stamparatus to make sure the sentiment was stamped well. Using the tool allowed me to stamp twice in the same place to give a very crisp image. I cut some banner ends and adhered with Snail adhesive.

I hope you enjoyed this project. The supplies used are listed and linked to the online store below.

Thanks for stopping by today and Happy Stampin’!

Verity x

Product List

Pansy Punch

[130698]

£14.50

Leaf Punch

[144667]

£14.50