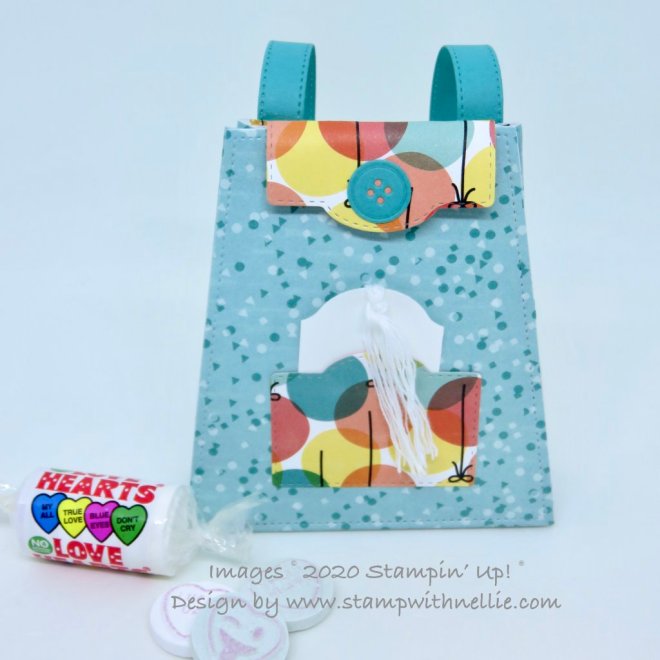
Watercolour Blossoms

Hello Everyone,

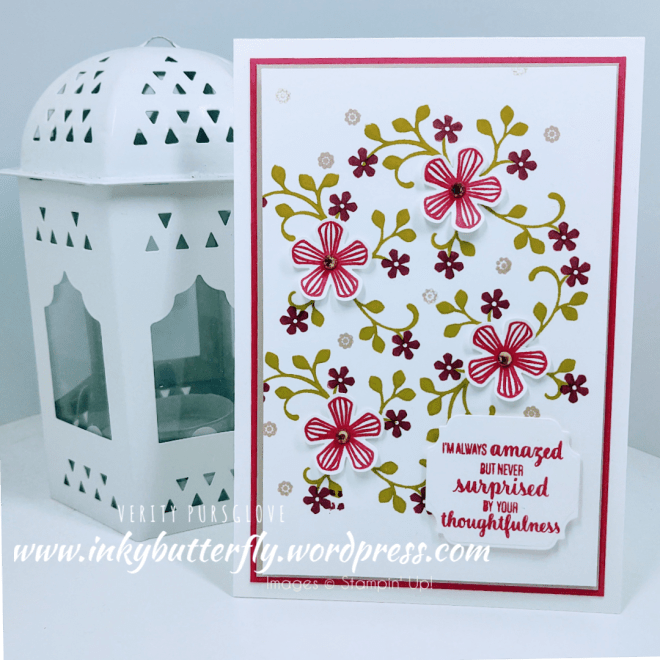
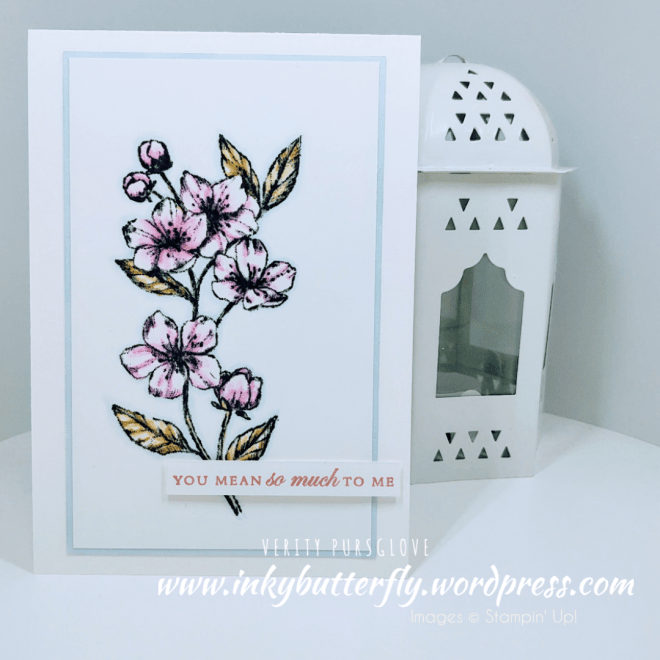
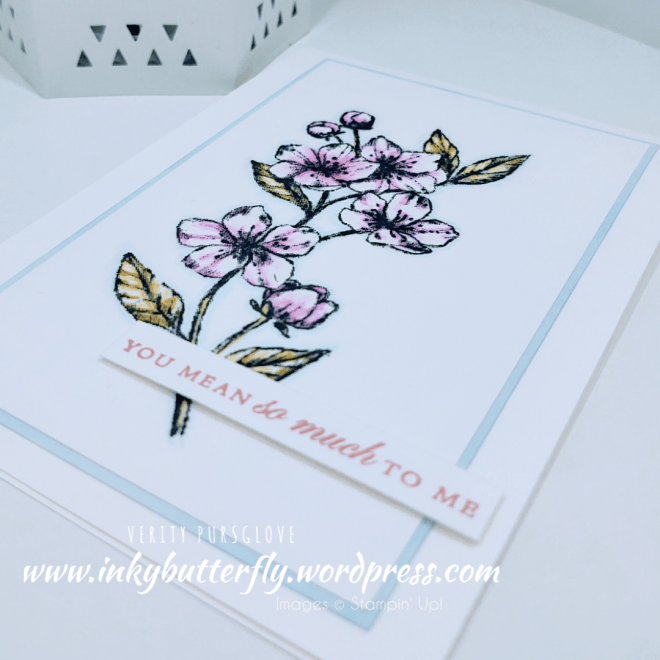
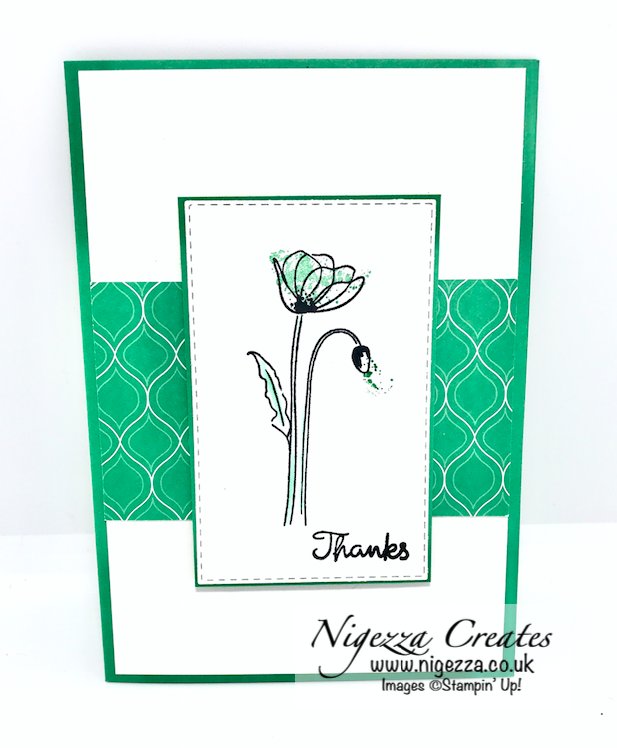
Another card for you today with lots of white space.

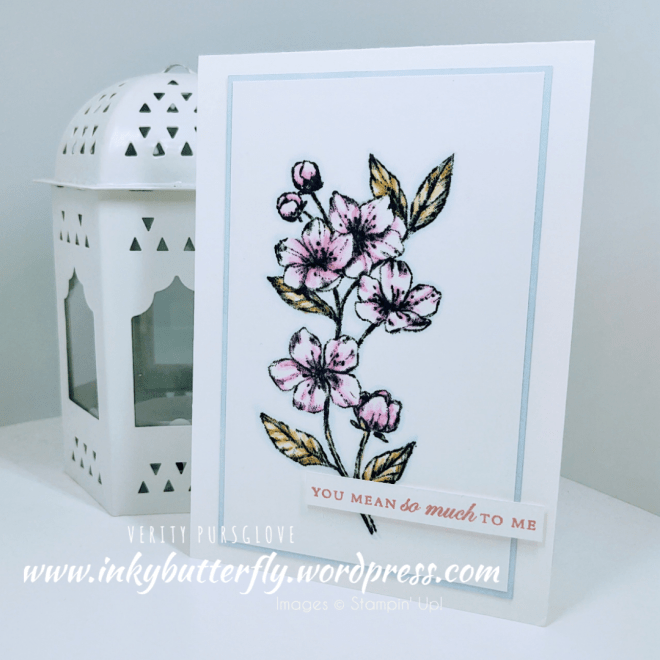
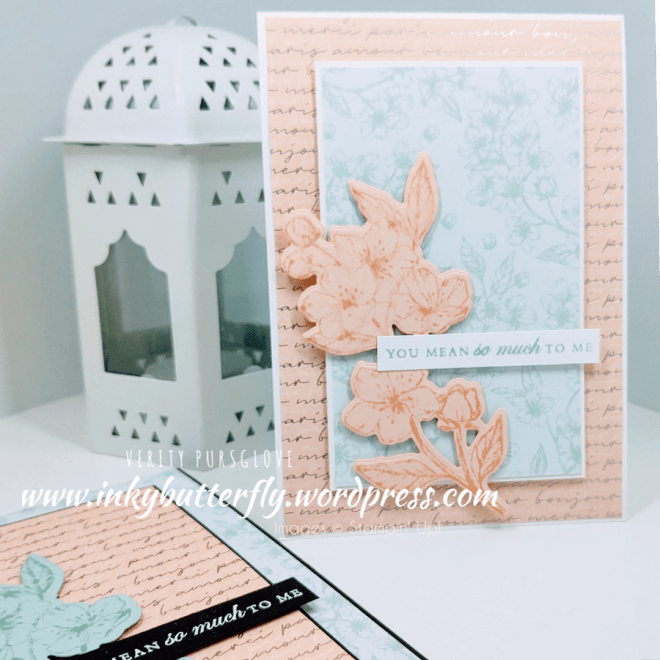
The cherry blossom was stamped with Stazon ink.

Flirty Flamingo and Old Olive watercolour pencils were used to colour the image.

A light Seaside Spray Stampin’ Blend Marker was used to outline the image and softened with a colourless lifter. It’s amazing how much of a difference it makes.

The image was layered with Seaside Spray card stock before adhering to a white card base.

The sentiment strip was added with dimensionals.

I hope you enjoyed this project. The supplies used are listed and linked to the online store below.

I would love to be your demonstrator.

Thanks for stopping by today and happy Stampin’!

Verity xx

Product List

Blender Pens

[102845]

£11.25

Paper Trimmer

[152392]

£23.00

Grace’s Garden

Hello Everyone,

I am so pleased with how this card turned out. It’s been in my head for some time!

I stamped the floral images I wanted to use on to some Whisper White card stock using Stazon black ink. The gate was stamped ith Memento ink. These were left to dry completely before colouring them.

Watercolour pencils were used to colour the flowers, smoothing out the lines with a blender pen.

I wanted the gate to be white, but added a touch of Ivory Stampin’ Blends marker for some depth.

All the pieces were die cut ready to adhere to the card.

A white card base was prepared by adding a layer of card stock which I coloured the edge of with a Highland Heather Stampin’ Blend Marker.

A final layer was stamped with a sentiment. The die cut pieces were added to the card using Snail and dimensionals.

I hope you enjoyed this project. The supplies used are listed and linked to the online store below.

I would love to be your demonstrator.

Thanks for stopping by today and happy Stampin’!

Verity xx

Product List

Blender Pens

[102845]

£11.25

Thank You Blooms

Hello Everyone,

I really love how this card turned out.

The design combines the So Sentimental bundle and Sale-a-bration items.

A Gray Granite card base was prepared and layered with white card stock.

Night of Navy ink was used to stamp the sentiment which was die cut and adhered with dimensionals.

Flower centres were stamped in Daffodil Delight and Grapefruit Grove inks. The punch was used to cut the flowers to give white petals.

Before adhering, a few leaves were added first using Old Olive. The blooms were shaped and added with multipurpose glue.

I hope you enjoyed this project. The supplies used are listed and linked to the online store below.

I would love to be your demonstrator.

Thanks for stopping by today and happy Stampin’!

Verity xx

Product List

CAS Colours and Sketches #356

Hello Everyone,

Welcome to my blog. Today I am sharing my project for the CAS Colours and Sketches challenge.

This time it’s a colour challenge. The design team have made some wonderful samples as inspiration. You can see them here

I wanted to create something different…. And this is it!

I used the Tailored Tag punch to cut shapes from Real Red, Flirty Flamingo and Silver Glimmer card stock. These were adhered to a piece of white card stock.

The excess was trimmed away and layered with more glimmer paper before adding to a white card base.

Real Red ink was used to stamp the sentiment which was also cut with the Tailored Tag punch. This was adhered with dimensionals.

I hope you enjoyed this project. The supplies used are listed and linked to the online store below.

I would love to be your demonstrator.

Thanks for stopping by today and happy Stampin’!

Verity xx

Product List

Paper Trimmer

[152392]

£23.00

Project Share Project

Hello Everyone,

Welcome to this week’s Project Share. As always my friends have created some lovely work. Please use the links to visit their blogs and read more about their projects.

Jill’s card shows that great cards can be made with a great layout. Change the colours and sentiment to suit the occasion.

Visit Jill’s blog here to see how this card was made.

I can’t believe I haven’t used this die yet! Look how cute Heather’s this back pack is.

See more at Heather’s blog here

This just one of the cards Gez gas made with one sheet of designer series paper!

See the others at Gez’s blog here

I hope you enjoyed these projects. The supplies used are listed and linked to the online store below.

I would love to be your demonstrator.

Thanks for stopping by today and happy Stampin’!

Verity xx

Product List

In Color 2018–2020 6

In Color 2018–2020 6″ X 6″ (15.2 X 15.2 Cm) Designer Series Paper

[146963]

£10.25

Lily Pad Thank You

Hello Everyone,

On first glance, the Lily Impressions designer series paper looks a bit crazy with so many bold colours…. But look how great this card looks!

DSP was adhered to a white card base.

Rich Razzleberry ink was used to stamp the sentiment and water lily images. These were cut with the Stitched So Sweetly and Lily Pad dies. An additional die cut was cut from Rich Razzleberry card stock.

The sentiment was adhered first with dimensionals.

The water lily was coloured by pulling ink from the outline image with a Wink of Stella glitter brush. The die cut outline was adhered over the top and then added to the card.

I hope you enjoyed this project. The supplies used are listed and linked to the online store below.

I would love to be your demonstrator.

Thanks for stopping by today and happy Stampin’!

Verity xx

Product List

Positive Birthday Thoughts

Hello Everyone,

Some exciting new coordinating products are on their way to the online store very soon.

These will include the Nature’s Thoughts dies that match the Positive Thoughts stamp set.

Whisper White card stock was layered on to Crumb Cake card stock. Polka Dot Tulle ribbon was tied around the panel before adhering to a Petal Pink card base.

The sentiment was stamped with Pool Party ink and die cut with the Stitched So Sweetly set. This was adhered to a larger die cut with dimensionals.

The leaves and flowers were stamped and die cut. These were added using multipurpose glue.

I hope you enjoyed this project. The supplies used are listed and linked to the online store below.

I would love to be your demonstrator.

Thanks for stopping by today and happy Stampin’!

Verity xx

Product List

Best Dressed Birthday

Hello Everyone,

Today’s card mixes Best Dressed designer series paper and the Layered with Kindness stamp set.

A white card base was covered with this pretty floral design paper.

A Stitched Rectangle was stamped with Old Olive ink to create a background. This was adhered to a layer of Lovely Lipstick card stock and added to the base with dimensionals.

The sentiment was stamped with Lovely Lipstick ink and cut with the coordinating punch. This was also adhered with dimensionals.

I hope you enjoyed this project. The supplies used are listed and linked to the online store below.

I would love to be your demonstrator.

Thanks for stopping by today and happy Stampin’!

Verity xx

Product List

CAS Colours and Sketches #355

Hello Everyone,

Today’s card is my entry for the CAS Colours & Sketches challenge.

This week there is a sketch to work with. The design team have created some very creative samples that you can see here

As I missed out on the previous week’s colour challenge, I’m throwing this in too just for fun!

And this is what I have designed.

I have used the Daisy Lane bundle from the annual catalogue.

I started by stamping the leaf from the set with Granny Apple Green ink. This panel was added to a white card base with dimensionals.

Daisies were stamped in Seaside Spray ink and punched out. These were adhered along the top of the stamped panel.

The sentiment is from the Sale-a-bration set, Sending you Thoughts. I used Rococo Rose ink and cut these with a Stitched Rectangle die.

I hope you enjoyed this project. The supplies used are listed and linked to the online store below.

I would love to be your demonstrator.

Thanks for stopping by today and happy Stampin’!

Verity xx

Product List

Birthday Blooms

Hello Everyone,

I can’t stop using the Thoughtful Blooms stamp set and Small Bloom punch!

Today it’s for a birthday card.

This one is really simple leaving lots of white space.

I added some foliage to the card base with Early Espresso ink.

A white layer was stamped with a sentiment from Peaceful Moments using Shaded Spruce ink. This was adhered to the card base with dimensionals.

Blooms were stamped with Balmy Blue ink and punched out. These were added using multipurpose glue.

The Leaf punch was used to cut leaves from vellum and added around the flowers.

I hope you enjoyed this project. The supplies used are listed and linked to the online store below.

I would love to be your demonstrator.

Thanks for stopping by today and happy Stampin’!

Verity xx

Product List

Leaf Punch

[144667]

£15.00

Paper Trimmer

[152392]

£23.00

Bone Folder

[102300]

£6.50

Punched Blooms

Hello Everyone,

This project has a little Sneak Peek at a new product coming soon, the Pleased as Punch Designer Series Paper.

This is one of a collection of items specifically designed to coordinate with products already available.

The paper can be used with these items;

Product List

For this project I wanted to create a wreath look with the Painted Labels dies. These elements were cut from Crumb Cake and Whisper White card stock.

The sentiment from the Honey Bee set was stamped with Mossy Meadow ink.

The same ink was used to add the foliage on the white card layer.

The card was assembled using a Crumb Cake card base.

One each of the coloured flowers on the paper was punched and adhered to the card.

A rhinestone was added to each of the flower centres.

I hope you enjoyed this project. The supplies used are listed and linked to the online store below.

I would love to be your demonstrator.

Thanks for stopping by today and happy Stampin’!

Verity xx

Product List

Parisian Blossoms 2 Ways

Hello Everyone,

I couldn’t decide on whether to use black or white card bases with this layout, so I made it with both.

Which do you prefer?

I used the usual card and DSP layers to build the card base.

The blossoms were stamped with matching ink on to the same colour card stock for a tone on tone look. Each was adhered with dimensionals.

The sentiment was stamped with Pool Party ink on white card stock. For the black card, this was heat embossed with white powder. These were also adhered with dimensionals.

I hope you enjoyed this project. The supplies used are listed and linked to the online store below.

I would love to be your demonstrator.

Thanks for stopping by today and happy Stampin’!

Verity xx

Product List

Paper Trimmer

[152392]

£23.00

InspireInk Blog Hop January 2020 – Birthdays!

Continue reading InspireInk Blog Hop January 2020 – Birthdays!

The World is Yours

Hello Everyone,

I am using the Peaceful Poppies suite of products for today’s project.

I picked out some designer series paper and added this to a Basic Black card base.

The sentiment was stamped with black ink and die cut with the Ornate Frames set. This was added to the card base with dimensionals.

The poppies were coloured with Stampin’ Blends markers. The dark marker was added to the shadowed parts of the image and blended out with the light marker.

I hope you enjoyed this project. The supplies used are listed and linked to the online store below.

I would love to be your demonstrator.

Thanks for stopping by today and happy Stampin’!

Verity xx

Product List

Every Moment

Hello Everyone,

Did you know you can get this pack of patterned paper for FREE during the Sale-a-bration event?

The paper coordinates perfectly with the Honey Bee bundle, add some card stock to make a qualifying purchase of £45.

The paper was adhered to a Whisper White card base.

Memento ink was used to stamp two bees and the sentiment. The coordinating dies were used to cut the bees. The Nested Labels set was used to cut the sentiment. I also cut the honeycomb, which I coloured with a Mango Melody blends marker.

The die cuts were added to the card base with dimensionals. The honeycomb is very delicate, so this was sandwiched between two dimensionals which also secure the sentiment and one of the bees!

I hope you enjoyed this project. The supplies used are listed and linked to the online store below.

I would love to be your demonstrator.

Thanks for stopping by today and happy Stampin’!

Verity xx

Product List

More Thoughtful Blooms

Hello Everyone,

I just love this stamp set and punch! There are so many colour combinations I want to try. This combo was suggested by the SU colour challenge Facebook group!

Merry Merlot, Lovely Lipstick, Sahara Sand & Granny Apple Green.

I started with Granny Apple Green, stamping the leaf clusters over some Whisper White card stock.

Merry Merlot was used to add the small flowers to the open stems. The spaces were filled with the tiny elements in the stamp set using Sahara Sand ink.

Lovely Lipstick and Sahara Sand card stock was added to a white card base. The stamped panel was trimmed down and adhered with dimensionals.

The blooms were stamped with Lovely Lipstick ink and punched out. Champagne rhinestones were added to the centres.

The sentiment was die cut using the Ornate Frames set. This was adhered with dimensionals.

I hope you enjoyed this project. The supplies used are listed and linked to the online store below.

I would love to be your demonstrator.

Thanks for stopping by today and happy Stampin’!

Verity xx

Product List

Thank You Blooms

Hello Everyone,

Here’s another card using the Parisian Blossoms Designer Series Paper. This time teamed with the Thoughtful Blooms Sale-a-bration stamp set and matching punch.

The topper is made simply, layering the paper with Cherry Cobbler card stock. This was added to a Petal Pink layer with dimensionals before adhering to a white card base.

Cherry Cobbler ink was used to stamp the sentiment and blooms. Petal Pink ink was added to the flowers to coordinate with the DSP. The sentiment was die cut with the Stitched So Sweetly set and the blooms were punched out.

The elements were assembled on to the card front. Champagne rhinestones were added to the flowers to finish.

I hope you enjoyed this project. The supplies used are listed and linked to the online store below.

I would love to be your demonstrator.

Thanks for stopping by today and happy Stampin’!

Verity xx

Product List


CAS Colours and Sketches #353

Hello Everyone,

Welcome to my blog. Today I am sharing my project for this week’s CAS Colours and Sketches challenge.

This time it’s a sketch challenge. The design team have made some wonderful samples as inspiration. You can see them here

And this is what I created!

This is quite different from my usual makes, but I am very pleased with how it turned out.

The base was made with Basic Black card stock. The Nature’s Thoughts dies were used to cut more black card which was layered with Basic Grey card before adding with dimensionals.

For the topper Basic Grey card stock was cut to size. The sentiment from the Positive Thoughts stamp set was added in black ink.

Other elements from the set were stamped on to Whisper White card stock and die cut.

The pieces were adhered to the card with glue and dimensionals.

Some champagne rhinestones were added to the butterfly for some extra sparkle.

I hope you enjoyed this project. The supplies used are listed and linked to the online store below.

I would love to be your demonstrator.

Thanks for stopping by today and happy Stampin’!

Verity xx

Product List

Paper Trimmer

[152392]

£23.00

Project Share Project

Hello Everyone,

Welcome to this week’s Project Share. As always my friends have created some lovely work. Please use the links to visit their blogs and read more about their projects.

Jill’s card uses the new Painted Poppies stamp set and the stunning coordinating Designer Series Paper. A simple layout is so impactful against the white background.

Visit Jill’s blog here for more information.

Heather has created a musical rainbow with help from the Stamparatus stamp positioning tool. Such a happy card!

Visit Heather’s blog here to see how to make this card.

Gez’s milk carton looks amazing in this colour combination. Thoughtful Blooms makes great custom patterned paper.

Visit Gez’s blog here to see more about this project.

I hope you enjoyed these projects. The supplies used are listed and linked to the online store below.

I would love to be your demonstrator.

Thanks for stopping by today and happy Stampin’!

Verity xx

Product List

Stamparatus

[148187]

£46.00

Together

Hello Everyone,

More Designer Series Paper in use today with this stunning Peaceful Poppies collection.

The paper makes card making so easy, just add a sentimental and it’s done!

I opted for a black card base, it really compliments the design.

Poppy Parade ink was used to stamp the sentiment from the Perfectly Framed stamp set. The set coordinates with the Ornate frames.

The die cut was added with dimensionals.

I hope you enjoyed this project. The supplies used are listed and linked to the online store below.

I would love to be your demonstrator.

Thanks for stopping by today and happy Stampin’!

Verity xx

Product List