Upline Colour Challenge

Hello Everyone,

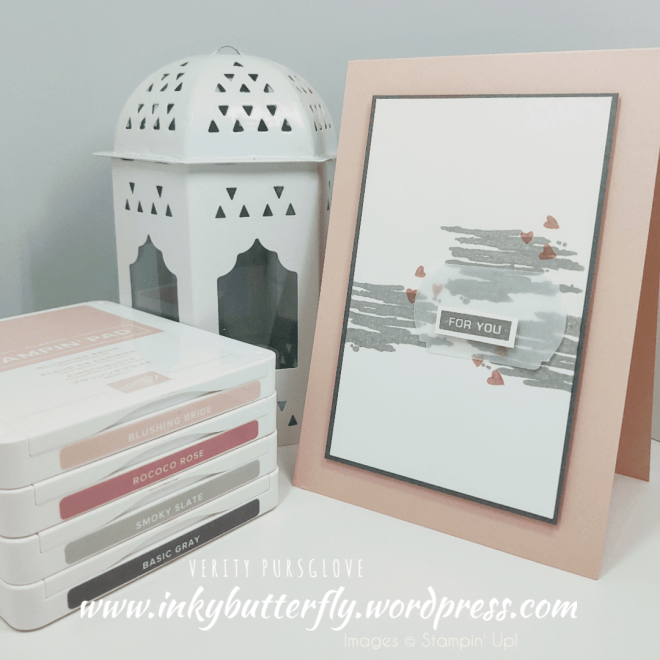
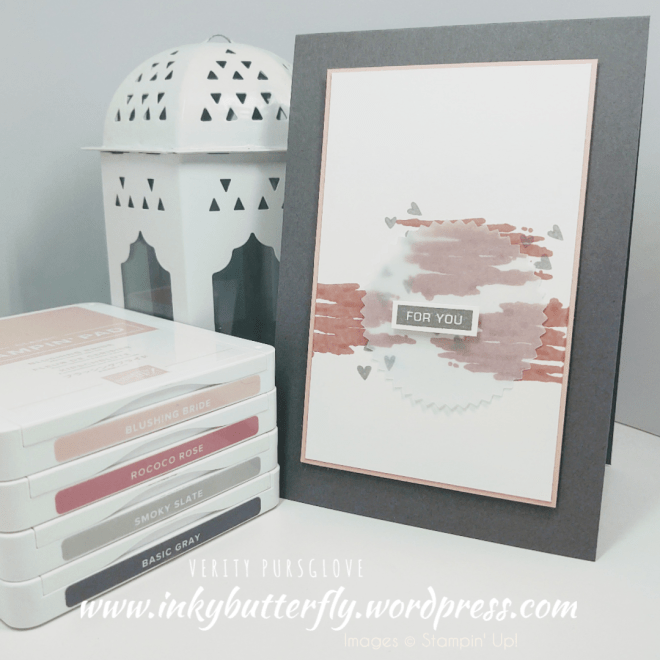
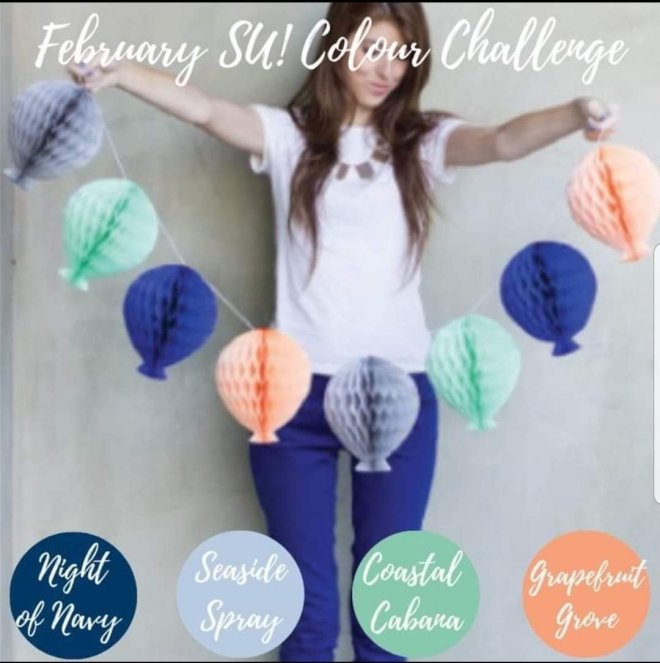
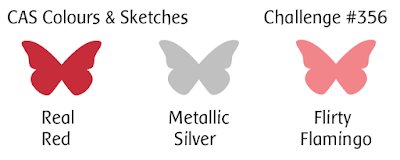
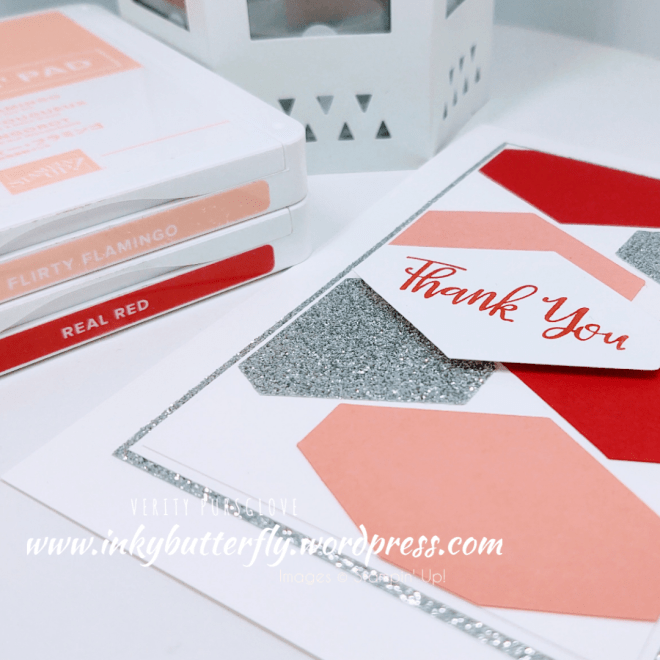
There’s nothing like a colour challenge to get the creativity flowing. This week, my upline challenged the team to use these colours!

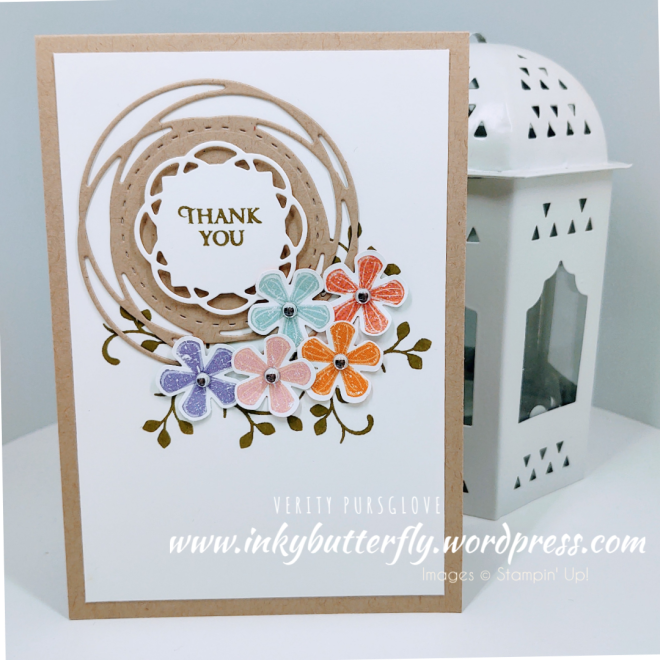
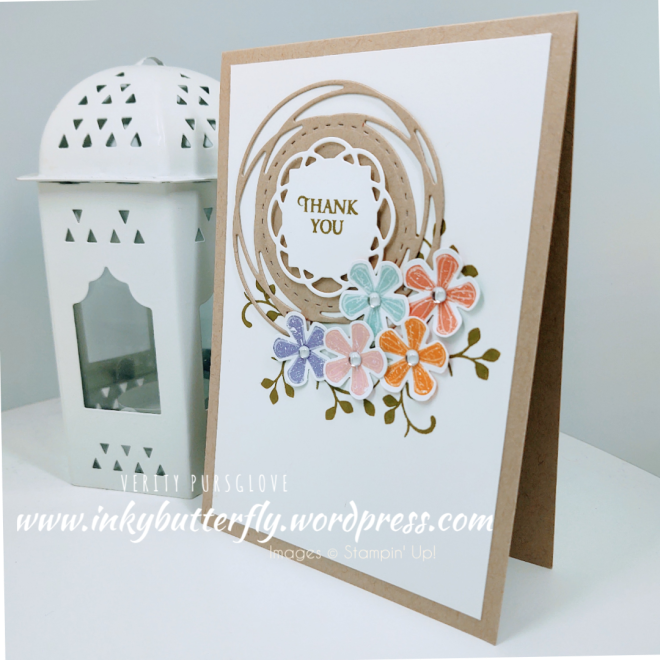
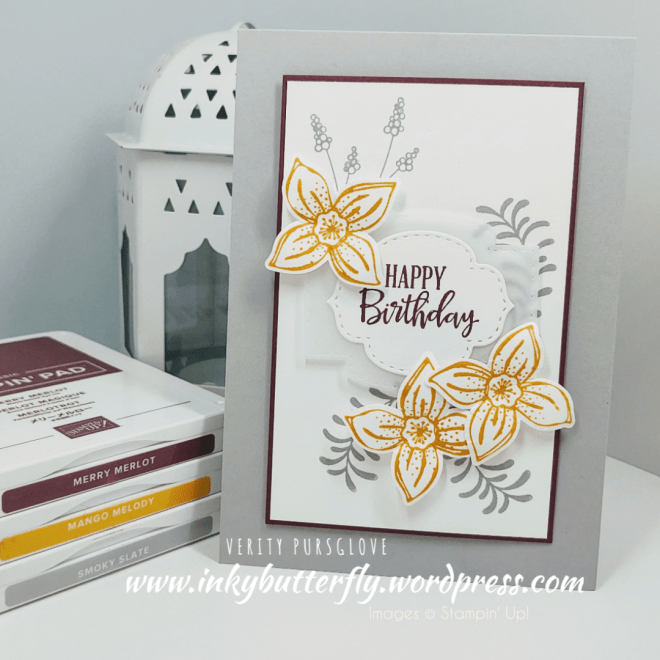
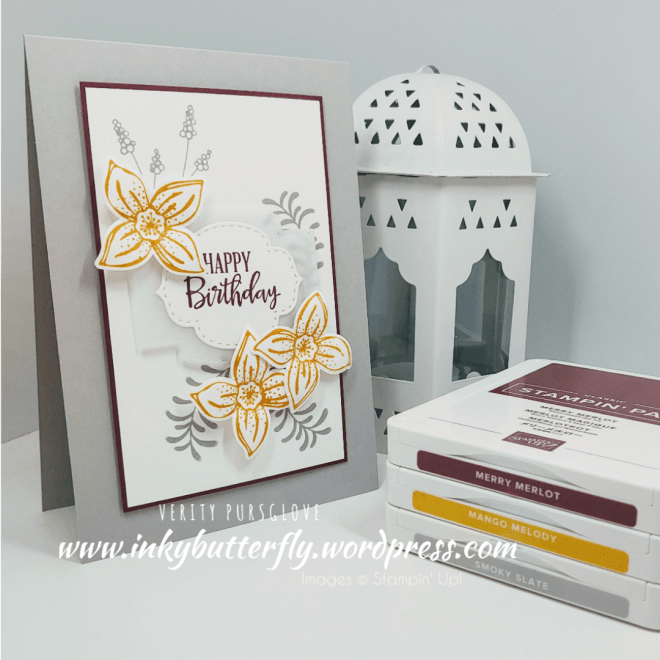
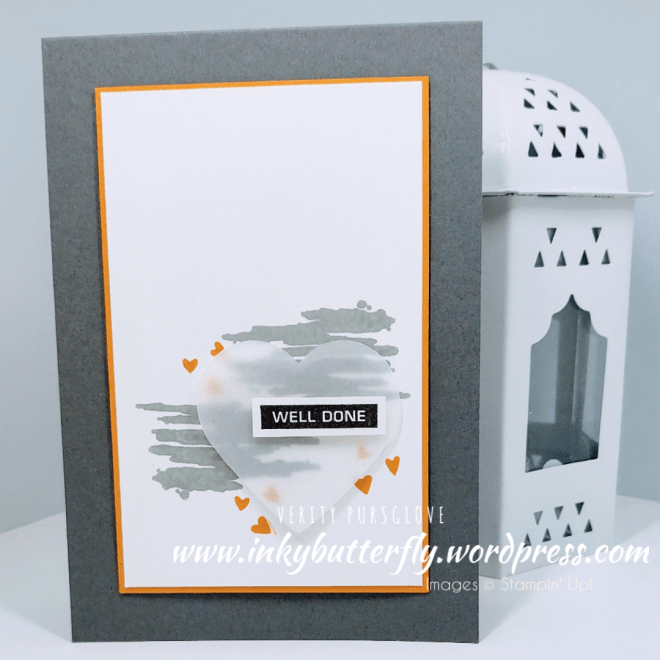
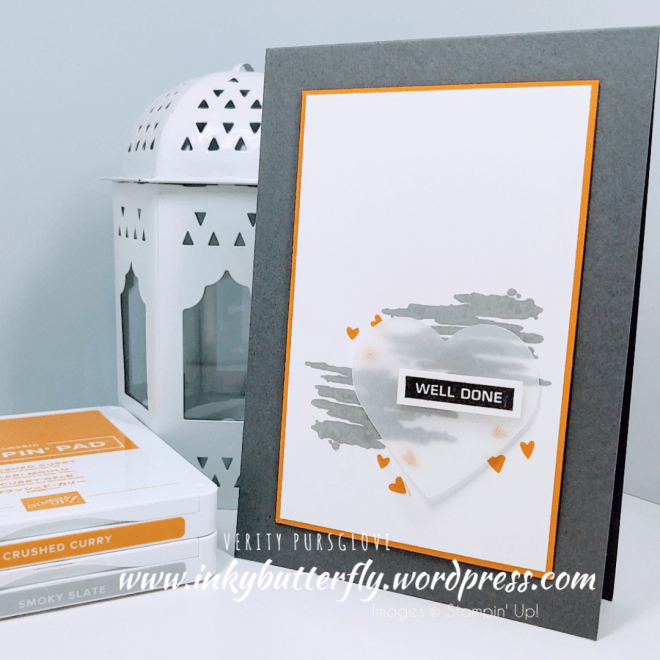
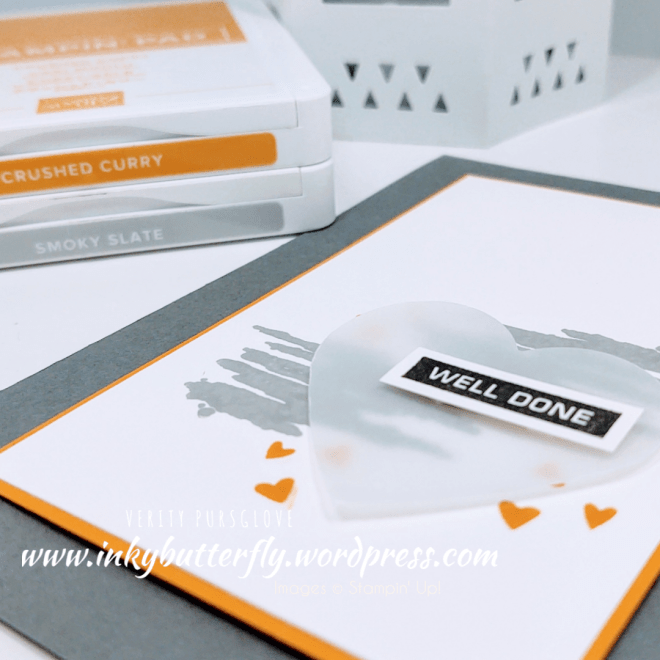
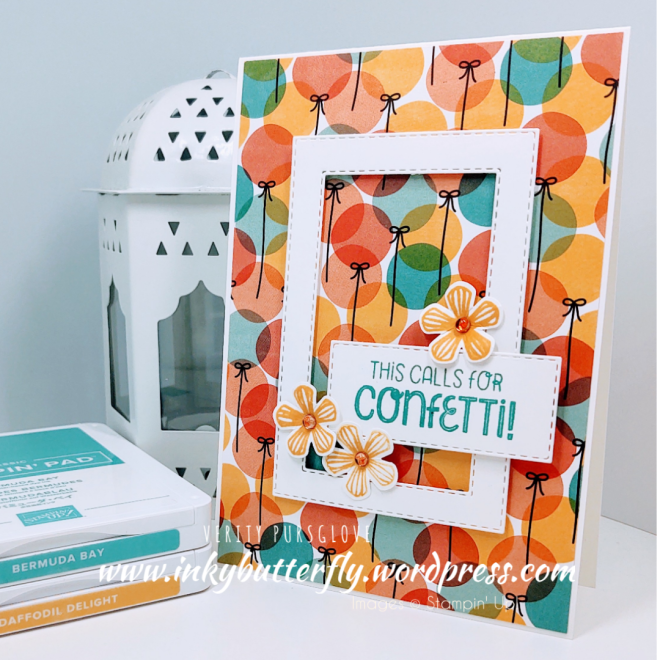
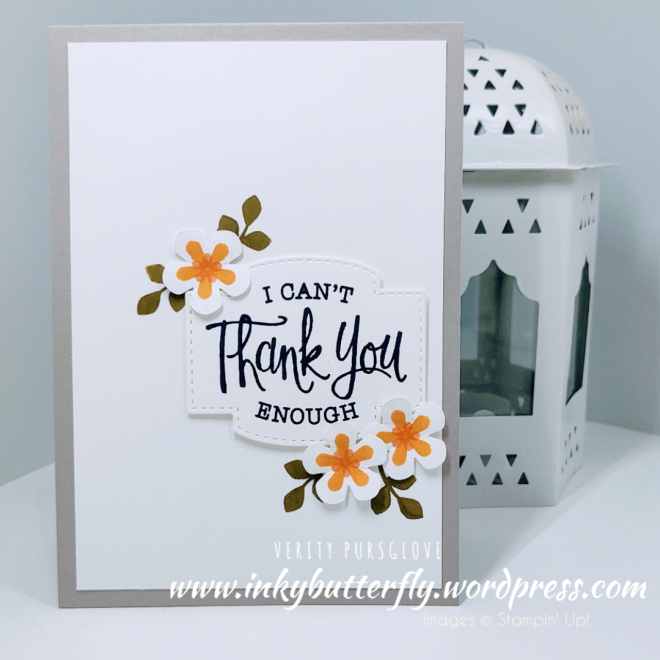
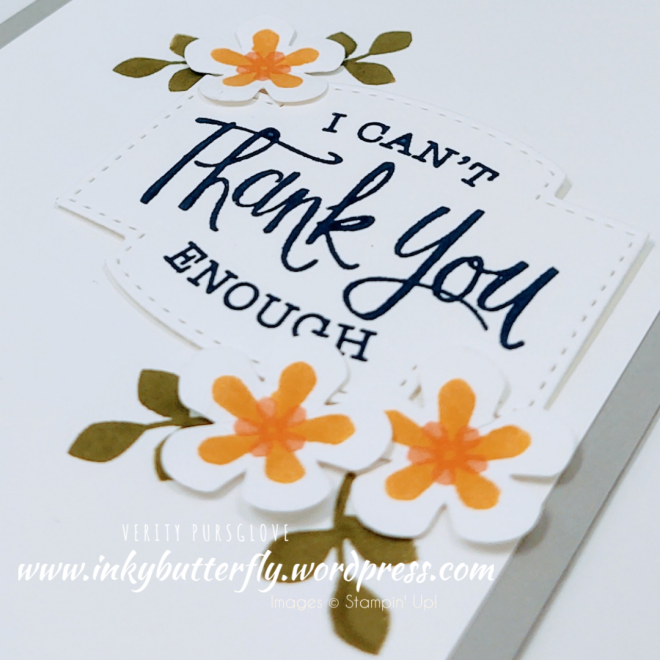
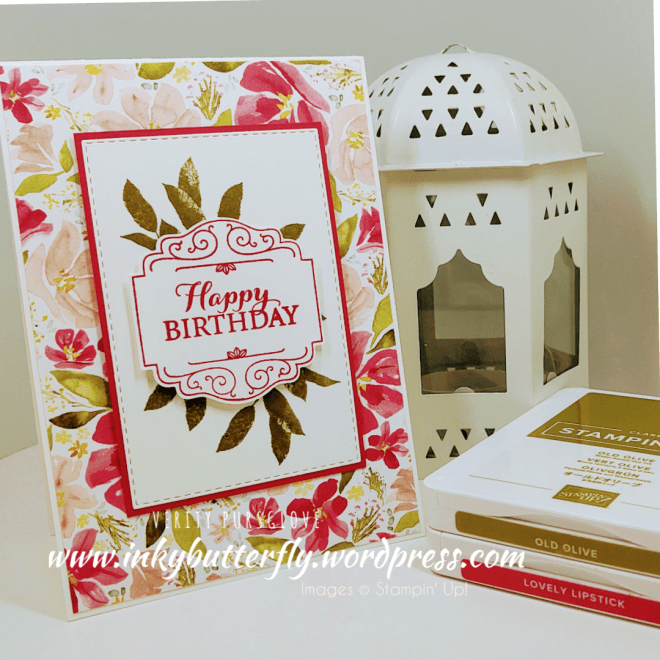
There are some stamp sets that really lend themselves to these types of challenge. Label Me Bold is one of those sets. With great images and some versatile sentiments this is a great beginner set too.

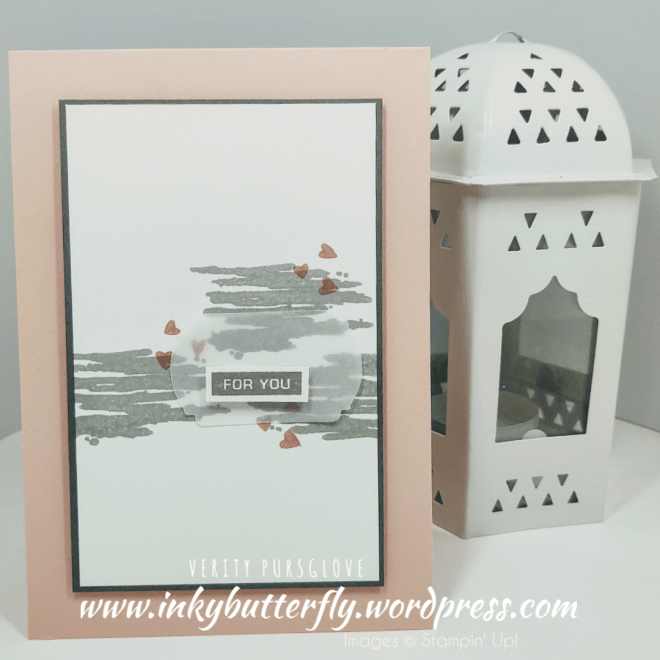
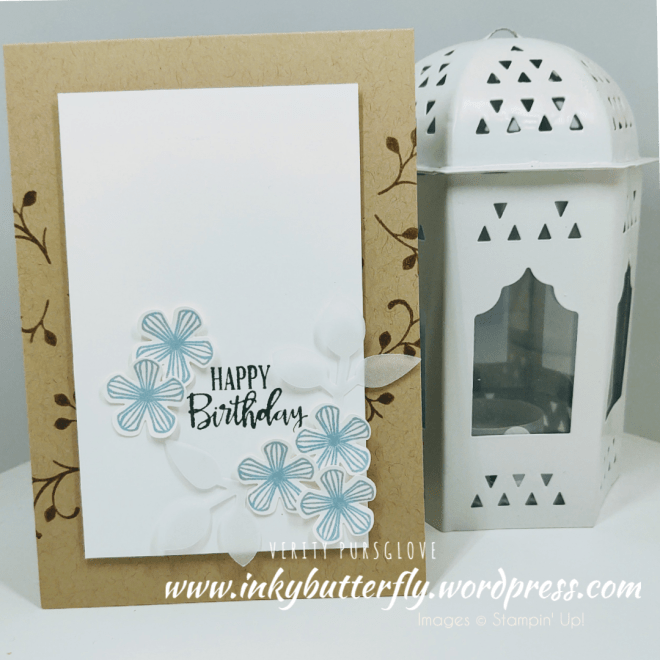
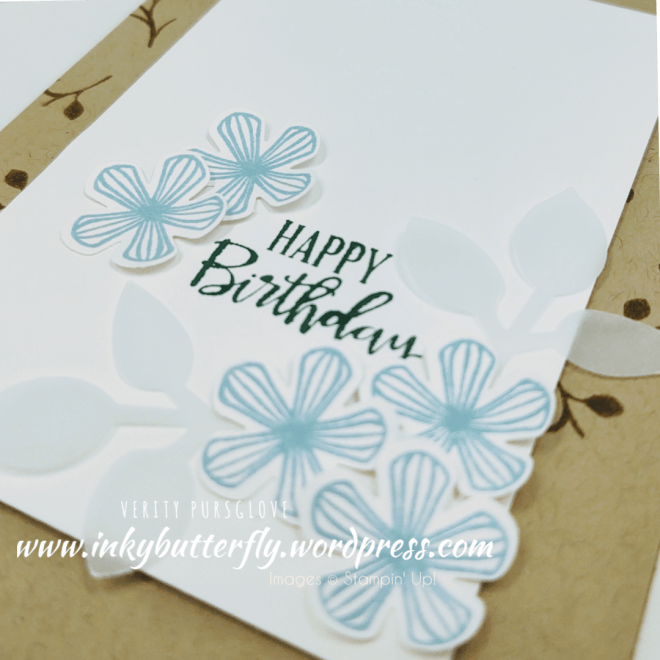
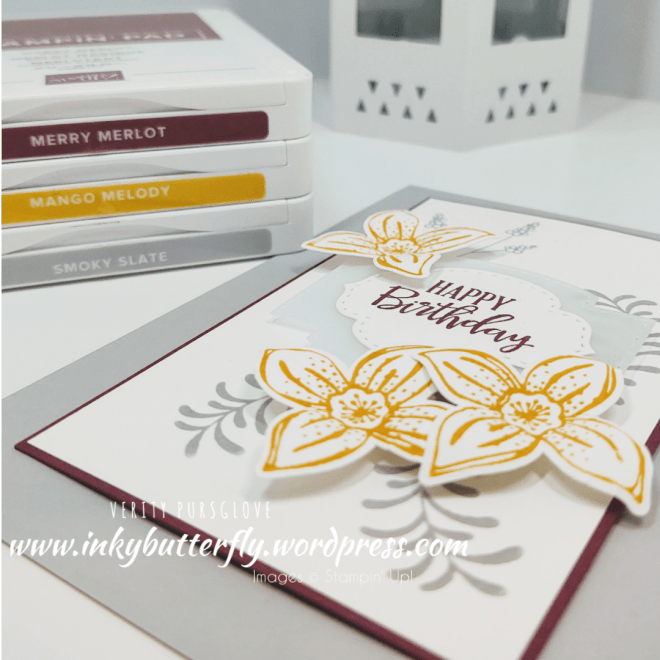
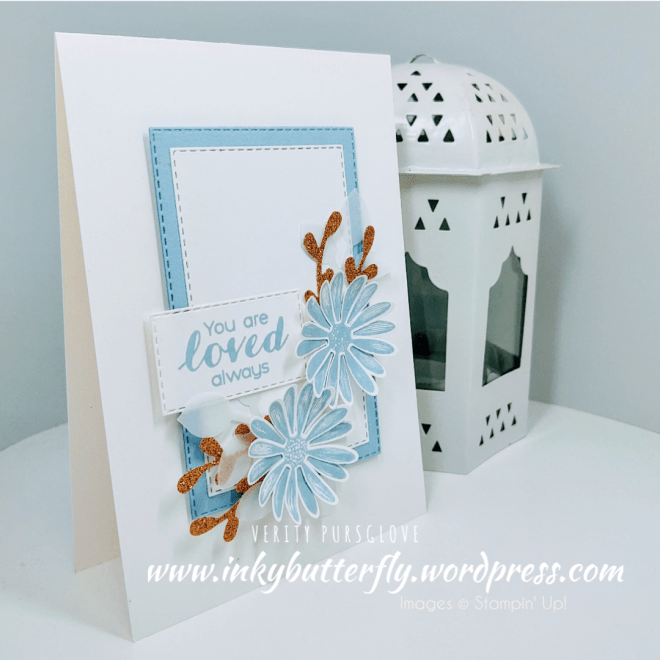
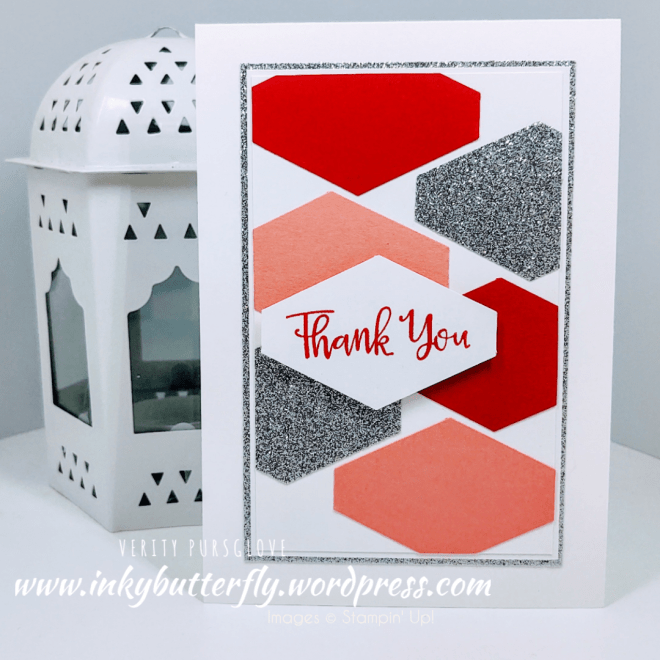
I have used my usual small card layer formula to make the card.

The white layer was stamped first with Smoky Slate ink, with the hearts added with Rococo Rose.

A vellum label was cut as an “overlay” and some extra texture.

The sentiment was stamped with Basic Grey ink and adhered with mini dimensionals.

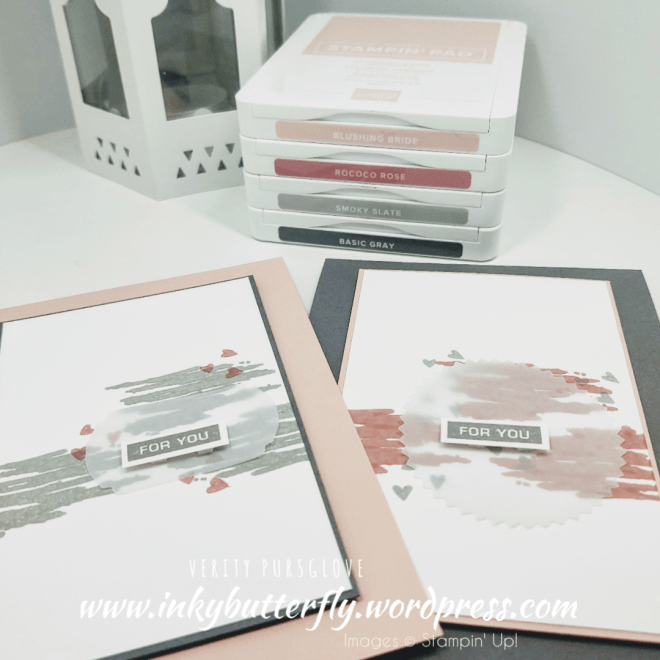
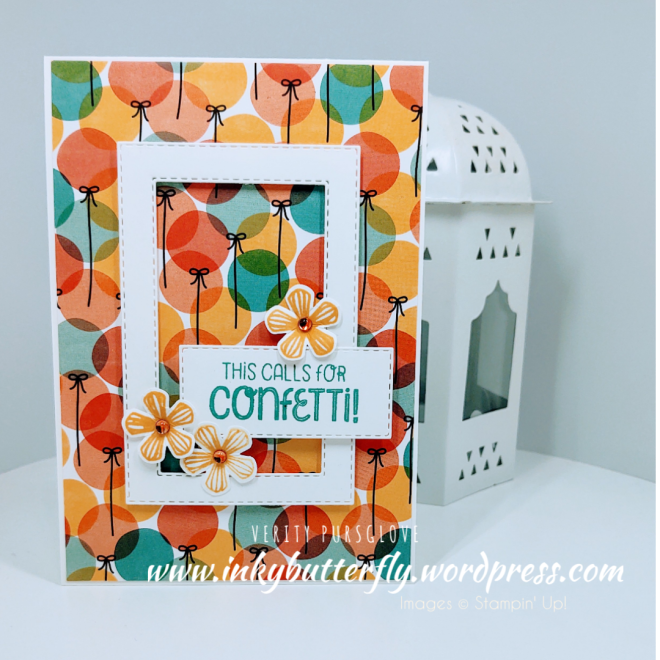
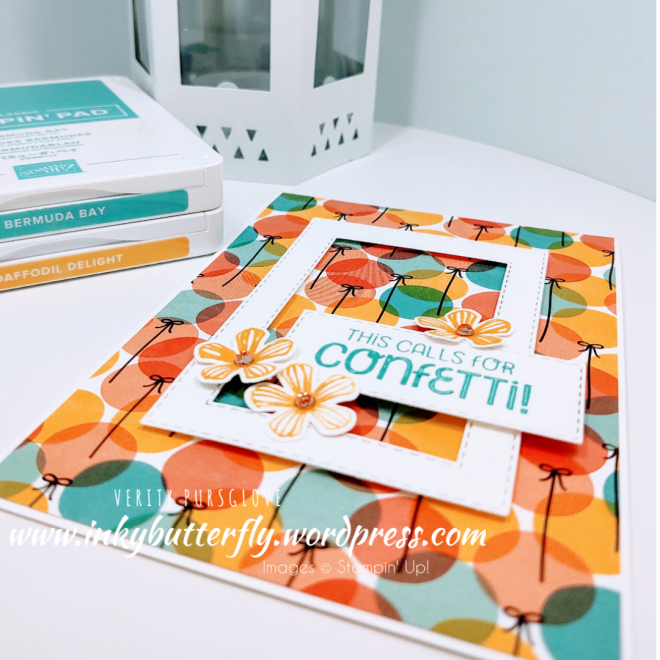
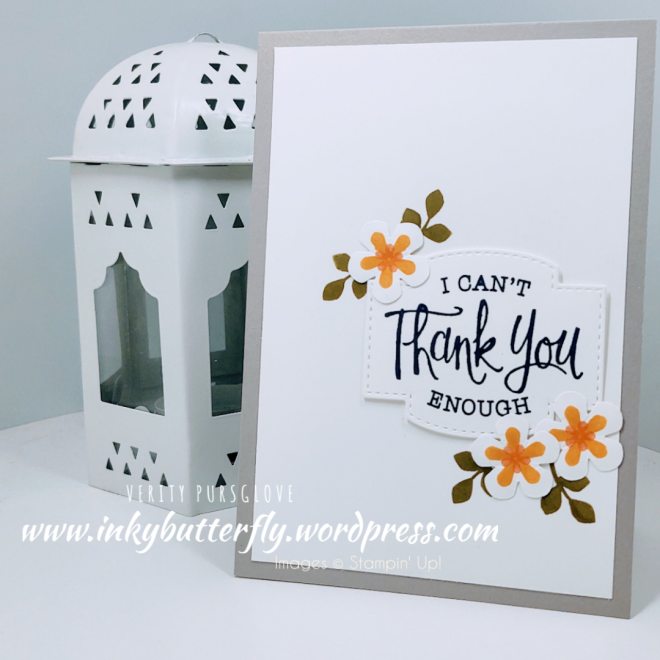
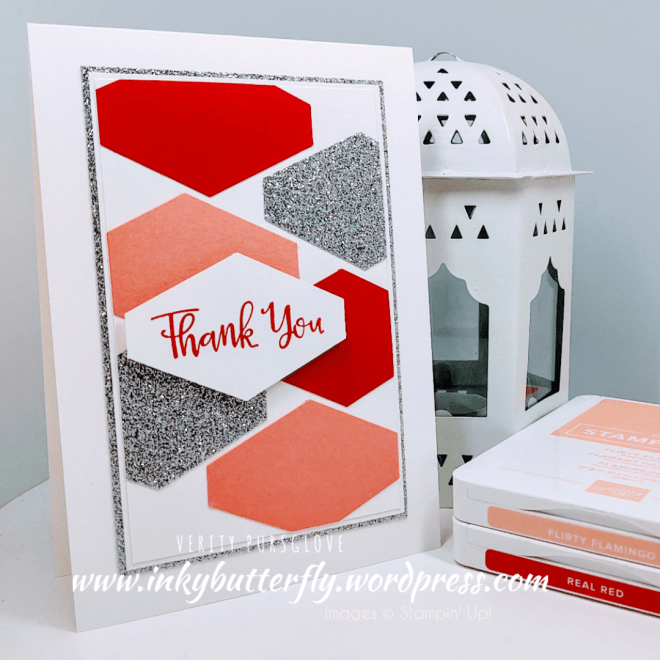
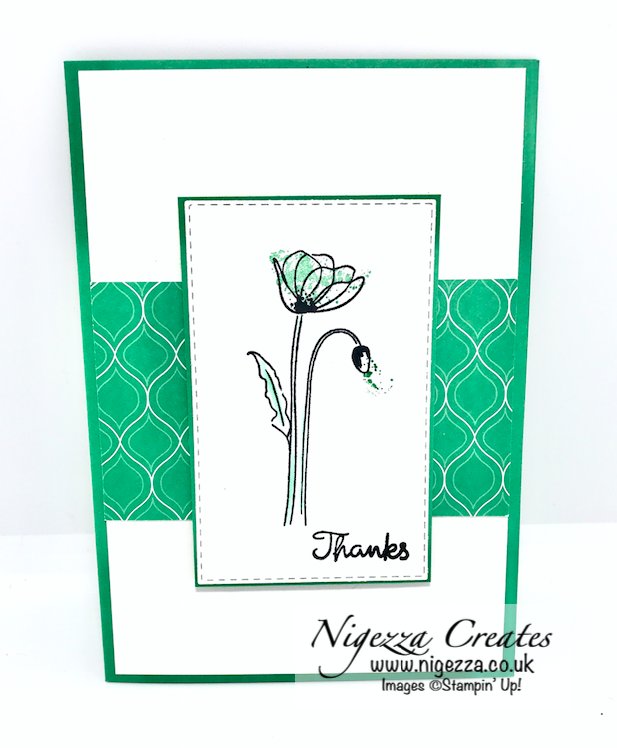
I also made an alternative version, mixing up the colours and swapping the label for the Starburst punch.

And here they are side by side…. Which do you prefer?

I hope you enjoyed this project. The supplies used are listed and linked to the online store below.

I would love to be your demonstrator.

Thanks for stopping by today and happy Stampin’!

Verity xx

Product List

Paper Trimmer

[152392]

£23.00

Project Share Project

Hello Everyone,

Welcome to this week’s Project Share. As always my friends have created some lovely work. Please use the links to visit their blogs and read more about their projects.

All of this week’s featured projects pay homage to the fabulous free items that were available during the Stampin’ Up! Sale-a-bration event which ended on Tuesday!

Jill’s card is lovely reminder that springtime is on it’s way!

Visit Jill’s blog here

Heather has used foiled DSP with this beautifully coloured cake!

Visit Heather’s blog here

Gez is using embossed coloured vellum for her pretty card!

Visit Gez’s blog here

I hope you enjoyed these projects. The supplies used are listed and linked to the online store below.

I would love to be your demonstrator.

Thanks for stopping by today and happy Stampin’!

Verity xx

Product List

Project Share Project

Hello Everyone,

Welcome to this week’s Project Share. As always my friends have created some lovely work. Please use the links to visit their blogs and read more about their projects.

Jill is getting ready for Easter with this basket!

Visit Jill’s blog here

Heather is making gorgeous paper handbags!

Visit Heather’s blog here

Gez has double the inspiration with these girl / boy alternatives!

Visit Gez’s blog here

I hope you enjoyed these projects. The supplies used are listed and linked to the online store below.

I would love to be your demonstrator.

Thanks for stopping by today and happy Stampin’!

Verity xx

Product List

Laurie’s Card

Hello Everyone,

I designed a card last week for a colour challenge that I was really pleased with, so when I realised it was a good friends birthday coming up I knew I wanted to make it again.

The original colours consisted of 2 neutrals to which I added a contrasting bright colour.

For this combo I chose Smoky Slate and Merry Merlot from the neutrals. I opted for Mango Melody as the contrasting colour.

I started by preparing a Smoky Slate card base and cutting Merry Merlot and Whisper White card stock layers.

The sentiment was stamped withe Merry Merlot ink and cut out with a Stitched So Sweetly die. This was adhered to vellum also cut with a die.

Before adhering the layers to the base, Smoky Slate ink was used to stamp the foliage. The layers were adhered together and added to the card with dimensionals.

The sentiment was added next, also with dimensionals.

Finally, the flowers were stamped with Mango Melody ink and punched. The petals were shaped before securing to the card.

I hope you enjoyed this project. The supplies used are listed and linked to the online store below.

I would love to be your demonstrator.

Thanks for stopping by today and happy Stampin’!

Verity xx

Product List

Paper Trimmer

[152392]

£23.00

Project Share Project

Hello Everyone,

Welcome to this week’s Project Share. As always my friends have created some lovely work. Please use the links to visit their blogs and read more about their projects.

Jill has made these cute little tags with the Bonanza Buddies stamp set. They make great card toppers too!

Visit Jill’s blog here see more about this project.

Heather’s card was made to celebrate International Women’s Day. I just love the sentiment and the stunning colour combo.

Visit Heather’s blog here to see more about how this card was made.

Gez has taken inspiration from the catalogue for her card. This is a great place to start when crafter’s block strikes!

Visit Gez’s blog here for more info and photos.

I hope you enjoyed these projects. The supplies used are listed and linked to the online store below.

I would love to be your demonstrator.

Thanks for stopping by today and happy Stampin’!

Verity xx

Product List

Inspire.Create #064

Hello Everyone,

Welcome to my blog. Today I am sharing a project that I have used as my entry for the Inspire.Create challenge.

This time it’s a colour challenge. The design team have made some wonderful samples as inspiration. You can see them here.

And this is what I created!

My choice of colour was Lovely Lipstick. I thought this would add some contrast to the otherwise neutral pallette.

The base card was prepared using Crumb Cake card stock. Layers of Night of Navy and White were cut with Stitched Rectangle dies.

I picked a bold sentiment from the So Sentimental stamp set. This was cut with the coordinating die. Before sticking this down, I first added foliage images from the Pop of Petals stamp set and Crumb Cake ink.

Three flowers were stamped with Lovely Lipstick ink and cut with the coordinating punch.

I hope you enjoyed this project. The supplies used are listed and linked to the online store below.

I would love to be your demonstrator.

Thanks for stopping by today and happy Stampin’!

Verity xx

Product List

Paper Trimmer

[152392]

£23.00

Project Share Project

Hello Everyone,Welcome to this week’s Project Share. As always my friends have created some lovely work. Please use the links to visit their blogs and read more about their projects.

Jill has combined the Honey Bee bundle with the Golden Honey Designer Series Paper available during Sale-a-bration. They are the perfect match!

Visit Jill’s blog here to see how these products were used to make this card.

Heather is also making use of free items. The Pleased as Punch Designer Series Paper is brand new, coordinates with punches, but so pretty used as it is!

Visit Heather’s blog here to see more about this card.

Gez is thinking of beginners with her project. Just one stamp set was need for this card. Label Me Bold is very versatile and works with any colour!

Visit Gez’s blog here to see how she achieved this look.

I hope you enjoyed these projects. The supplies used are listed and linked to the online store below.I would love to be your demonstrator.

Thanks for stopping by today and happy Stampin’!

Verity xx

Product List

Well Done

Hello Everyone,

Today I wanted to make something very simple that a new paper crafter could achieve. The layout would work with many different colour combinations, use the supplies you have!

My card base is made with Basic Grey card stock. I cut panels of Crushed Curry and Whisper White card stock.

The white panel was stamped using the Label Me Bold stamp set and adhered to the Crushed Curry layer.

The sentiment was stamped with black ink and cut with snips. I added this to a heart punched from vellum using mini dimensionals.

I hope you enjoyed this project. The supplies used are listed and linked to the online store below.

I would love to be your demonstrator.

Thanks for stopping by today and happy Stampin’!

Verity xx

Product List

Paper Snips

[103579]

£9.25

Mother’s Day Tulips

Hello Everyone,

Mother’s Day is only a few weeks away so I thought I would share this card with you. It’s very easy to make if you are just starting out with paper crafting.

The patterned paper is part of the free sampler pack available exclusively when joining Stampin’ Up! You will also receive a mini paper cutter and an additional free stamp set of your choice. This is all on top of the regular, totally customisable, starter kit – the best value product in the catalogue.

See more about joining Stampin’ Up! and the benefits it has by clicking here!

I started by making a white card base and adhering the patterned paper to the front.

Next, I stamped the tulips. They look great stamped in a single colour. I opted to mix Real Red and Flirty Flamingo. This can be done by applying each ink to the stamp with a sponge dauber. Each flower was cut out with the coordinating punch.

Before committing to sticking these in place, I positioned them first so the the stems could be stamped in the right place. The panel was layered with Real Red card stock and added to the card base.

I added the flowers with dimensionals to lift them slightly.

Finally, I added the sentiment. I have die cut mine, but this cut be cut with a paper trimmer just as easily.

I hope you enjoyed this project. The supplies used are listed and linked to the online store below.

I would love to be your demonstrator.

Thanks for stopping by today and happy Stampin’!

Verity xx

Product List

Paper Trimmer

[152392]

£23.00

Confetti!

Hello Everyone,

I have a lovely bright card to share today.

I picked out this cute paper as the background.

I cut a frame using the Stitched Rectangle dies and adhered this with mini dimensionals.

The sentiment was stamped with Bermuda Bay ink. This was also cut with a Stitched Rectangle die. This was positioned overhanging the frame.

Finally, some blooms were stamped with Daffodil Delight ink and punched out. An epoxy dot was coloured with a Poppy Parade Stampin’ Blend marker and added to the centres before adding to the card with multipurpose glue.

I hope you enjoyed this project. The supplies used are listed and linked to the online store below.

I would love to be your demonstrator.

Thanks for stopping by today and happy Stampin’!

Verity xx

Product List

Loved Always

Hello Everyone,

Super pleased with this clean and simple card.

I’ve used Seaside Spray as the main colour but really like the pop of gold glimmer paper.

Rectangle dies were used the make the background layers.

Four medium daisies were stamped and punched. Two daisies were adhered together and then to the card.

Vellum leaves and gold sprigs were added behind the petals.

Seaside Spray ink was used to stamp the sentiment. This was cut with a Stitched Rectangle die to match the background layers.

I hope you enjoyed this project. The supplies used are listed and linked to the online store below.

I would love to be your demonstrator.

Thanks for stopping by today and happy Stampin’!

Verity xx

Product List

Leaf Punch

[144667]

£15.00

Sprig Punch

[148012]

£17.00

Butterfly Grove

Hello Everyone,

Today I am revisiting a favourite set from the annual catalogue for a colour challenge;

This one had me stumped and this was the third attempt at something I liked. I think the Grapefruit Grove was the sticking point but found a way to use it without overpowering the design.

I stamped the butterflies with Night of Navy ink. Seaside Spray and Coastal Cabana inks were used to fill in the images. These were cut with the coordinating punch.

Grapefruit Grove ink was used for the sentiment and cut with a Stitched Rectangle die.

I built up the card layers and added the sentiment with dimensionals. Three butterflies were adhered with multipurpose glue with the wings bent up for extra texture.

I hope you enjoyed this project. The supplies used are listed and linked to the online store below.

I would love to be your demonstrator.

Thanks for stopping by today and happy Stampin’!

Verity xx

Product List

Paper Trimmer

[152392]

£23.00

Thank You Blooms

Hello Everyone,

I really love how this card turned out.

The design combines the So Sentimental bundle and Sale-a-bration items.

A Gray Granite card base was prepared and layered with white card stock.

Night of Navy ink was used to stamp the sentiment which was die cut and adhered with dimensionals.

Flower centres were stamped in Daffodil Delight and Grapefruit Grove inks. The punch was used to cut the flowers to give white petals.

Before adhering, a few leaves were added first using Old Olive. The blooms were shaped and added with multipurpose glue.

I hope you enjoyed this project. The supplies used are listed and linked to the online store below.

I would love to be your demonstrator.

Thanks for stopping by today and happy Stampin’!

Verity xx

Product List

CAS Colours and Sketches #356

Hello Everyone,

Welcome to my blog. Today I am sharing my project for the CAS Colours and Sketches challenge.

This time it’s a colour challenge. The design team have made some wonderful samples as inspiration. You can see them here

I wanted to create something different…. And this is it!

I used the Tailored Tag punch to cut shapes from Real Red, Flirty Flamingo and Silver Glimmer card stock. These were adhered to a piece of white card stock.

The excess was trimmed away and layered with more glimmer paper before adding to a white card base.

Real Red ink was used to stamp the sentiment which was also cut with the Tailored Tag punch. This was adhered with dimensionals.

I hope you enjoyed this project. The supplies used are listed and linked to the online store below.

I would love to be your demonstrator.

Thanks for stopping by today and happy Stampin’!

Verity xx

Product List

Paper Trimmer

[152392]

£23.00

Project Share Project

Hello Everyone,

Welcome to this week’s Project Share. As always my friends have created some lovely work. Please use the links to visit their blogs and read more about their projects.

Jill’s card shows that great cards can be made with a great layout. Change the colours and sentiment to suit the occasion.

Visit Jill’s blog here to see how this card was made.

I can’t believe I haven’t used this die yet! Look how cute Heather’s this back pack is.

See more at Heather’s blog here

This just one of the cards Gez gas made with one sheet of designer series paper!

See the others at Gez’s blog here

I hope you enjoyed these projects. The supplies used are listed and linked to the online store below.

I would love to be your demonstrator.

Thanks for stopping by today and happy Stampin’!

Verity xx

Product List

In Color 2018–2020 6

In Color 2018–2020 6″ X 6″ (15.2 X 15.2 Cm) Designer Series Paper

[146963]

£10.25

Best Dressed Birthday

Hello Everyone,

Today’s card mixes Best Dressed designer series paper and the Layered with Kindness stamp set.

A white card base was covered with this pretty floral design paper.

A Stitched Rectangle was stamped with Old Olive ink to create a background. This was adhered to a layer of Lovely Lipstick card stock and added to the base with dimensionals.

The sentiment was stamped with Lovely Lipstick ink and cut with the coordinating punch. This was also adhered with dimensionals.

I hope you enjoyed this project. The supplies used are listed and linked to the online store below.

I would love to be your demonstrator.

Thanks for stopping by today and happy Stampin’!

Verity xx

Product List

Project Share Project

Hello Everyone,

Welcome to this week’s Project Share. As always my friends have created some lovely work. Please use the links to visit their blogs and read more about their projects.

Jill’s card is so cute. I love all the colours and uses my favourite stamp set available during Sale-a-bration.

Visit Jill’s blog here to see which colours were used.

Heather’s card shows how designer series paper makes a stunning card with only a few extra embellishments.

Visit Heather’s blog here to see how this card was made.

Gez has made this sweet little bag. I can see this being used at Easter time for some sweet treats.

Visit Gez’s blog here for the measurements to make your own.

I hope you enjoyed these projects. The supplies used are listed and linked to the online store below.

I would love to be your demonstrator.

Thanks for stopping by today and happy Stampin’!

Verity xx

Product List

Birthday Blooms

Hello Everyone,

I can’t stop using the Thoughtful Blooms stamp set and Small Bloom punch!

Today it’s for a birthday card.

This one is really simple leaving lots of white space.

I added some foliage to the card base with Early Espresso ink.

A white layer was stamped with a sentiment from Peaceful Moments using Shaded Spruce ink. This was adhered to the card base with dimensionals.

Blooms were stamped with Balmy Blue ink and punched out. These were added using multipurpose glue.

The Leaf punch was used to cut leaves from vellum and added around the flowers.

I hope you enjoyed this project. The supplies used are listed and linked to the online store below.

I would love to be your demonstrator.

Thanks for stopping by today and happy Stampin’!

Verity xx

Product List

Leaf Punch

[144667]

£15.00

Paper Trimmer

[152392]

£23.00

Bone Folder

[102300]

£6.50

Punched Blooms

Hello Everyone,

This project has a little Sneak Peek at a new product coming soon, the Pleased as Punch Designer Series Paper.

This is one of a collection of items specifically designed to coordinate with products already available.

The paper can be used with these items;

Product List

For this project I wanted to create a wreath look with the Painted Labels dies. These elements were cut from Crumb Cake and Whisper White card stock.

The sentiment from the Honey Bee set was stamped with Mossy Meadow ink.

The same ink was used to add the foliage on the white card layer.

The card was assembled using a Crumb Cake card base.

One each of the coloured flowers on the paper was punched and adhered to the card.

A rhinestone was added to each of the flower centres.

I hope you enjoyed this project. The supplies used are listed and linked to the online store below.

I would love to be your demonstrator.

Thanks for stopping by today and happy Stampin’!

Verity xx

Product List