Lovely Happy Birthday

Good Morning!

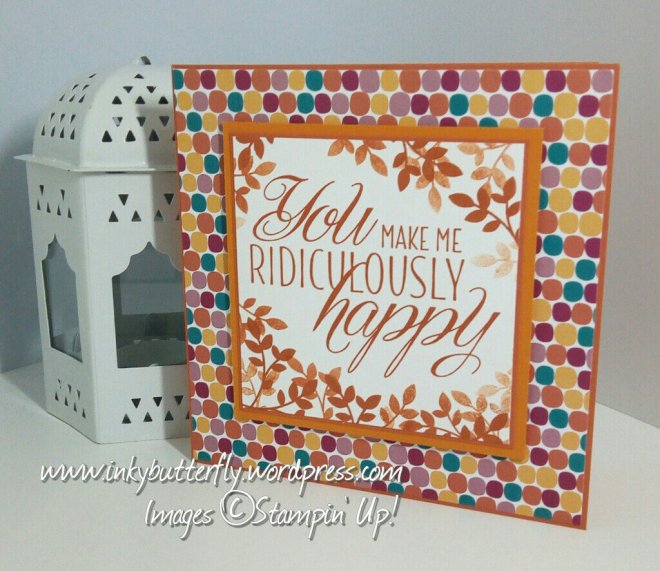
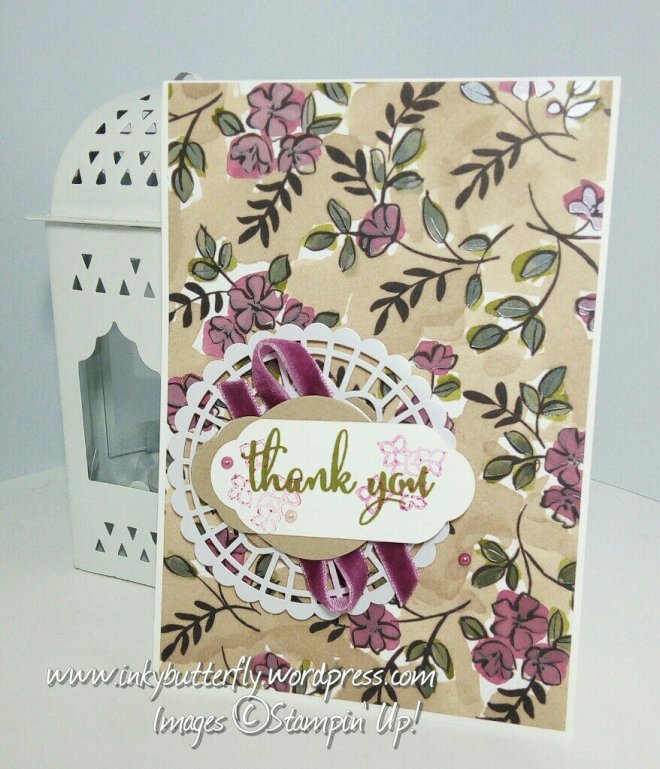
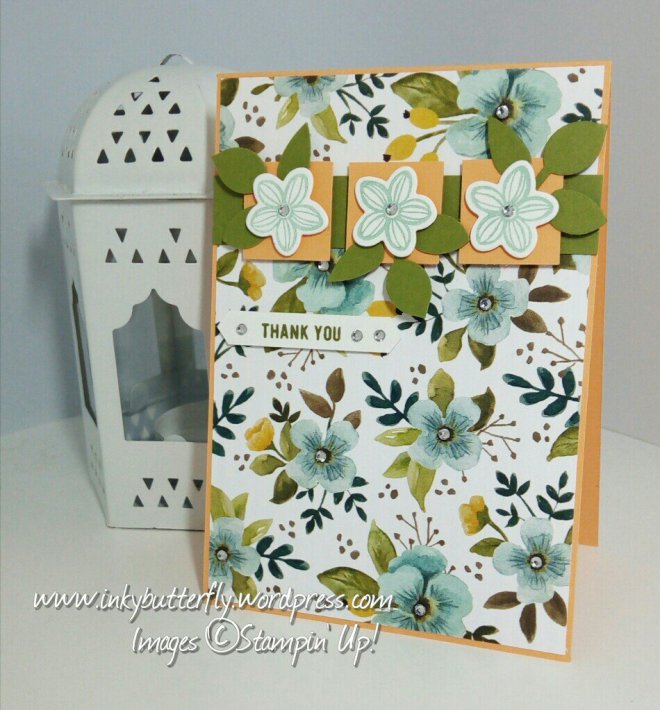
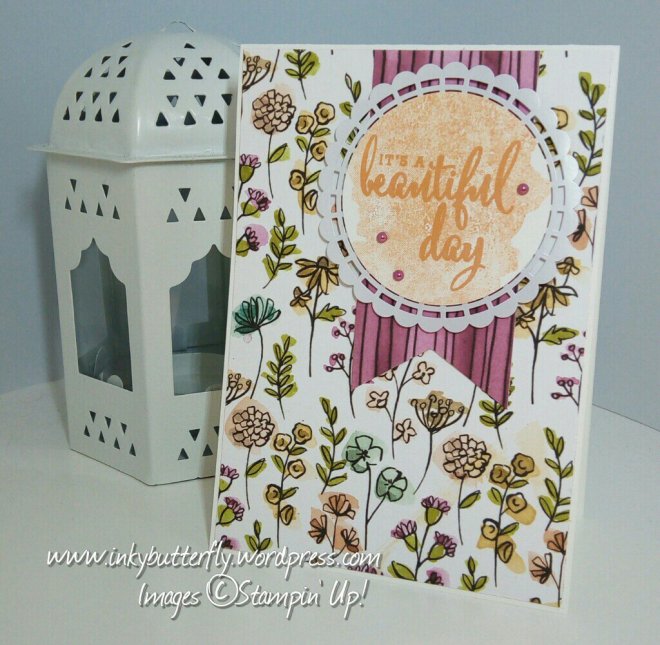
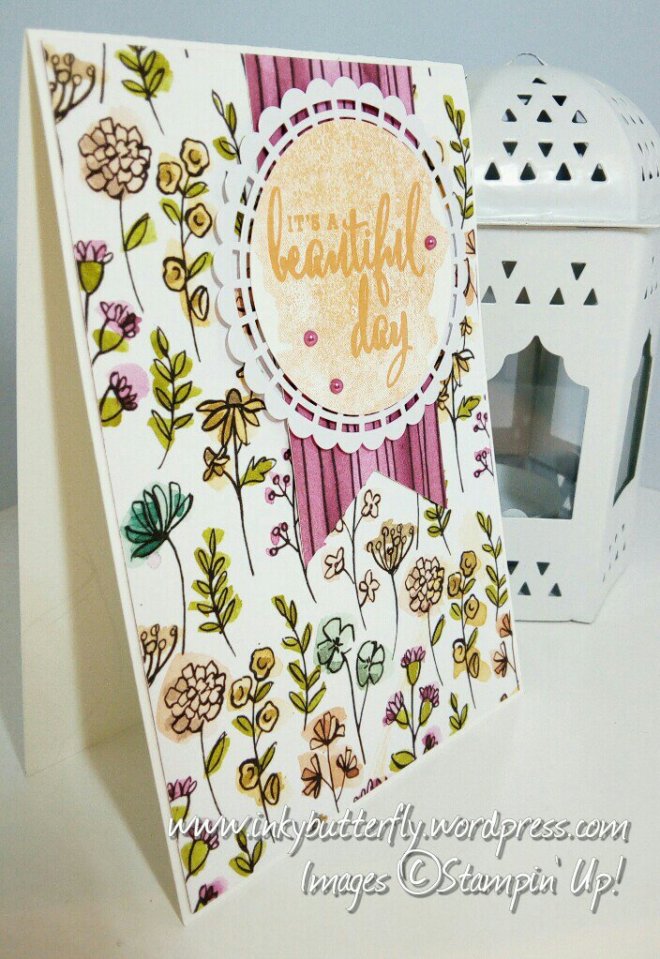
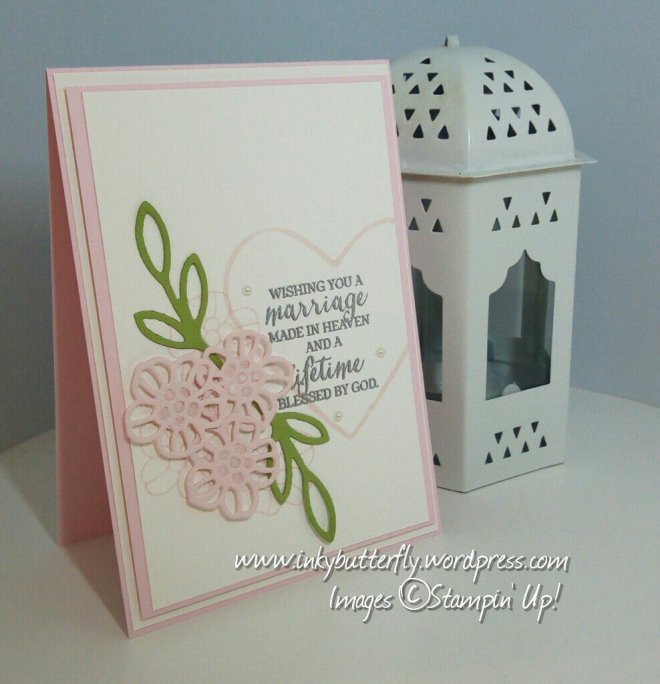
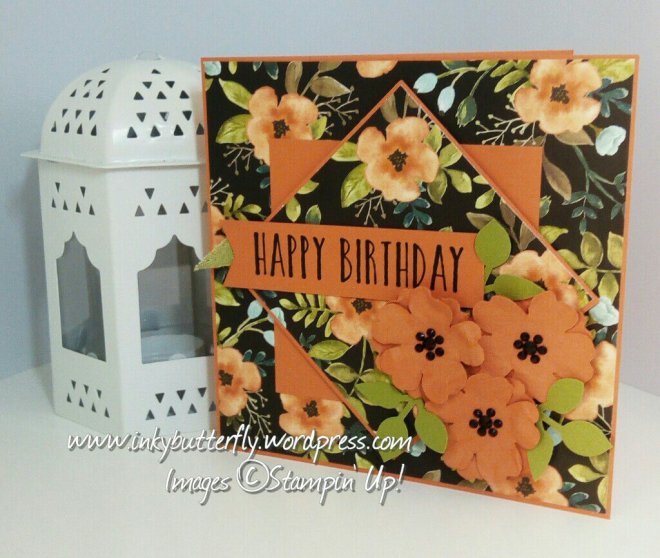
I’ve made another large card for today’s project. This one features the Whole Lot of Lovely designer series paper.

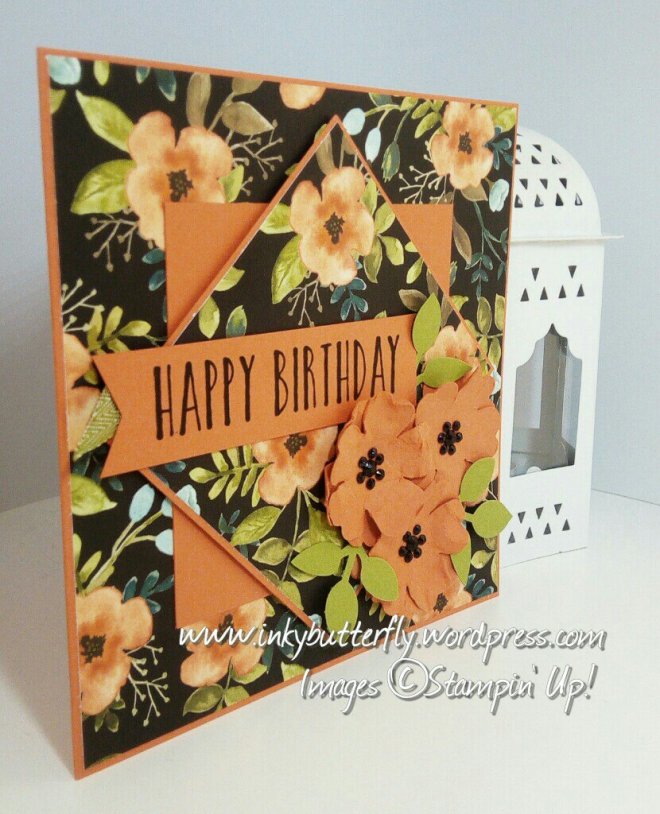
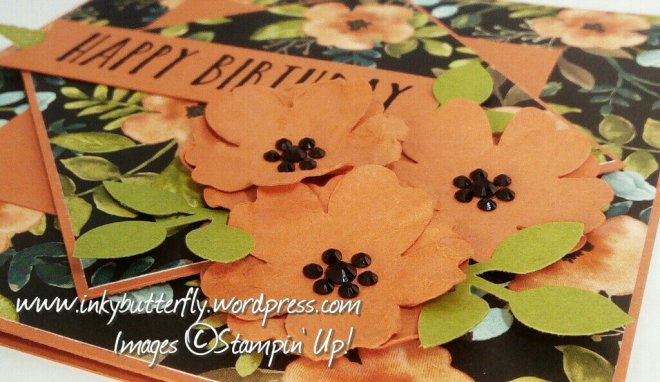
The base was made from Tangerine Tango card stock which was cut lengthways at 5-7/8 inches and then folded in half. Keep the leftover strip for later.

A 5-3/4 inch square of patterned paper was added to the front.

Two 3-3/4 inch squares of Tangerine Tango were cut to make the topper. One was covered with patterned paper.

The plain square was adhered flat to the card base with Snail adhesive. The patterned piece was added at an angle with dimensionals.

Using the strip of leftover card stock, punch out six flowers with the Pansy punch. Also cut three sets of leaves from Old Olive card stock with the Leaf Punch.

Each of the flowers were lightly spritzed with water and scrunched. Once dry, two flowers were layered together with glue dots.

The flowers and leaves were arranged in the corner. Black rhinestones were added to the centres.

I used my stamparatus to make sure the sentiment was stamped well. Using the tool allowed me to stamp twice in the same place to give a very crisp image. I cut some banner ends and adhered with Snail adhesive.

I hope you enjoyed this project. The supplies used are listed and linked to the online store below.

Thanks for stopping by today and Happy Stampin’!

Verity x

Product List

Pansy Punch

[130698]

£14.50

Leaf Punch

[144667]

£14.50

Thanks for the Smile

Hi there Everyone,

I thought I would break out the Dragonfly Dreams stamp set. This set will be carrying over in to the new annual catalogue!

If you would like a complementary catalogue then please contact me!

For today’s project, I have used Marina Mist to make the card base. Versamark ink was used to stamp along the edges.

A 3 inch strip of Whisper White card stock was stamped using the dragonfly image and Soft Sky ink. This was adhered to Soft Sky card stock before adding to the card.

A dragonfly was die cut from Soft Sky card stock, the wings were shaped before adhering to the card.

The sentiment was stamped with Marina Mist ink and adhered with dimensionals.

I hope you enjoyed this project. The supplies used are listed and linked to the online store below.

Thanks for stopping by today and Happy Stampin’!

Verity x

Product List

Lemon Zest #FMS337

Hi there everyone,

As it is Friday, today’s project is my entry for the Freshly Made Sketch challenge.

This week’s challenge has been set by Linda. You can see what the design team have created here!

This is the card I have designed.

I have used Peekaboo Peach to make the card base.

Some Tutti-Frutti designer series paper was cut to 5 by 3-1/4 inches and adhered along the right hand side of the card.

The topper was made using a 3-1/2 inch square of Whisper White card stock which was adhered to some Lemon Lime Twist card stock.

The first part of the sentiment was stamped with Flirty Flamingo ink. This was then added to the card with dimensionals.

To decorate, the fruit from the Lemon Zest stamp set were stamped with Daffodil Delight, Lemon Lime Twist and Pumpkin Pie. The images were punched out.

Black ink was used to add the second portion of the sentiment on to the lemon. The fruit were then added to the card using snail and dimensionals.

A few glitter enamel dots finished the card.

I hope you enjoyed this project. The supplies used are listed below.

Thanks for stopping by today and Happy Stampin’!

Verity x

Product List

Ridiculously Happy

Good Morning!

I have made a larger card than usual today. Rather than cutting lengthways at 4-1/8 inches, this was cut at 5-7/8 inches and then scored at the same measurement to make a square card. I have used Tangerine Tango.

Some Tutti-Frutti designer series paper was cut to 5-3/4 inches square and adhered to the card base.

A 4 inch square of Whisper White card stock was stamp using the Lovely Friends stamp set and Tangerine Tango ink.

This was layered on to more Tangerine Tango card stock and then some Pumpkin Pie card stock. This was adhered to the card with dimensionals.

I hope you enjoyed this project. The supplies used are listed and linked to the online store below.

Thanks for stopping by today and Happy Stampin’!

Verity x

Product List

Happy For You #GDP138

Hello there,

As it is Wednesday, today I am sharing my entry for this week’s Global Design Project sketch challenge.

You can see what the design team created here!

This is the card I made.

I have used a Crumb Cake card base which was stamped with coordinating ink with the Touches of Texture stamp set.

To make the topper, I cut a 2-1/2 inch strip of Lemon Lime Twist Foil Frenzy designer series paper. To this I adhered a 2 inch piece of Crumb Cake.

Some Lemon Lime Twist Finely Woven ribbon was ruffled along the bottom edge. The panel was then adhered to the card base with dimensionals.

A small piece of Lemon Lime Twist card stock was made into a banner. The butterfly from the Butterfly Basics stamp set was stamped and fussy cut.

The sentiment is taken from the Sunshine Sayings set. This was stamped using Soft Suede ink.

I hope you enjoyed this project. The supplies used are listed below.

Thanks for stopping by today and Happy Stampin’!

Verity x

Product List

Wood Words Gift Set

Good Morning,

Those of you who follow my blog will know I am most definitely a card maker, but today I have stretched myself and made this simple matchbox to hold a tea light.

I have used Tempting Turquoise as the colour theme. This is a retiring colour. Of course, this can be made in whatever colour you wish… There are plenty to choose from in the Stampin’ Up! catalogue.

I used the large floral image was stamped to create a background.

The topper was made with a combination of circle punches and layering circles dies.

The sentiment was stamped first, adding the stars over the top with second and third generation ink.

The final piece was added to the card with dimensionals.

To make the gift box, I began by constructing the insert for the tea light.

A piece if card stock was cut to 3-1/4 inches square and scored on all sides at 1/4 inch. A die was used to cut the aperture.

The tray was made next. Card stock was cut to 3-3/4 inches square and scored on each side at a fraction under 1/2 inch. The insert was secure in place with a little multipurpose glue.

To make the sleeve, a strip of card stock 2-13/16 inch wide was cut from the full length of an A4 sheet. This was scored at 2-13/16. The next score was made 9/16 from the first. Continue until three squares have been created and cut away the excess.

The centre square was decorated in the same way as the card.

The end squares were adhered together with fast fuse to form the sleeve.

I hope you enjoyed this project. The supplies used are listed and linked to the online store below.

I would love to be your demonstrator! Be sure to check the latest deals on the clearance rack and the list of retiring products…. When they are gone they are gone!!

There is also an exciting early release bundle which is truly stunning. See below.

Thanks for stopping by today and Happy Stampin’!

Verity x

Product List

Good Times! Just Add Ink 408

Happy Monday!

I am taking part in this week’s Just Add Ink colour challenge today.

The design team have made some fabulous samples. You can see them here.

These are the colours for the challenge. Whilst they shout out florals, I wanted to do something different.

I decided to build a background and make the sentiment the feature.

I picked out the Happy Celebrations set because I liked the idea of using triangles to make my background.

The card base is made with Wild Wasabi card stock.

Layers were cut from Melon Mambo, Pear Pizzazz and adhered these together.

A separate Whisper White layer WS cut for stamping. The triangles were stamped with Pear Pizzazz and Powder Pink inks. I used first, second and third generation ink to get a range of shades in the same colour.

The stamped panel was adhered to the other layers. Some Powder Pink finely woven ribbon was added at the bottom. This was then secured to the card base with dimensionals.

The “celebrate” and “good times” sentiments were stamped separately with Wild Wasabi ink and trimmed to size. These were added to the card using dimensionals.

I hope you enjoyed this project. The supplies used are listed below.

Thanks for stopping by today and Happy Stampin’!

Verity x

Product List

Sending Hugs & Kisses

Hi there Everyone,

I have made this cute card today using two of my favourite retiring colours and the Lovely Inside and Out bundle.

The card base is made with Dapper Denim card stock which I have layered with Soft Sky and White.

In a separate piece of white card stock, I stamped the sunburst sort of image using Soft Sky Dapper Denim inks. I adhered this to more Dapper Denim card stock and then to the card base with dimensionals.

I used the coordinating “hugs” die with layering circles to created the topper which was added to the card using dimensionals.

I stamped the additional parts of the sentiment with Dapper Denim ink and cut them with the Classic Label punch, (also retiring).

I hope you enjoyed this project. The supplies I have used are available while stocks last. The links are below.

Thanks for stopping by and Happy Stampin’!

Verity x

Product List

Love What I Do

Good Morning,

Here is another creation using the Share What You Love exclusive early release bundles.

Today I am using products only available in the Gotta Have It All option. These includes card stock, a gorgeous embossing folder and amazing designer series paper.

The card base is made with Old Olive card stock. The pack in the kit also contains Rich Razzleberry, the new in colour Grapefruit Grove and the returning favourite Mint Macaron!

I used the Big Shot to emboss some Whisper White card stock. This is a thick folder so only one cutting pad is needed. I was going to leave this uncoloured, but it was too stark against the card base. I used Old Olive and Grapefruit Grove inks and sponged over the debossed side.

This piece was adhered to the card base over some designer series paper using dimensionals.

The sentiment was stamped simply with Old Olive ink on to Very Vanilla card stock and layered on to some more DSP. A few Grapefruit Grove Artisan Pearls finished the card.

I hope you enjoyed this project. The supplies used are listed below and linked directly to the online store.

Verity x

Product List

Big Shot

[143263]

£99.00

Here are some of the other cards I cave made with this suite.

And these are ideas from Stampin’ Up!

Sending Love & Hugs #FMS336

Hello and Happy Friday!

The freshly made sketches design team have been busy again. See how they interpreted this week’s sketch here!

And this is what I have created;

Some Real Red Tutti-Frutti designer series paper was adhered to a Whisper White card base.

A piece of Lemon Lime Twist paper from the same collection was cut to size along with a piece of Whisper White.

The Ribbon of Courage stamp set was used as the feature image. I chose to use Real Red ink to match the base layer.

The ribbon was coloured with watercolour pencils.

The layers were adhered together with snail, and then to the base card with dimensionals.

I hope you enjoyed this project. The supplies used are listed below.

Thanks for stopping by today and Happy Stampin’!

Verity x

Product List

Blender Pens

[102845]

£10.75

A Little More!

Hello Everyone,

I am here today to share more from the Share What You Love customer pre-order bundles.

This time I have used items from the mid range option, A Little More Please.

The embellishment kit contains some cute mini paperclips,twine and tags. The doilies have a pearlized finish which is stunning in person.

My card started with a Very Vanilla card base.

Grapefruit Grove ink was used to stamp images from the Love What You Do stamp set. I also stamped the sentiment on to one of the tags.

Half a doily was adhered to the card with some of the Tranquil Tide twine looped over the top.

Some velvet ribbon was looped through the tag which was then added with dimensional adhesive and finished with a mini paperclip and Artisan Pearls.

I hope you enjoyed this project. The supplies used are listed and linked to the online store below.

Get even more value for money by joining Stampin’ Up! and purchasing this bundle as part of your starter kit! Find out more here!

Thanks for stopping by today and Happy Stampin’!

Verity x

Product List

Amazing #GDP137

Hello Everybody,

The Global Design Project is challenging us to use this fun colour combination this week!

The design have made some wonderful projects as inspiration. You can see them here!

This is my card for the challenge.

I made use of the Playful Backgrounds stamp set to make my card.

The card base is made from Pool Party card stock. A Lemon Lime Twist layer was adhered to this.

Melon Mambo and Pool Party ink were used to stamp on to a Whisper White layer.

The All Things Thanks stamp set was used to stamp the sentiment with Melon Mambo ink. This was cut with a 2 inch circle punch. This was adhered to a Lemon Lime Twist Sunburst and a 2-1/4 inch circle of Pool Party card stock.

Some Lemon Lime Twist Finely Woven and mini striped grosgrain ribbons were criss crossed behind the sentiment, which was adhered to the card with dimensionals.

I hope you enjoyed this project. The supplies used are listed below.

Thanks for stopping by today and Happy Stampin’!

Verity x

Product List

Lift Your Spirits

Good Morning!

This is one of favourite stamp sets and I am so glad it will be staying with us.

Today I am pairing it with the retiring In Colour, Dapper Denim.

The card base was made in the usual way by cutting an A4 sheet lengthways at 4-1/8 inches and scoring at 5-7/8 inches. A white card layer was added to this 1/4 inch shorter and narrower.

Subsequent layers of Dapper Denim and Whisper White card stock were cut 1/4 inch smaller.

These layers were adhered together. Some striped grosgrain ribbon was wrapped around these layers before adding to the card base with dimensionals.

The sentiment was stamped with Dapper Denim ink and cut to size and adhered to some Dapper Denim card stock. This was added to the card where the ribbon crossed using dimensionals.

Three balloons were stamped and die cut. Two were adhered using dimensionals and the third flat to create an illusion of distance.

I hope you enjoyed this project. The supplies used are listed and linked to the online store below.

Also check out the exclusive customer pre-order Share What You Love bundles, the Retiring Products list and the bargains on the Clearance Rack!

Thanks for stopping by today and Happy Stampin’!

Verity x

Product List

Inspire.Create 017

Hi Everyone,

I hope you are having a wonderful bank holiday!

Today’s project is my entry for the Inspire Create Challenge.

This time it is a sketch challenge…. I like these because it makes me think differently about my crafting. You can see what the design team did with this by clicking here!

This is how I decided to interpret this sketch.

Of course I am using up supplies that are due to retire at the end of the month.

The card base is made with Peekaboo Peach card stock with a layer of A Whole Lot of Lovely designer series paper added to it.

A 3/4 inch strip of Old Olive card stock was added at the top.

Three 1 inch squares of Peekaboo Peach card stock were cut ready to decorate the card.

The small flower from the Falling Flowers stamp set was stamped with Pool Party ink and die cut.

The flowers were adhered to each square with leaves punched from Old Olive card stock. This was then added to the card with dimensionals.

I wanted to add a sentiment, so I used a small thank you from Thoughtful Banners which was cut with the Classic Label punch.

Then I went a bit crazy with the rhinestones! Adding to the flower centres and the sentiment.

I hope you enjoyed this project. The supplies used to make it are listed below.

Thanks for stopping by and Happy Stampin’!

Verity x

Product List

Leaf Punch

[144667]

£14.50

Just Getting Started?

Hi there,

Have you ever tried paper crafting? Have you been overwhelmed by all the things and not known where to start?

Why not try this new product bundle from Stampin’ Up!? With everything you need if you are “just getting started”!

  1. Love What You Do photopolymer stamp set
  2. Grapefruit Grove and Old Olive ink pads
  3. Clear acrylic block
  4. Very Vanilla A4 card stock
  5. FREE Very Vanilla note cards and envelopes

Find out more by clicking here.

This the sample that Stampin’ Up! designers created using this bundle. I have used this idea to inspire today’s project.

I have used the very Vanilla card stock to make the card base, though this could easily be one of the note cards.

I started by stamping the flowers using Grapefruit Grove ink down the side and bottom edge of the card.

The sprigs were added using the same ink, but the image was stamped off on to scrap paper first to get a lighter shade.

Old Olive was used to add the leaves and stamp the sentiment on to a separate piece of card.

I have used a punch to cut out my sentiment, but this could be trimmed with scissors if this is something that you don’t have.

I chose to adhered this with dimensionals.

I hope you enjoyed this project. There is a link to this bundle and the other options available below. Just click on the image.

Thanks for stopping by today and Happy Stampin’!

Verity x

Product List

Thank you for Sharing

Hi Everyone,

I think I might be in love with the Share What You Love bundle.

For today’s project, I have used the Pearlized Designer Series paper as the background.

I have stamped the sentiment from the Love What You Do stamp set on to some Whisper White card stock in Old Olive ink.

Some third generation Rich Razzleberry ink was used to add the tiny flowers. The card stock was cut down using the Pretty Label punch.

The same punch was used to cut some Crumb Cake card stock. The sentiment was adhered to this.

A Pearlised Doily was adhered to the card base with dimensionals, and some Velvet ribbon was looped over the top.

The sentiment piece was then added over the top. A fee Artisan Pearls finished the card.

I hope you enjoyed this project. The items used will be listed below. Products are currently only available to purchase as part of the Early Release bundles. Just click on the images at the bottom of the post to see what is included.

The Share What You Love bundles are exclusively available during May as a special treat for Stampin’ Up! customers.

Which bundle will you pick?

And don’t forget…. You can also pick a bundle as part of your starter kit if you decide to join! There is no obligation to sell, just get a discount on your favourite Stampin’ Up! products!

Thanks for stopping by today and Happy Stampin’!

Verity x

Product List

Share What You Love!

What an exciting day! Stampin’ Up! are giving customers the opportunity to purchase three exclusive bundles ahead of the new 2018 catalogue launch!

It’s called Share What You Love. Each bundle has been put together with customers in mind. Whether you are “just starting out”, want “a little bit more” or “gotta have it all” there is something for you!

Here is a video explaining what you will receive in these bundles!

So are you tempted? If so that is great news, I would love to welcome new crafter’s in to the Stampin’ Up! family.

Here are some samples created by the Stampin’ Up! team to inspire you.

And this is something I have made.

The designer series paper is beautiful and strong enough to make gift packaging.

The reverse side of this paper was used to make the banner.

The new In Colour, Grapefruit Grove was used to stamp the sentiment. This was cut with a 2-1/4 inch punch and added to one if the stunning Pearlised Doilies.

The coordinating adhesive pearls finish off the card.

Thanks for taking the time to stop by today.

Visit the online store to get your exclusive bundle here! Remember, if your order totals more than £150 you will qualify for Stampin’ Rewards (free stuff).

Did you know that for just £99, you can join Stampin’ Up! and get all the perks of being a demonstrator? Find out more here!

Happy Stampin’!

Verity x

Product List

To Think of You – Just Add Ink #406

Hi there Everybody,

I am taking part in the Just Add Ink challenge today.

This week is a sketch challenge. The design team have made some stunning samples. You can see them here!

I went all in and made six cards in different colour ways;

Marina Mist, Always Artichoke, Perfect Plum, Tangerine Tango, Tempting Turquoise and Elegant Eggplant.

To make each circular topper, I stamped the sentiment and beaded circle from the Eastern Beauty stamp set. This was cut with a 2-1/4 inch punch.

Each card base was stamped with coordinating ink using the larger circle stamp from the set.

Black and White striped paper from the Tutti-Frutti DSP stack was cut in to 1-1/2 inch strips and then adhered at an angle.

The sentiment topper was added to the card base with dimensionals. A few black rhinestones finished the card.

I hope you enjoyed this project. The supplies used are listed below.

Thanks for stopping by and Happy Stampin’!

Verity x

Product List

A Marriage Made in Heaven

Good Morning!

Welcome to April’s InspirInk blog hop. This month Hannah chose the theme….

Weddings!

Now wedding cards are not something I make a lot of, so this one got me thinking!

I chose a sentiment first and after rummaging in my stash for something pretty, I found my Rose Wonder stamp set and dies.

Generally speaking, I try to use just one stamp set for my projects, so I planned my overall design with Rose Wonder.

It was all too tempting to use the large rose image, but I liked the small flower in the set too.

After a bit of playing about with the different elements I decided on this design. Love it!

The card base was cut and scored in the usual way with a white card layer adhered to this.

Additional coloured and white card stock layers were cut smaller still and put to one side.

On the white piece, I stamped the greeting with clear versamark ink and heat embossed with silver powder. For extra emphasis, I also stamped the heart outline from the More Than Chocolate set.

Three flowers were stamped on to the card in coordinating ink.

Three flowers and two sets of leaves were die cut. To help adhere the flowers, I punched out 1/2 inch circles in matching card. This allowed me to use a dimensional behind each of the flowers.

The white layer was added to the coloured card stock and then adhered to the preprepared card base with dimensionals.

Some extra details were added to the flowers centres using multipurpose glue. Three basic pearls completed the card.

I hope you enjoyed this project. The supplies used are listed below.

Please be sure to hop around the rest if the projects by clicking “next”. Sam’s project is next!

Happy Stampin’!

Verity x

Product List

Daisy Trio #FMS334

Hi there Everyone,

It’s Friday again and that means a Freshly Made Sketch challenge entry.

This sketch leaves plenty of room for interpretation. You can see what the design team made here!

Here is my entry;

I decided to keep this very simple.

Some Delightful Daisy designer series paper was adhered to a Whisper White card base.

Three daisies were stamped with Soft Sky ink. These were punched out along with an additional three plain daisies.

These were adhered together and added to the card front. A clear faceted gem was placed in the centre of each flower.

I hope you enjoyed this project. The supplies used are listed below.

Thanks for stopping by and Happy Stampin’!

Verity x

Product List

Daisy Punch

[143713]

£16.00